Showing posts with label taxonomy. Show all posts

Tuesday, March 29, 2011

Supplement to SharePoint Taxonomy Series

Ken Efta, writing for http://blog.allyis.com, has kindly mentioned my SharePoint Enterprise Metadata Management (SharePoint Taxonomy, Managed Metadata Service [MMS]) blog series in his post on the topic.

Also, Ken has touched on some aspects that I didn’t cover, so I’d like to return the favour. In his post, Managed Metadata Services and Term Sets in SharePoint 2010, Ken covers topics such as Localized Term Sets, Term Synonyms, and Using Terms Sets as part of Content Types (via the Managed Metadata Column).

Here are the links to my series:

SharePoint Taxonomy Part One – Introduction to SharePoint Managed Metadata
SharePoint Taxonomy Part Two – End-User Experience
SharePoint Taxonomy Part Three – Administrator Experience
(including Using SharePoint Term Stores and SharePoint Taxonomy Hierarchy)
SharePoint Taxonomy Part Four – Developer Experience
(including SharePoint 2010 Visual Web Parts and SharePoint 2010 Taxonomy Reference Issues)

Wednesday, September 29, 2010

SharePoint Taxonomy Series Featured in SPTechReport

My blog series on SharePoint taxonomy (SharePoint Enterprise Metadata Management) has been featured in this week’s SharePoint Tech Report newsletter.

This e-mail newsletter is free and you can sign up quickly by visiting the SD Times website.

SPTechReportBanner

Thursday, September 09, 2010

SharePoint Game of Life Web Part on CodePlex

Earlier this year, I presented a session at SharePoint Saturday New York on the new SharePoint 2010 taxonomy features (Enterprise Metadata Management). At the time, I offered to provide the source code for the visual web part sample I used in the developer portion of the talk.

The sample is a simple SharePoint 2010 visual web part based on John Conway’s Game of Life cellular automaton. I wrote about the SharePoint Game of Life web part previously on this blog. If you’re interested in SharePoint taxonomy, you can also check out my blog series on Enterprise Metadata Management (EMM).

The idea is that each term in the SharePoint taxonomy term store represents an organism. As you run through each generation, terms are added and deleted based on the parameters of the simulation.

image

It took a few months, but I’ve cleaned it up, added better error handling and uploaded the code to the SharePoint 2010 Game of Life Web Part project on CodePlex. This project is written in C#. It requires Visual Studio 2010 and SharePoint 2010 Server.

The Long Tale: This SharePoint 2010 taxonomy sample is actually a port of an old-school ASP code sample that I wrote in 1999 for the NCompass Resolution API. Resolution went on to become Microsoft Content Management Server (MCMS).

image

Wednesday, February 03, 2010

SharePoint Game of Life

I’m sure some SharePoint community folks will remember John Conway’s Game of Life population simulation (cellular automaton) from comp. sci. For my SharePoint 2010 Enterprise Metadata Management (EMM, or taxonomy) talk at SharePoint Saturday in New York last weekend, I decided to create my own version for testing the performance of the new SharePoint taxonomy API.

Update: I have posted the source code for the SharePoint Game of Life web part on CodePlex. If you’re interested in SharePoint taxonomy, you can also check out my blog series on Enterprise Metadata Management (EMM).

Using the rules of the Game of Life, I created a SharePoint 2010 Visual Web Part that creates a new taxonomy term for each organism spawned during the simulation. When the creature dies, the term is deleted from the term store.

SharePointGameofLife

- SharePoint Game of Life running a glider

I actually did this back in 1999 for the NCompass Resolution Publishing API (the software that eventually became Microsoft Content Management Server), so I also had an interesting exercise of porting ASP script to C# code. The SharePoint Game of Life web part tracks the number of terms created and the time it took to run. I’m planning to use this web part as a sample for a SharePoint 2010 book project.

Here are the rules of the game (from Wikipedia):

  • Any live cell with fewer than two live neighbours dies, as if caused by under population.
  • Any live cell with more than three live neighbours dies, as if by overcrowding.
  • Any live cell with two or three live neighbours lives on to the next generation.
  • Any dead cell with exactly three live neighbours becomes a live cell.
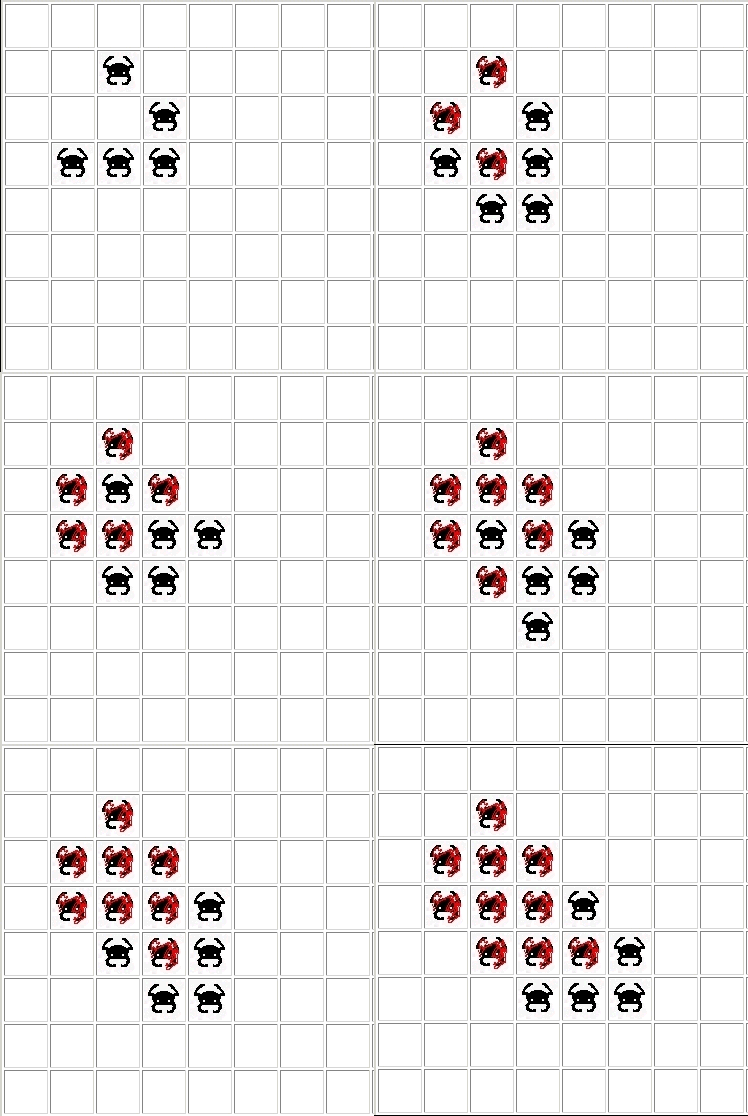
  • The most famous pattern in the game is called a glider. This pattern is interesting because over iterations, it will simply continue to move across the grid. The glider configuration has been adopted as the hacker emblem.

    clip_image002

    - the glider starting position

    For dramatic effect, I decided to add an image for a dead organism—as you can see in the animation. This isn’t normally done, so for the Game of Life purists, I’ll probably add an option to disable it in the release version of the code.

    The code isn’t ready for prime time yet, so I don’t have perf numbers to publish yet. But hopefully, I’ll get a chance to polish it up soon.

    BTW – The creature is an homage to Mazogs. A ZX-81 (Timex Sinclair 1000) game I played as a kid.

    Thursday, January 07, 2010

    SharePoint Managed Metadata End-User Experience

    This post is part two in a series that I’m writing about SharePoint 2010 Enterprise Managed Metadata (EMM or ‘taxonomy’). If you haven’t set up a SharePoint 2010 development environment yet, you may also want to check out SharePoint 2010 Beta 2 install.

    SharePoint Taxonomy Part One – Introduction to SharePoint Managed Metadata
    SharePoint Taxonomy Part Two – End-User Experience
    SharePoint Taxonomy Part Three – Administrator Experience
    (including Using SharePoint Term Stores and SharePoint Taxonomy Hierarchy)
    SharePoint Taxonomy Part Four – Developer Experience
    (including SharePoint 2010 Visual Web Parts and SharePoint 2010 Taxonomy Reference Issues)

    There are two types of tags in the new SharePoint 2010 taxonomy system: managed keywords and managed terms. I’ll cover each one and give example of how users can take advantage of the various features that each type enables.

    Managed Keywords

    Keywords are used to informally tag content within SharePoint. Instead of relying on a centrally managed store of terms that they must choose from, keywords allow users to add their own tags. This means that faculties such as folksonomy and informal tag clouds are enabled.

    Note: Managed keywords are stored in a separate single database and do not have a hierarchical structure.

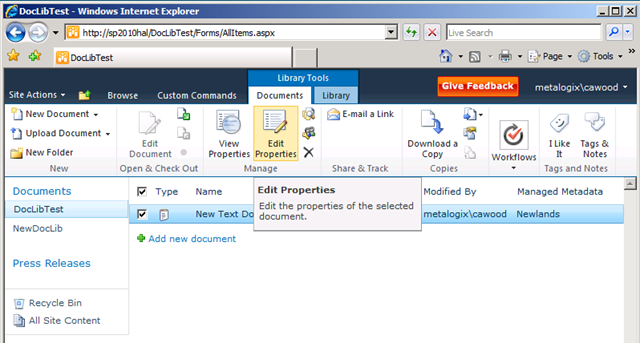
    To add a managed term to a document, first select the document in the document library and select Edit Properties.

    image
    - Selecting a document for editing

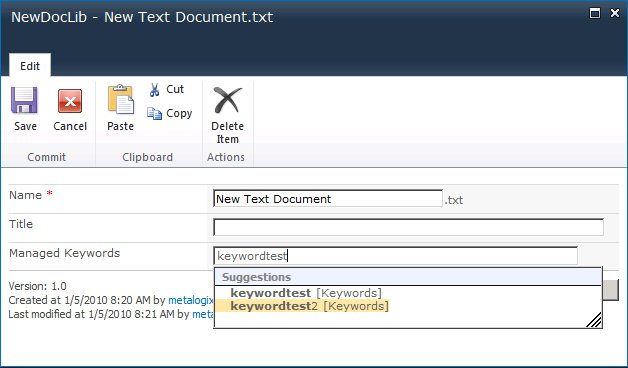
    Once you have the edit document properties dialog open, find the Managed Keywords field and you can either start typing an existing keyword (which will prompt you with suggestions) or you can type in a new keyword.

    image
    - Adding a keyword to a document

    The Tag Cloud Web Part

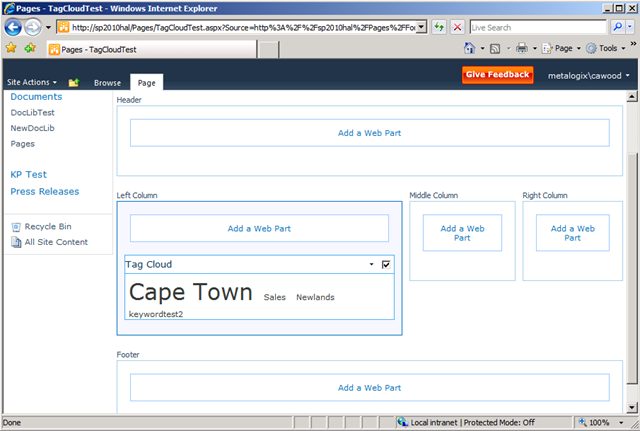
    Once you’ve begun tagging things, you’ll probably want to be able to use that data in convenient ways. The tag cloud web part is a quick way to get a sense of the folksonomy being created on your SharePoint server.

    If you have sufficient permissions to create a web part page and add web parts, you’ll be able to add the tag cloud web part to web part pages.

    image
    - Adding the tag cloud web part to a page

    Once added, there are a number of options in the tag cloud settings.

    image
    - A tag cloud web part in edit page mode

    image

    - A tag cloud web part in published mode

    Note: A lot of features aren’t activated at the site collection level by default. Activating the “SharePoint Server Standard” feature enables the Tag Cloud web part. If you find that you’re not offered the Tag Cloud web part, ask your SharePoint admin to investigate.

    Managed Terms

    Managed terms are placed in a central repository of terms. This enables consistency across users, provides hierarchical organization, and allows for strict information architecture. In the SharePoint Term Store Management Tool, users with sufficient permissions are be able to perform many operations on terms in the hierarchy. However, most users will simply use the terms from the central store.

    As with keywords, terms can be added to many types of content within SharePoint. This example, will show how to add a term to a document within a document library that has already been enabled for tagging with terms. For more information about enabling a SharePoint 2010 Beta 2 document for tagging with managed terms, refer to SharePoint Taxonomy Part Three – Administrator Experience.

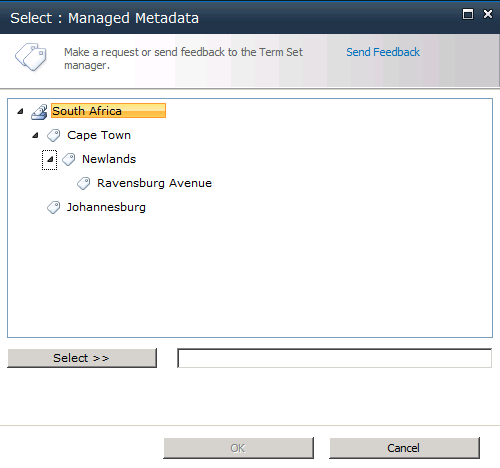
    To add a managed term to a document, first select the document in the document library and select Edit Properties. Once you have the edit document properties dialog open, find the managed metadata field and you can either start typing a term or click the “Browse for a valid choice” icon on the right.

    image
    - Browsing for a term to add to a document

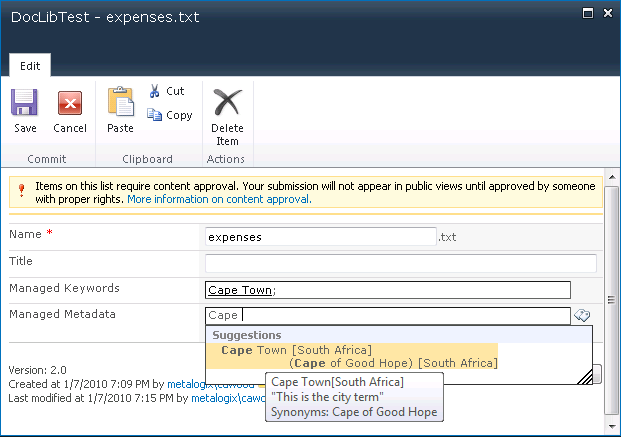
    The screenshot below shows the suggest as you type feature which will show terms that match your partial input. Also, in the box below, you can see the labels (synonyms) and the description which helps users understand how different tags should be used.

    image

    Metadata-driven Navigation

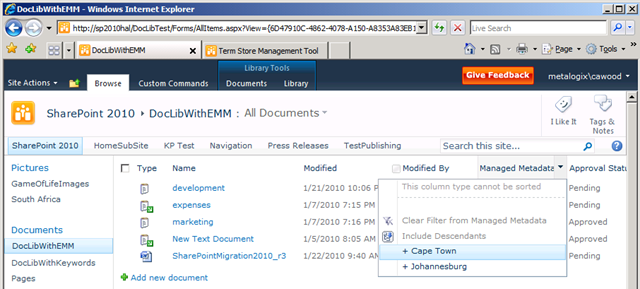
    Managed Metadata can also be used to enable some cool navigational features within SharePoint 2010. For example, if you go to a list that has a managed metadata column, you’ll be able to filter the view by simply selecting one of the terms being used in the list. This enables the end-user to instantly filter lists without having to create a custom view.

    image
    - Filtering a document library using the Managed Metadata term “Cape Town”

    Once you apply the filter, the column heading will show a funnel icon to indicate that you’re not seeing the full list. This essentially allows you to see SharePoint through a simple parametric navigation mechanism—or as we used to say on the SharePoint team, “navigation goggles.”

    image
    - The filtered results

    Happy tagging!

    [Disclaimer: This information is based on SharePoint 2010 Beta 2 and may differ from the RTM build.]

    Tuesday, January 05, 2010

    SharePoint Managed Metadata Administrator Experience

    This post is part three in a series that I’m writing about SharePoint 2010 Enterprise Managed Metadata (EMM or ‘taxonomy’). If you haven’t set up a SharePoint 2010 development environment yet, you may also want to check out SharePoint 2010 Beta 2 install.

    SharePoint Taxonomy Part One – Introduction to SharePoint Managed Metadata
    SharePoint Taxonomy Part Two – End-User Experience
    SharePoint Taxonomy Part Three – Administrator Experience
    (including Using SharePoint Term Stores and SharePoint Taxonomy Hierarchy)
    SharePoint Taxonomy Part Four – Developer Experience
    (including SharePoint 2010 Visual Web Parts and SharePoint 2010 Taxonomy Reference Issues)

    As a SharePoint administrator, the first step when using the new EMM features is to learn how to use SharePoint Term Stores and research the details for creating a SharePoint Taxonomy Hierarchy. You’ll also want to read Microsoft’s best practices and make use of the managed metadata planning data sheets. You can find those links at the bottom of my post SharePoint Taxonomy Part One – Introduction to SharePoint Managed Metadata.

    After you have got your term store set up and you’ve decided how your taxonomy will be organized, you’ll need to set the permissions on your term store and enable various content for tagging. Remember that there are two types of tagging: managed keywords and managed metadata. Managed keywords are used for informal “folksonomy” style tagging and managed terms are used for centrally controlled and delegated hierarchical term structures.

    How to Enable Managed Metadata on Your Server

    Step 1: Add an administrator to your term store.
    I covered this process in Using SharePoint Term Stores.

    Step 2. Create some terms.
    I covered the details of this topic in SharePoint Taxonomy Hierarchy.

    Step 3. Add a column of type “Managed Metadata”
    I’m not sure if this will be the case when the RTM version of SharePoint 2010 ships, but despite the fact that the documentation suggests that many content types (inc. document) come with a managed metadata column for tagging, I have found that this column only works for keywords—not for managed terms. In Beta 2, the column that comes with a document library is called “Managed Keywords” and has the internal name “TaxKeyword.”

    To use managed terms, I had to add a new column to my document libraries. To do this, first go to the list you want to enable and choose the Library tab from the ribbon, then Library Settings from the Settings area. Once there, choose Create Column.

    image
    - Adding a new column to a list

    When the Create Column dialog opens, choose the Managed Metadata column type and give it a name. You’ll also be able to choose options such as whether you want to allow multiple values.

    image - Use the Managed Metadata column type for managed terms

    After adding this column, you should be able to edit the properties of a document in the document library and see a new option to choose managed terms to put into the new managed metadata field. Click on the little tags icon on the right of the field to browse your term store.

    image
    - After adding the managed metadata column, terms can be associated with the document

    Promoting a Managed Keyword to a Managed Term

    One philosophy for building a taxonomy is to let the users decide which terms are important. In SharePoint 2010, there are two ways to achieve this. First, you can allow “fill-in” keywords in your term sets. Secondly, you can allow users to tag with managed keywords and then choose to promote some (or all) of them to managed terms.

    To change a managed keyword to a managed term, you simply open the term store management tool (from central admin or site settings) and use the "Move” option to move the keyword into the term hierarchy.

    image
    - Moving a keyword to the term store will convert it to a managed term

    Note: It is not possible to move a managed term to the keywords store. In other words, you can promote a managed keyword to a managed term, but you can’t demote a term to a keyword.

    Polyhierarchy

    A polyhierarchy enabled tree can include leaves (nodes) that have more than one branch (parent node). In SharePoint Server 2010, you can create a polyhierarchical structure with the Reuse Terms action in the Term Store Management Tool.

    This example doesn’t really make sense, but let’s just imagine that I had used terms that weren’t as regimented as a geography. Say, for example, I had used people instead and the Term Sets defined teams to which they belong. In that case, a person could be on more than one team and therefore, you might want to reuse the term. For simplicity, the screen below shows the same hierarchy used in my other examples, but the Cairo term has been reused and it now appears in two different locations in the tree hierarchy.

    image

    - An example of polyhierarchy

    If you look at the properties of the term (see screen below), you can see that it now belongs to two term sets.

    image

    More Notes about EMM Administration

    - When you create a new term store, make sure the application pool is running.
    - the Term Store Management Tool (TSMT) is available in Central Administration (and site settings). This tool manages terms centrally for the whole farm and can be used to create, copy, reuse, move, duplicate (for polyhierarchy), deprecate, delete and merge terms. The TSMT is also used to manage permissions on term stores.

    image
    - Term management options

    - The Managed Metadata column can allow multiple values.
    - All managed keywords are stored in a single non-hierarchical term set called the keyword set.
    - Site collections can optionally use their own term sets at the column level rather than use the central term store.
    - You can enable fill-in choices with a submission policy, this enables folksonomy.
    - Multilingual (MUI) terms are available.
    - Terms can be labelled to create synonyms that help users figure out which term to use.

    [Disclaimer: This information is based on SharePoint 2010 Beta 2 and may differ from the RTM build.]

    Thursday, December 31, 2009

    SharePoint Taxonomy Hierarchy

    If you’re wondering how to organize your SharePoint 2010 Enterprise Managed Metadata (EMM), you should start by reading the TechNet article, Plan terms and term sets (SharePoint Server 2010). I’m going to highlight some of the key points of that article and also add a few points from other sources.

    While the TechNet article reminds us that you could simply allow your users to add keywords and then use their input to create your taxonomy—promoting keywords to managed terms—it seems likely that most organizations will want to start with an organized metadata hierarchy.

    As explained in SharePoint Taxonomy Part One – Introduction to SharePoint Managed Metadata, the SharePoint 2010 EMM is organized into a hierarchy. The objects within this hierarchy are term stores, groups, term sets, and terms.

    Note:
    Keywords are stored in a non-hierarchical fashion in there own storage space.

    These are the rules for the taxonomy hierarchy:
    When a Managed Metadata service is created, a term store will be created. Once you have a term store, you can create a group. A group is a security boundary.
    • Once you have a group, you can create a term set. A term set must be the child of a single parent group.
    • Under a term set, terms can be created. A term can be the child of a term set, or of another term.
    • A term can be added as a child of another term.
    • Terms can be nested to seven levels. [Update: this documented rule is not enforced in the RTM version]

    One of the key points of the TechNet article about planning your terms and term sets is that a group is a security boundary. A group contributor can manage the term sets in the groups and create new term sets. All users who have access to a term set under a group can see all of the other term sets—even if they don’t have rights to manage the other term sets. Based on this, you should organize your term sets into groups based on the groups of users who will manage them. For this reason, your taxonomy may correlate to your organizational structure. Let’s take a look at an example.

    image

    - Sample SharePoint 2010 EMM (taxonomy) hierarchy

    Term Store: In the sample hierarchy shown in the figure above, you can see that there is one term store (called “Taxonomy” for lack of inspiration for a better name). Remember that you can have multiple terms stores, but each term store is stored in a separate SQL Server database.

    Group:
    Under the term store are two groups: Africa and North America. The idea is that these could be significant geographical locations to this particular fictional organization. Remember that the groups are a security boundary, so the users assigned to the Africa group don’t have to have any access to the Egypt group. However, if users are given rights to a term set under one of the groups, they will be able to see the names of all the term sets under that group.

    Term Set: Inside the Africa group there are two term sets: South Africa and Egypt.

    Terms: At the top level, the South Africa term set contains the terms Cape Town, Johannesburg and Joburg. Terms can be nested seven levels deep. In this case, the Cape Town term contains the child term “Newlands” (a neighbourhood in Cape Town), and that term contains the child term “Ravensberg Avenue” (the street I lived on in Cape Town).

    When you’re creating your managed terms, you’re free to identify synonyms; you can also specify which is the preferred term so that when a user types in “Joburg,” she will be asked to assign the term “Johannesburg.”

    Here are a couple more quick points to keep in mind:

    - You can specify a custom sort order for terms, so it isn’t necessary to show them in alphabetical order.
    - Term sets can be open or closed. Open sets allow all users to add terms. Terms can only be added to closed sets by users who are contributors to the group.
    - In addition to terms, SharePoint 2010 EMM contains keywords. Keywords aren’t restricted, so they can be used informally to create “folksonomy,” but keywords can be promoted to managed terms.

    If you’ve been tasked with creating the taxonomy for your EMM hierarchy, keep these points in mind, but I strongly recommend that you also take advantage of the articles and the worksheets available on TechNet.

    Note: You can see the taxonomy terms in a hidden list: http://servername/Lists/TaxonomyHiddenList

    [Disclaimer: This information is based on SharePoint 2010 Beta 2 and may differ from the RTM build.]

    Wednesday, December 30, 2009

    SharePoint Managed Metadata Developer Experience

    This post is part four in a series that I’m writing about SharePoint 2010 Enterprise Managed Metadata (EMM or ‘taxonomy’). If you haven’t set up a SharePoint 2010 development environment yet, you may also want to check out SharePoint 2010 Beta 2 install.

    Update: I have posted a video demo on the Metalogix blog showing how to create a SharePoint 2010 Taxonomy Web Part.

    SharePoint Taxonomy Part One – Introduction to SharePoint Managed Metadata
    SharePoint Taxonomy Part Two – End-User Experience
    SharePoint Taxonomy Part Three – Administrator Experience
    (including Using SharePoint Term Stores and SharePoint Taxonomy Hierarchy)
    SharePoint Taxonomy Part Four – Developer Experience
    (including SharePoint 2010 Visual Web Parts and SharePoint 2010 Taxonomy Reference Issues)

    Opening Microsoft.SharePoint.Taxonomy in the Visual Studio Object Browser reveals a long list of objects, but you won’t need to worry about a number of them. In this post, I’m going to start with the most useful and then add others if I find that they’re worth covering.

    image
    - Exploring the Taxonomy DLL in the Object Browser

    But if you’re curious, here’s the full list:

    ChangedGroup
    ChangedItem
    ChangedItemCollection
    ChangedItemType
    ChangedOperationType
    ChangedSite
    ChangedTerm
    ChangedTermSet
    ChangedTermStore
    FeatureIds
    Group (used in the sample below)
    GroupCollection
    HiddenListFullSyncJobDefinition
    ImportManager
    Label
    LabelCollection
    MobileTaxonomyField
    StringMatchOption
    TaxonomyField
    TaxonomyFieldControl
    TaxonomyFieldEditor
    TaxonomyFieldValue
    TaxonomyFieldValueCollection
    TaxonomyItem (base class for classes such as Term and TermSet)
    TaxonomyRights
    TaxonomySession (used in the sample below)
    TaxonomyWebtaggingControl
    Term (used in the sample below)
    TermCollection
    TermSet (used in the sample below)
    TermItem
    TermStore (used in the sample below)
    TermStoreCollection
    TermStoreOperationException
    TreeControl

    TaxonomySession

    The first class to cover is TaxonomySession. To use the taxonomy API to manipulate managed metadata, you’ll first need to instantiate a TaxonomySession object. Microsoft describes the class in this way:

    “The TaxonomySession class creates a new session in which to instantiate objects and commit changes transactionally to the TermStore object. A TaxonomySession object can have zero or more TermStore objects associated with it. TermStore objects are associated with the Web application of the parent SPSite object.”

    I’m going to continue with the example I started in SharePoint 2010 Visual Web Parts, but don’t worry if you’re not interested in building a web part, I just happened to choose that as the example. You can use the same code from a number of different places (e.g., a Windows Form application). I won’t be covering remote access to the taxonomy API in this post since that will topic is worthy of its own attention.

    The starting point for this conversation is VisualWebPart1UserControl.ascx.cs from the simple web part example. I covered issues adding the references in SharePoint 2010 Taxonomy Reference Issues.

    using System;
    using System.Web.UI;
    using System.Web.UI.WebControls;
    using System.Web.UI.WebControls.WebParts;

    // Added references
    using Microsoft.SharePoint;
    using Microsoft.SharePoint.Taxonomy;

    public partial class VisualWebPart1UserControl : UserControl
    {
    protected void Page_Load(object sender, EventArgs e)
    {
    using (SPSite site = new SPSite("
    http://localhost/"))
    {
    //Instantiates a new TaxonomySession for the current site.
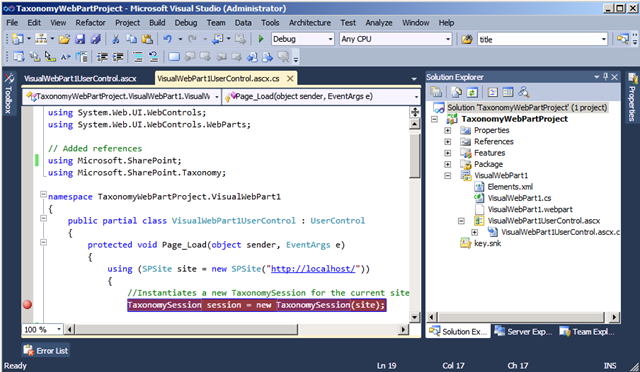
    TaxonomySession session = new TaxonomySession(site);

    //Instantiates the connection for the current session
    TermStore termStore = session.TermStores["Managed Metadata Service"];

    // Write out the names of the term stores to a label
    Label1.Text = “”;
    foreach (TermStore termstore in session.TermStores)
    {
    Label1.Text += termstore.Name.ToString() + " … ";
    }

    // Write the name of the term store to a label
    Label1.Text += " Finished";
    }
    }
    }

    As you can see, this is a pretty straightforward example of how to get a TaxonomySession object and employ it. Once loaded, this web part will immediately write out the names of each term store available on the server.

    So let’s break it down. The first thing that happens inside the Page_Load method is getting an SPSite object. As mentioned above, TermStore objects are associated with the Web application of the parent SPSite object. By running the code within a using statement, you can rest assured that dispose() will be properly called on your objects. Since this web part project is using the SharePoint Visual Web part template, the only references I had to add were Microsoft.SharePoint (for the SPSite object) and Microsoft.SharePoint.Taxonomy (for the taxonomy objects).

    Now that you have a taxonomy session, you can start to use the taxonomy classes. In this case we’ll loop through each available term store on the server and write the results to a label. The label was simply dragged onto VisualWebPart1UserControl.ascx from the Toolbox onto design view for the web part.

    image
    - After dragging the label from the toolbox

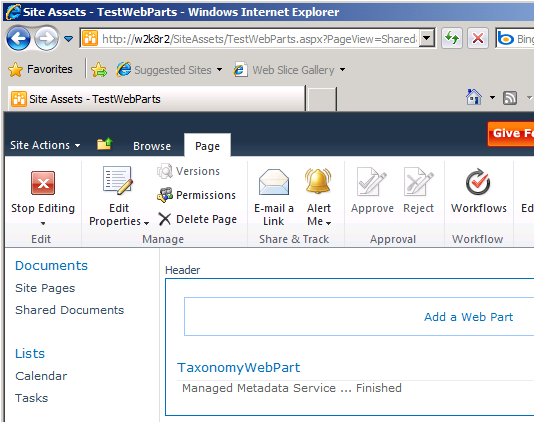
    Pressing F5 will start the debugger and allow you to run the code as described in SharePoint 2010 Visual Web Parts.

    image
    - Running the web part to see the term store name

    In this case, there is only one term store, so only one name is returned. It’s a simple example but useful since you will need to know the name of your term store before you instantiate a term store object and start reading from or writing to your taxonomy.

    Note: If you get the name of your term store wrong, the error you see may not immediately tip you off that you’re fat fingered the text value. The error is:

    System.ArgumentOutOfRangeException was unhandled by user code
    Message=Specified argument was out of the range of valid values.
    Parameter name: index
    Source=Microsoft.SharePoint.Taxonomy
    ParamName=index
    StackTrace: at Microsoft.SharePoint.Taxonomy.Generic.IndexedCollection`1.get_Item(String index)

    The Hierarchy of Managed Metadata

    As explained in SharePoint Taxonomy Part One – Introduction to SharePoint Managed Metadata, the SharePoint 2010 EMM is organized into a hierarchy. The objects within this hierarchy are term stores, groups, term sets, and terms. For more info about the EMM hierarchy, refer to my SharePoint Taxonomy Hierarchy post.

    There are the rules for the taxonomy hierarchy (the latter three are from Microsoft):
    When a Managed Metadata service is created, a term store will be created. Once you have a term store, you can create a group. The Taxonomy API cannot create a term store (it is done through Central Administration or with a PowerShell script). However, the rest of the EMM containers can be created using the Taxonomy API.
    • After a Group object is created, the first TermSet object can be created. A TermSet object must be the child of a single parent Group object.
    • After a TermSet object is created, the first Term object can be created. A Term object can be the child of a TermSet object, or of another Term object.
    • After a Term object is created, another Term object can be created and added as a child Term object.

    Method to the Madness

    Here are some common methods that you’ll use when working with the EMM API:

    termStore.CreateGroup()
    group.CreateTermSet();
    termSet.CreateTerm()
    term.SetDescription()
    term.CreateLabel()
    term.Delete()
    termStore.CommitAll()

    Let’s start with the last one first: the CommitAll method. After performing write operations to a TermStore object, you must call CommitAll to commit the transactions. The taxonomy API is transactional so either every operation will be successfully committed, or none of the changes will be applied. As you saw in the list of classes above, the object model also includes changes. For example, ChangedItem and ChangedGroup. These are used to record what has happened.

    The SetDescription method allows you to create a description for the term and you can use CreateLabel to create synonyms. You can choose whether the label will be the default using a true or false Boolean. Of course, the Delete method will delete an object.

    Note that when creating a term or label, EMM provides the ability to supply the same term in different languages. This provides a number of multilingual features, but it also means that you’ll need to supply a Locale Identifier (LCID) when using some of the create methods. Windows uses the LCID to choose the language and culture when displaying information. The ID for English is 1033.

    Here’s a longer version of the using statement from above--it shows an example of these methods in action:

    using (SPSite site = new SPSite("http://localhost/"))
    {
    //Instantiates a new TaxonomySession for the current site.
    TaxonomySession session = new TaxonomySession(site);

    //Instantiates the connection named "Managed Metadata Service" for the current session.
    TermStore termStore = session.TermStores["Managed Metadata Service"];

    Group group = termStore.CreateGroup("Africa");
    TermSet termSet = group.CreateTermSet("South Africa");
    Term term = termSet.CreateTerm("Cape Town", 1033);
    term.SetDescription("This is the city term for Cape Town", 1033);
    term.CreateLabel("Cape of Good Hope", 1033, false);
    Term termChild = term.CreateTerm("Newlands", 1033);
    termChild.Delete();
    termStore.CommitAll();

    Label1.Text = " Finished";
    }

    image
    - The hierarchy has been created and the description and label were set

    [Disclaimer: This information is based on SharePoint 2010 Beta 2 and may differ from the RTM build.]

    Tuesday, December 29, 2009

    SharePoint Saturday New York Presentation

    I'll be speaking about SharePoint 2010 Managed Metadata (taxonomy) at SharePoint Saturday in New York (#spsnyc) on January 30th.

    website: http://www.sharepointsaturday.org/ny

    I’ve been digging into the new taxonomy features and I’m looking forward to showing off some code.

    image

    SharePoint 2010 Taxonomy Reference Issues

    If you’re looking to use the new SharePoint 2010 Managed Metadata (Taxonomy) API, you will likely run into one or both of these issues. One of them is mentioned in the known issues for SharePoint 2010 Beta 2, but not in a way that’s conducive to finding the solution with Bing or Google, so I’m including it here as well as a new one I’ve stumbled across.

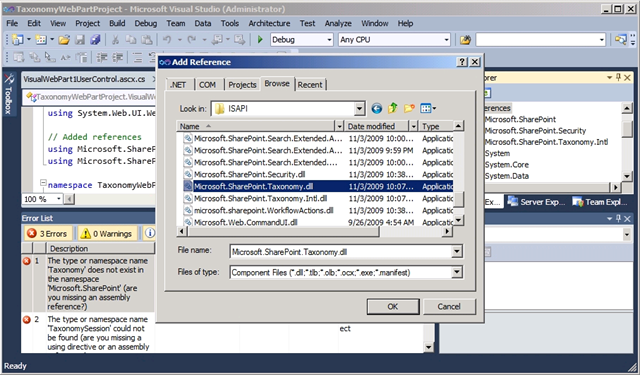
    The first issue is that after adding the Microsoft.SharePoint.Taxonomy reference, your project will not recognize any of the taxonomy classes (e.g., TaxonomySession). The first thing that I noticed is that adding the reference to Microsoft.SharePoint.Taxonomy from the .NET reference list simply did not work. Instead, I got a reference to Microsoft.SharePoint.Taxonomy.Intl—which is obviously a different DLL.

    image 
      - Broken reference to Microsoft.SharePoint.Taxonomy

    To resolve this issue, I simply used the browse option and added the right DLL explicitly from: C:\Program Files\Common Files\Microsoft Shared\Web Server Extensions\14\ISAPI\Microsoft.SharePoint.Taxonomy.dll. I deleted the other Taxonomy reference just for clarity.

    image
    - Browsing to the Taxonomy DLL will resolve the first issue

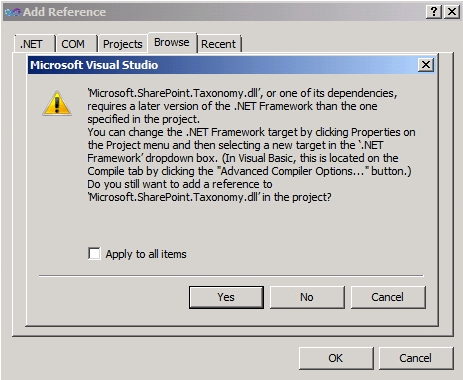
    When you add the right version, you may see the error: “’Microsoft.SharePoint.Taxonomy.dll’ or one of its dependencies, requires a later version of the .NET framework than the one specified in the project. You can change the .NET Framework target by clicking Properties on the Project menu...” You can ignore this error (you want to use .NET 3.5), it is resolved by the next solution.

    image 
      - You can ignore this message

    The second problem is the one mentioned in the known Beta 2 issues:

    “Some assemblies, such as Microsoft.SharePoint.Publishing, appear in some cases to have a dependency on an incorrect version of the System.Web.DataVisualization assembly. The incorrect reference causes build failures. If you see this problem, add a reference to the correct version of System.Web.DataVisualization on your system. If you installation is on the C drive, that assembly will be located here: C:\Program Files (x86)\Microsoft  Chart Controls\Assemblies\System.Web.DataVisualization.dll”

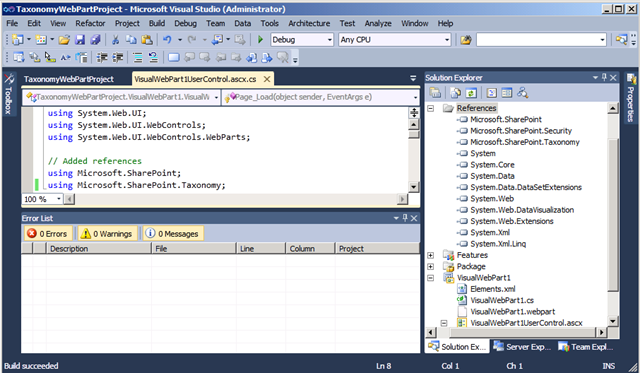
    Evidently, Microsoft.SharePoint.Taxonomy is another one of the assemblies with this issue. Fortunately, the solution is straightforward. Simply add a reference to System.Web.DataVisualization using the path above and your problems are solved.

    image 
      - After fixing the Taxonomy reference and adding DataVisualization, the project compiles

    [Disclaimer: This information is based on SharePoint 2010 Beta 2 and may differ from the RTM build.]

    SharePoint 2010 Visual Web Parts

    One of the new features in SharePoint 2010 that I’m most excited about is the ease with which developers can now create web parts. To distinguish the old from the shiny new, SharePoint 2010 provides the “Visual Web Part” project type. In this post, I’ll quickly cover the basics of getting a new web part working in debug mode--I’ll get into more detail in future posts.

    Update: I have posted a video demo on the Metalogix blog showing how to create a SharePoint 2010 Taxonomy Web Part.

    Obviously, you’ll need a working SharePoint 2010 development machine, so if you don’t have the set up yet, I suggest you refer to my post about SharePoint 2010 Beta 2 Install.

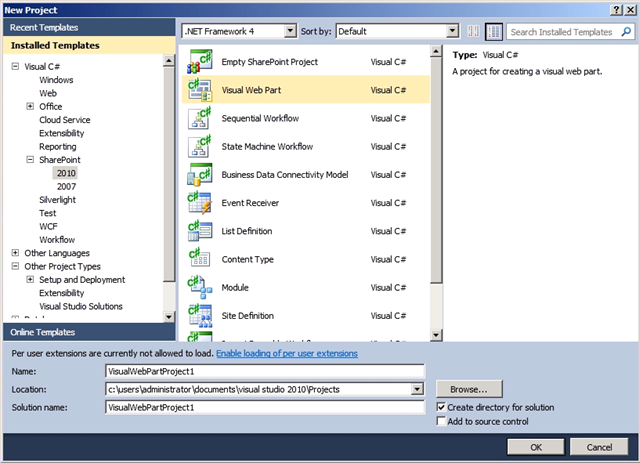
    Once you have everything set up, the first step is to create a new project in Visual Studio 2010 Beta 2.

    image
    - Creating a new project in Visual Studio 2010 Beta 2

    The new project dialog gives you the ability to choose a myriad of project types. You’ll want to choose Visual C# > SharePoint 2010 > Visual Web Part. As usual, you also have the option of choosing a project name, the path for the project files and a solution name.

    image
    - The new project dialog

    When the project is created, you will see that the plumbing of your new web part is provided in the project template.

    image
    - Your blank template for web part creations

    Rather than dive into the code, we’re just going to get this blank web part running, so start the debugger (F5 or click the green arrow).

    At this point, you’ll be asked to create a web part page to associate with your web part. After you choose a name and template for your new web part page, you can save your choices and the page will be created.

    Note: The good news is that if you delete this web page, you will be asked to created another when if you choose to debug your project again. The bad news is that it appears that overwriting the page may be necessary--even if you don't delete the first page.

    Update: Thanks to Peter Holpar who pointed out that I neglected to mention that you can add the debug page URL (once you've created it) into the Debug option of the project properties. This saves the extra steps of creating the page for each subsequent debug run.

    image
    - Creating a web page to run the web part in debug mode

    Depending on which template you choose, click an area where you see “Add web part” to bring up the web part picker. If you chose the default web page template, you will see four options.

    image
    - The web part page has been created

    You’re new web part will appear in the “Custom” category. After you choose to add it, you’ll see the name appear on your web part page.

    image
    - Choosing the new custom web part from the available web parts

    And that’s it. You now have a blank web part project that you can use to build what you want. Sure, it doesn’t actually do anything, but just enjoy how simple it is to get a working web part running in debug mode on your SharePoint server. Now you can drag and drop controls from the Toolbox just like any other ASP.NET page and start your creation.

    image
    - The new visual web part has been added

    Debugging and Breakpoints

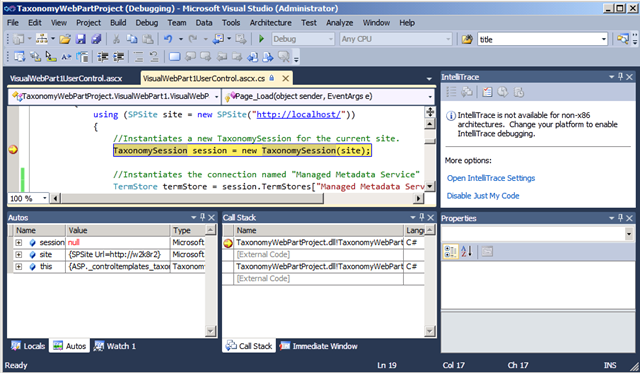
    One of the new advances in web part goodness is ease of debugging. To see how easy it is to debug and step through your code, simply insert a breakpoint into your visual web part.

    image
    - A breakpoint set in the SharePoint web part

    When you now run the debugger, code execution will stop at your breakpoint and let you step into/over or do whatever you desire in debug mode.

    image
    - The debugger has hit the breakpoint

    Now the trick is to figure out what you want to do, but isn’t that better than worrying about the plumbing?

    [Disclaimer: This information is based on SharePoint 2010 Beta 2 and may differ from the RTM build.]

    Thursday, December 24, 2009

    SharePoint Taxonomy Best Practices

    From my earlier post, SharePoint Taxonomy Part One – Introduction to SharePoint Managed Metadata, here’s a list of SharePoint Managed Metadata best practices URLs:

    Managed Metadata Best Practices from Microsoft:

    Plan managed metadata (SharePoint Server 2010)
    Managed metadata overview (SharePoint Server 2010)
    Managed metadata service application overview (SharePoint Server 2010)
    Managed metadata roles (SharePoint Server 2010)
    Plan terms and term sets (SharePoint Server 2010)
    Plan to import managed metadata (SharePoint Server 2010)
    Plan to share terminology and content types (SharePoint Server 2010)

    Using SharePoint Term Stores

    In the new SharePoint 2010 Managed Metadata feature (a.k.a. Managed Metadata Service [MMS]), all taxonomy data is stored within a SQL Server database called the term store. Creating a managed service application will create a term store that you can use to build your taxonomy hierarchy within, or as it reads on TechNet, “A managed metadata service publishes a term store and, optionally, content types; a managed metadata connection consumes these.”

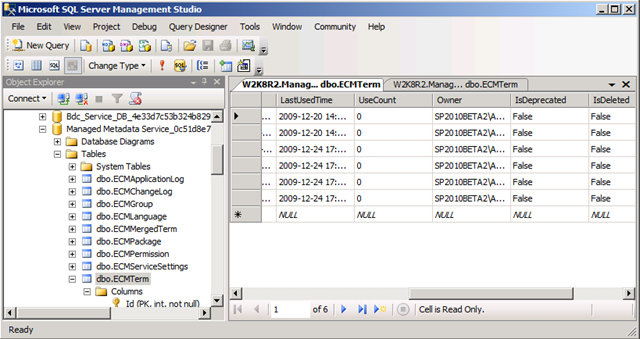
    When you install SharePoint 2010, a managed metadata service called “Managed Metadata Service” is created for you. This term store maps to a SQL DB that begins with the same name.

    image
    - Managed Metadata Service DB in SQL Server

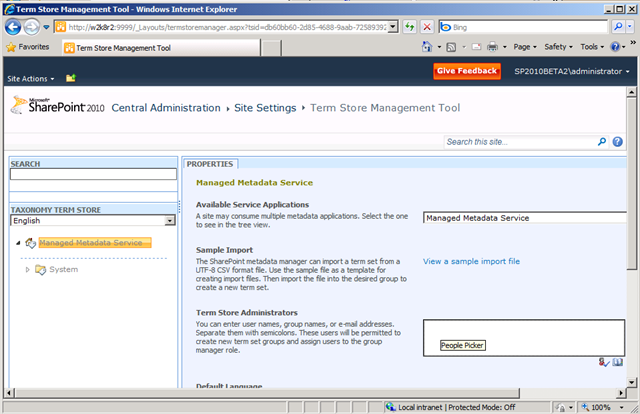
    However, if you go to the Term Store Management Tool (through Central Administration or Site Settings), you’ll find that you don’t have any options to create or manage terms. The reason for this is that you need to add yourself to the administrators group for the managed metadata service.

    image
    - The Term Store Management Tool without any administrators

    After you add yourself and save the changes, you’ll be able to create groups, term sets and terms.

    image
    - Once you add your admins, you can start to use the term store

    At this point, you can try to tag SharePoint content. If you open a list and try to tag something, and you see the message, “This control is currently disabled. You might not have the right permission level to use this, you might need to select an object or item, or the content might not work in this context,” then you either have a rights issue, or another problem with your server.

    image
    - Tagging control disabled in the ribbon

    Creating Your Own Term Store

    If you want to create your own term store, you’ll need to follow the steps below to create a new managed metadata service. Creating a SharePoint 2010 Managed Metadata Term Store is covered on TechNet, but I’ll be delving into Managed Metadata development in a future post, so I figure I should cover the basics as well.

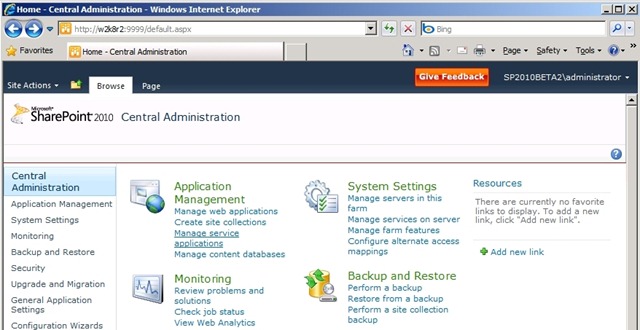
    1. First you’ll need to open SharePoint 2010 Central Administration and select Manage Service Applications from the Application Management section.

    ManagedService1

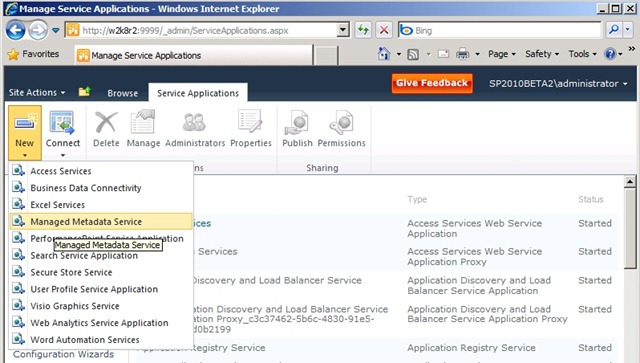
    2. At this point, the Service Applications tab should be selected at the top of the page. Next, click the dropdown arrow under New and and click on Managed Metadata Service.

    ManagedService2b

    3. This opens the Create New Managed Metadata Service dialog.

    ManagedService5

    The fields in this dialog are:

    Name: This is simply the name of your new managed metadata service.

    Database Server: Name of your database server.

    Note from Microsoft: “If you are using SQL Express, do not change the default value of <machine name>\SharePoint. ”

    Database Name: The database on the selected server you wish to use. If the DB does not exist, it will be created.

    Note from Microsoft: “The only way to obtain the name of a database if you have deleted the managed metadata connection to the database is by using SQL Server Management Studio.”

    Database authentication: The recommended option is Windows authenticated, but SQL authentication is also available.

    Failover Database Server: If you’re using a failover DB server, you can enter it here.

    Web Application Pool: You can either create a new pool or choose an existing one from the dropdown menu. Note: Ensure that the selected application pool is actually running before you try to use your term store.

    Content Type Hub: From Microsoft: “If you want the managed metadata service to provide access to a content type library as well as to a term store, type the URL of the site collection that contains the content type library in the Content Type hub box. The service will share the content type library at the root of the site collection.”

    There are also two checkbox options at the bottom:

    - Report syndication import errors from Site Collections using this service application

    Note from Microsoft: “When another Web application imports the content types that this service shares, the import process might generate errors. To record these errors in the error log of the site collection that is exporting (as well as to the error log of the site collection that is importing), select Report syndication import errors from Site Collections using this service application.”

    - Add this service application to the farm’s default list

    Note from Microsoft: “The service is automatically added to the Default proxy group for the farm. To have a connection to this service created automatically when a new Web application is added to the farm, select Add this service application to the farm’s default list.”

    From the same area of central admin, you have the option to perform numerous other operations on your term store. For example, delete a term store, modify the term store permissions, add term store administrators, etc.

    image
    - The ribbon offers more term store management options

    Here’s some quick and dirty code to check the term stores available on your server:

    using (SPSite site = new SPSite("http://localhost/%22))
    {
    //Instantiates a new TaxonomySession for the current site.
    TaxonomySession session = new TaxonomySession(site);

    foreach (TermStore termstore in session.TermStores)
    {
    Label1.Text += "\n" + termstore.Name.ToString();
    }
    }

    SharePoint Managed Metadata (Taxonomy) Posts:

    SharePoint Taxonomy Part One – Introduction to SharePoint Managed Metadata
    SharePoint Taxonomy Part Two – End-User Experience
    SharePoint Taxonomy Part Three – Administrator Experience
    (including Using SharePoint Term Stores and SharePoint Taxonomy Hierarchy)
    SharePoint Taxonomy Part Four – Developer Experience
    (including SharePoint 2010 Visual Web Parts and SharePoint 2010 Taxonomy Reference Issues)

    Managed Metadata Best Practices from Microsoft:

    Plan managed metadata (SharePoint Server 2010)
    Managed metadata overview (SharePoint Server 2010)
    Managed metadata service application overview (SharePoint Server 2010)
    Managed metadata roles (SharePoint Server 2010)
    Plan terms and term sets (SharePoint Server 2010)
    Plan to import managed metadata (SharePoint Server 2010)
    Plan to share terminology and content types (SharePoint Server 2010)

    [Disclaimer: This information is based on SharePoint 2010 Beta 2 and may differ from the RTM build.]

    Sunday, December 20, 2009

    Introduction to SharePoint Managed Metadata

    I have the day off and as I ate my brown sugar Mini-Wheats, I naturally came to the conclusion that today would be the day that I would finally begin to write a series of blog posts about the biggest new SharePoint 2010 feature: Enterprise Managed Metadata (a.k.a. EMM, Managed Metadata Service (MMS) or SharePoint 2010 taxonomy).

    image

    Update: These are the posts currently in this series:

    SharePoint Taxonomy Part One – Introduction to SharePoint Managed Metadata
    SharePoint Taxonomy Part Two – End-User Experience
    SharePoint Taxonomy Part Three – Administrator Experience
    (including Using SharePoint Term Stores and SharePoint Taxonomy Hierarchy)
    SharePoint Taxonomy Part Four – Developer Experience
    (including SharePoint 2010 Visual Web Parts, SharePoint 2010 Taxonomy Web Part Development Screencast, SharePoint 2010 Taxonomy Reference Issues, and SharePoint Game of Life web part on CodePlex.)

    Back in 2005, I’m pretty sure I was one of the SharePoint Program Managers most disappointed when we learned that taxonomy wasn’t going to make the cut for Microsoft Office SharePoint Server 2007 (MOSS). I didn’t work on the specs, but I believed quite strongly that it needed to be built. It wasn’t a huge surprise that it got cut though. The Enterprise Content Management (ECM) team had plenty of work to do—mainly focused on providing Microsoft Content Management Server (MCMS) features in SharePoint. However, with the MOSS release out the door and MOSS for Internet sites popping up all over the Internet, it was time to tackle taxonomy. I know it was a Herculean task, so I tip my cap to my old friends on the SharePoint team who have made it a reality in SharePoint 2010.

    What’s all the fuss about?

    Managed Metadata definition from Microsoft TechNet: “Managed metadata is a hierarchical collection of centrally managed terms that you can define, and then use as attributes for items in Microsoft SharePoint Server 2010.”

    Why is taxonomy arguably the most important new feature in SharePoint 2010? Hasn’t SharePoint always had metadata? There are many useful tagging features in the new release, but another important aspect is the potential unlocked by the new infrastructure. As a Microsoft PM, I heard a clear refrain from customers and partners. I’ll paraphrase it in this way: “Sure, we’d like you to do everything, but we know you can’t. Please just give us the foundation so we can do what’s necessary for our business needs.” [Pardon the SharePoint Foundation pun.] By adding the managed metadata service plumbing to SharePoint, customers and partners have the opportunity to use and extend the taxonomy system.

    Before the 2010 improvements, organizations using SharePoint would have to either build their own taxonomy solution, or rely upon business rules for how their users should add metadata to SharePoint items—this meant that different users could be tagging items with slightly different terms and eliminating most of the value of taxonomy. There were also technical constraints that prevented creation of a custom solution. For example, the logical place to store terms would be in a list, but lists couldn’t be shared across the site collection boundary, so the same content would have to be duplicated if the terms were to be shared. There was also no concept of hierarchical metadata and there was no way to share a collection of terms with delegated permissions. But if all that isn’t enough for you, MVP Chris O’Brien wrote a whole post about why SharePoint 2010 taxonomy is important and here’s a list of Benefits of using managed metadata from TechNet:

    More consistent use of terminology
    Managed metadata facilitates more consistent use of terms, as well as more consistent use of the managed keywords that are added to SharePoint Server items. You can pre-define terms, and allow only authorized users to add new terms. You can also prohibit users from adding their own managed keywords to items, and require them to use existing ones. Managed metadata also provides greater accuracy by presenting only a list of correct terms from which users can select values. Because managed keywords are also a type of managed metadata, even the managed keywords that users apply to items can be more consistent.

    Because metadata is used more consistently, you can have a higher degree of confidence that it is correct. When you use metadata to automate business processes—for example, placing documents in different files in the record center based on the value of their department attribute—you can be confident that the metadata was created by authorized users, and that the value of the department attribute is always one of the valid values.

    Better search results
    A simple search can provide more relevant results if items have consistent attributes.

    As users apply managed terms and keywords to items, they are guided to terms that have already been used. In some cases, users might not even be able to enter a new value. Because users are focused on a specific set of terms, those terms—and not synonyms—are more likely to be applied to items. Searching for a managed term or a managed keyword is therefore likely to retrieve more relevant results.

    Dynamic
    In previous versions of SharePoint Server, to restrict the value of an attribute to being one of a set of values, you would have created a column whose type is "choice", and then provided a list of valid values. When you needed to add a new value to set of choices, you would have to modify every column that used the same set of values.

    By using managed metadata in SharePoint Server 2010, you can separate the set of valid values from the columns whose value must be one of the set of valid values. When you need to add a new value, you add a term to the term set, and all columns that map to that term set would use the updated set of choices.

    Using terms can help you keep SharePoint Server items in sync with the business as the business changes. For example, assume your company's new product had a code name early in its development, and was given an official name shortly before the product launched. You included a term for the code name in the "product" term set, and users have been identifying all documents related to the product by using the term. When the product name changed, you could edit the term and change its name to the product's official name. The term is still applied to the same items, but its name is now updated.”
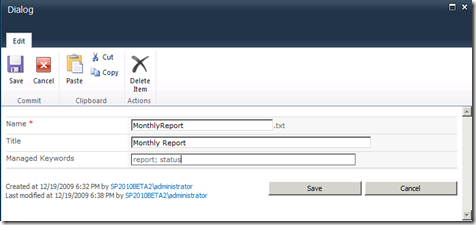
    image - Adding keywords to a document in SharePoint 2010 Beta 2

    What’s in this release?

    To borrow a joke from Dan Kogan’s SharePoint Conference 2009 (#SPC09) talk, when we talk about terms, we need to first define our terms. From MSDN’s definitions of SharePoint Managed Metadata:

    term
    A word or phrase that can be associated with an item in SharePoint Server 2010.
    term set
    A collection of related terms.
    managed term
    A term that can be created by users only with the appropriate permissions and often organized into a hierarchy. Managed terms are usually predefined.
    managed keyword
    A word or phrase that has been added to SharePoint Server 2010 items. All managed keywords are part of a single, non-hierarchical term set called the keyword set.
    term store
    A database that stores both managed terms and managed keywords.

    Also, one definition that isn’t in the list:
    group
    In the term store, all term sets are created within groups. In other words, group is the parent container for term sets.

    image - The Term Store Management Tool

    These are the elements within the SharePoint 2010 managed metadata functionality, but the pieces aren’t the only consideration—it’s also important how they fit together. According to information management experts Earley & Associates, there are three different types of relationships in taxonomies:

    Equivalent (Synonyms: "LOL = Laughing out loud")
    Hierarchical (Parent/Child : "Sports Equipment => ball")
    Associative (Concept/Concept: "Bouncy things - ball")

    SharePoint 2010 will provide SharePoint users, administrators and developers with the UI and API required for the first two. This means that faculties such as centrally managed terms, folksonomy and tag clouds (social tagging) are enabled. The third type—that SharePoint 2010 will not be offering—is ontologies. Here’s a quick discussion of each type.

    Equivalent Terms

    SharePoint taxonomy will allow synonyms and preferred terms. Synonyms allow a central understanding that LOL is the same as “laughing out loud,” and preferred terms specify which of the two should be used.

    The other side of the equivalence coin is dealing with words with more than one meaning. To help disambiguate terms, SharePoint term descriptions show in a tooltip so that users can differentiate between G-Force (the recent movie featuring a specially trained squad of guinea pigs) vs. G-Force (my favourite childhood cartoon) from Battle of the Planets.

    Hierarchical Terms

    A central repository of terms enables consistency across users. Providing a hierarchy allows for information architecture and organization. In the SharePoint Term Store Management Tool, users with sufficient permissions will be able to perform many operations on terms in the hierarchy. These include: copying, reusing, moving, duplicating (for polyhierarchy), deprecating, and merging. The hierarchy is broken down into a term store at the top, then a group, term sets, and finally, managed terms.

    image - Example of a taxonomy hierarchy (image courtesy Microsoft)

    Note: managed keywords (or just keywords) will be stored in a separate single database. Keywords will be used for social tagging such as tag clouds and folksonomy, but keywords can be promoted to managed terms.

    Associative Terms

    An ontology is a means of classifying data based on an associative relationship. There are endless possibilities for these types of relationships. For example, I could have a hierarchy of terms in SharePoint 2010 that includes the terms “ball” and “bat” as children of the term “sports equipment.” An ontology would allow me to also create a relationship between “Bouncy things” and “ball” because they are conceptually related. Why didn’t the SharePoint team add ontologies? That’s a reasonable question, but the fact is that it simply may not have been worth the effort to tackle such a specialized function when they were already trying to build an ambitious feature. Also, many people wonder if anyone but a library scientist or a taxonomist will complain.

    How will SharePoint taxonomy be used?

    Obviously, the most popular end-user use of EMM will be taxonomy to fulfill business needs and social tagging. Many content types will ship with a Managed Metadata data-type column and users will be able to tag their list items, documents, etc, with shared terms. This end-user associated metadata will then be used to classify, organize, find and share information within SharePoint. By tagging external pages, users have a way to add links to their favourite browser’s bookmarks.

    However, another aspect of the new managed metadata functionality is how it could be used for enhanced navigation and search. For example, terms can be used to enable more advanced parametric search features, targeted search and possibly even lemmatisation in FAST search—but I’m not a search expert, so I’d have to do some more research to find out what’s happening on the search side. One thing is for sure, customers and partners will find interesting ways to use the taxonomy framework.

    In terms of navigation, the ability to alter the way you navigate your data based on tags is also referred to as faceted navigation. When I was working on SharePoint navigation, we nicknamed faceted navigation, “navigation goggles.” The idea being that you could choose different types of navigation the same way you can shift between song view, albums or artists on many MP3 players.

    For developers, SharePoint 2010 EMM also includes the Taxonomy APIs. Most of the EMM classes are found in the Microsoft.SharePoint.Taxonomy namespace.

    • TaxonomySession class
    • TermStore class
    • Group class
    • TermSet class
    • Term class
    • CommitAll method
    • IsAvailable property
    • Name property
    • CreateLabel method
    • SetDescription method

    This block of sample code (courtesy of Microsoft) shows how the taxonomy API can be used.

    using (SPSite site = new SPSite(http://localhost/))
    {
    //Instantiates a new TaxonomySession for the current site.
    TaxonomySession session = new TaxonomySession(site);

    //Instantiates the connection named "Managed Metadata Service
    //Connection" for the current session.
    TermStore termStore = session.TermStores["Managed Metadata Service Connection"];

    // Creates and commits a Group object named Group1, a TermSet object
    // named termSet1, and several Term objects. Term1, Term2, and Term3 are
    // members of termSet1. Term1a and Term1b are children of Term1.
    Group group1 = termStore.CreateGroup("Group1");
    TermSet termSet1 = group1.CreateTermSet("TermSet1");
    Term term1 = termSet1.CreateTerm("Term1", 1033);
    Term term2 = termSet1.CreateTerm("Term2", 1033);
    Term term3 = termSet1.CreateTerm("Term3", 1033);
    Term term1a = term1.CreateTerm("Term1a", 1033);
    Term term1b = term1.CreateTerm("Term1b", 1033);
    termStore.CommitAll();

    // Sets a description and some alternate labels for term1 and commits
    // the changes to termStore.
    term1.SetDescription("This is term1", 1033);
    term1.CreateLabel("TermOne", 1033, false);
    term1.CreateLabel("FirstTerm", 1033, false);
    termStore.CommitAll();

    // Deletes an unnecessary term, term3, from termStore and commits changes
    term3.Delete();
    termStore.CommitAll();

    }

    Multilingual Taxonomy In SharePoint 2010

    In the Enterprise Metadata Management documentation it states that Managed Terms could be used when metadata "Can be applied in one language, but might be viewed in other languages"

    This is available in term stores because Managed terms can be assigned multiple labels. When someone types in any of the labels (which could be in different languages), they will be applying the same term. This creates a multilingual term system.

    Here is the documentation page about Multilingual term sets (SharePoint Server 2010)

    Note: Labels are different than descriptions. There can only be one description on a term and it's generally used for disambiguation. (e.g., "this is Dallas the city, not Dallas the TV show")

    Conclusion

    The new SharePoint 2010 Managed Metadata functionality is exciting and provides a framework to build more taxonomy features. Through managed metadata, SharePoint users gain access to functionality such as folksonomy, social tagging (tag clouds) and more powerful search options. EMM also provides a way to centrally manage bookmarks.

    The Term Store Management Tool available in Central Administration (and Site Settings) enables administrators to manage a central vocabulary of terms for the whole farm. Operations that administrators can perform on the term hierarchy include copying, reusing, moving, duplicating, deprecating, and merging. Furthermore, having a managed repository enforces consistency across users.

    Enterprise Metadata Management is a huge topic. In fact, how SharePoint 2010 exposes the taxonomy features (e.g., the new tag cloud web part) is worthy of its own post, so I’m not going to try and sum it all up in one.

    These are the upcoming posts:

    SharePoint Taxonomy Part One – Introduction to SharePoint Managed Metadata
    SharePoint Taxonomy Part Two – End-User Experience
    SharePoint Taxonomy Part Three – Administrator Experience
    (including Using SharePoint Term Stores and SharePoint Taxonomy Hierarchy)
    SharePoint Taxonomy Part Four – Developer Experience
    (including SharePoint 2010 Visual Web Parts, SharePoint 2010 Taxonomy Web Part Development Screencast and SharePoint 2010 Taxonomy Reference Issues)

    Managed Metadata Best Practices from Microsoft:

    Plan managed metadata (SharePoint Server 2010)
    Managed metadata overview (SharePoint Server 2010)
    Managed metadata service application overview (SharePoint Server 2010)
    Managed metadata roles (SharePoint Server 2010)
    Plan terms and term sets (SharePoint Server 2010)
    Plan to import managed metadata (SharePoint Server 2010)
    Plan to share terminology and content types (SharePoint Server 2010)
    SharePoint Enterprise Content Management

    [Disclaimer: This information is based on SharePoint 2010 Beta 2 and may differ from the RTM build.]