Showing posts with label tech. Show all posts

Wednesday, December 28, 2016

How GitHub Shows My Second Child Arrived

I happened to notice this funny visual representation of the 2015 birth of my son on my GitHub profile. When anyone asks me questions about having kids, I'll have to show them this.

I'm pasting in a screenshot of my profile page below. The heat map is pretty clear about my son arriving in September. There's one outlier green square after his arrival--which I assume was me just committing every change I had made before his birth.

Saturday, October 15, 2016

My Blog's Most Popular Search Term: Microsoft Bob


This goes into the wacky Internet category. I just happened to glance at the "Search Keywords" stats for my blog in the Blogger admin console and noticed the single most popular search term (since I started the blog around 2005) that has led people to the geeklit blog is "Microsoft Bob."


What's possibly even more bizarre is that number two is "barcelona aquarium." Really? Out of all the pages out there, people are searching for an aquarium and thinking, "ya, geeklit sounds like the right site for that."

Very strange people...

Sunday, September 18, 2016

Why I Just Bought a MacBook Pro

I wrote a post in 2014 entitled, Why I Just Bought a Chromebook, so it may seem odd that I'm now writing this post. To be clear, I'm not backing off my favourable position on Chromebooks at all. They're great and they can be a lot more affordable than other laptops... like the MacBook Pro, for example. MacBooks are overpriced; I feel that's a pretty defensible comment. So why would I buy one?


The answer is actually quite simple and surprisingly non-technical. I have spent my entire career working in software, but I've never bought an Apple computer of any type. I've been using my wife's old MacBook for years, but I've never experienced the best that Apple has to offer and I always wondered what I was missing. If you combine that with the current popularity of Macs--especially amongst web developers--and I just decided it was time. I've run many versions of Windows. I've used FreeBSD and some flavours of Linux (including Ubuntu on my Chromebook), but it's not until now that I can say that I've really had the full Mac experience.


Unfortunately, this version of the MacBook is missing some of the hardware niceties that I enjoyed in the older MacBook I used. For example, the MagSafe connector for the power cord is gone, there is no SD card reader, no light to show the battery is charging, and no external lights to show how much of the battery remains. Those were all useful. Most people have heard about the lack of ports on this new laptop--I've given a nod to that controversy by including a dongle in the image above. Almost everything requires a dongle which is a pain. One notable exception is the headphone jack. Until the iPhone 7, the MacBook Pro actually does have a headphone jack which is nice. I'll have to see how much of an issue this is (or isn't) for me. So far, I've only purchased one dongle--for USB devices. That will cover a lot for me. If I really have issues, I'll get one of the third-party adaptors that adds ports to the machine. (Update: I saw a pretty cool "HyperDrive" one that adds an SD card reader, USB port and HDMI port.)

Of course, there are lots of improvements as well. The screen is much better, the battery life is improved and everything just generally runs faster on the newer processor and RAM. I also really like the keyboard. It has a very satisfying click which reminds me of a mechanical keyboard.

I haven't had the machine very long, so this isn't a proper review. At this point, I'm feeling good about the purchase. Yes, I do miss some MacBook features, but the Pro machine is much faster than my old one and allows me to project to Apple TV. The other one was too old to offer that feature--which gives you an idea of just how big a step us this was in hardware. 

Tuesday, April 26, 2016

Chromebooks to run almost every Android app?

Oh let it be true... please let this be true: Chromebooks may soon be able to run almost every Android app.

From the article, "Chromebook users will soon get access to the 'more than a million' games and apps on the Google Play Store."


This would be huge. I've already written about how much I enjoy my Chromebook, but having full access to the massive Google Play store would be unbelievable. As more and more software is written in app form, 'old school' operating systems are becoming less and less relevant. ChromeOS is a fantastic bridge between having to do everything on a tiny screen and running a heavy O/S on a larger machine.

Wednesday, March 30, 2016

Why I Switched from Apple Music to Google Play Music

When Rdio was shut down, I successfully used Move to Apple Music to copy my playlists into a free trial of Apple Music. However, after using Apple Music for a few months, I've run into more snags than I can handle, and I've decided to migrate to Google Play Music.

Google Play Music

Fortunately, just like my previous switch, there is a way to get my playlists over to the new platform. To copy playlists from Apple Music to Google Play Music, I'm using STAMP.io. Although it seems to have the same issue I encountered in the last move--not choosing the same recording of the songs--it's certainly better than redoing all that time intensive work of creating the lists. The premium version costs a few dollars, but it's worth it.

So why go through the hassle of switching streaming services again? Here are the "why not" reasons:

  • The cost is the same for the family plan, so price isn't an issue.
  • I can copy over my playlists (with a bit of clean up required)
  • I thought Apple Music would work seamlessly with iTunes. For example, I expected to be able to freely mix my content from iTunes and the streaming service. That's not the case. There appears to be no synergy there.

The deal breaker was the flexibility of Apple Music--or rather, the lack of flexibility. I simply cannot use Apply Music on enough devices in my house. Here are the devices/options I tested:

  • Windows PC: works via iTunes
  • MacBook: works via iTunes
  • iPhone 6: works via Apple Music App
  • iPhone 3 (my daughter plays with it): no app, does not work at all
  • Android Tablet (Kindle Fire): no app, does not work at all
  • Nexus 5x: works via Apple Music App
  • Chromebook: does not work at all

Obviously, some of these are more important than others, but the fact remains that Google Play Music works fine on every one of these devices. Furthermore, it does not require any install to run on a PC/Mac/Linux/ChromeOS browser; I really miss the web listening experience that I had with Rdio and I want that back. In the end, it was an easy decision to make the switch and go Google.

Wednesday, January 13, 2016

I AM CARDBOARD VR Url Not Recognized Setup Error


For Christmas, I picked up a Google Cardboard viewer. It's the easiest (read: cheapest) way I know to get a virtual reality headset for home use. When I co-wrote Augmented Reality: A Practical Guide for the pragmatic programmers (in 2006), headsets for augmented reality or virtual reality were expensive and bulky.

That certainly has changed. Google cardboard devices are literally made of cardboard. There are lots of choices. I got the I AM CARDBOARD® 45mm Focal Length Virtual Reality Google Cardboard. So far, I'm impressed with the inexpensive device. Enabling clicking in the virtual user interface by moving a magnet on the side of the device is ingenious.


Unfortunately, I quickly ran into a problem with the set up. When asked to use my phone's camera to grab the QR code on the cardboard, I received the error "URL not recognized" or "Problem in parsing the Url." QR codes represent a URL and if that URL changes, they can break. The solution was to find the manufacturer's website and search for a QR code there. In this case, I found a working QR code for the I AM CARDBOARD. Now I'm looking forward to trying out more of the apps with my daughter.


Update: My daughter loved it! I shot a video of her reaction that I'm sharing with family. So cool.

BTW: from the site -- "Calibrate your VR headset using the QR code found in this listing images. To do so, open the Google Cardboard app, select "Configuration" menu option, click on "Switch viewer" and scan the QR code."

Tuesday, October 06, 2015

Copying Playlists from Rdio to Apple Music

Even before it was announced that Rdio was in financial trouble, and even before we learned that Pandora was buying parts of Rdio to shut it down, I wondered if I should move to a different music streaming service. I enjoy Rdio, but I couldn't shake the nagging feeling that I had backed the wrong horse and eventually my hard work on playlists would vanish. Because of this, I was reluctant to spend too much time creating and fine tuning my Rdio playlists.

Fortunately, there's a solution, I successfully used Move to Apple Music to copy my playlists into my free trial of Apple Music--I still haven't decided if Apple's service is the way to go. This playlist migration from Rdio to Apple Music cost me $4.99 and it was well worth it.

I used an old MacBook for the playlist migration and it took about 12-16 hours. Yes, that's right about 16 hours. During that time, I couldn't use the machine for much because it was tying up the internet connection. I had about 2800 songs because it counts Rdio's "My collection" as a playlist.


Move to Apple Music allowed me to export a copy of my playlists (in XML), then upload the playlists I want into Apple Music. It also provides a list of the songs it couldn't find on Apple Music. In my case it was over 200, but when I checked into it, it turned out that most of the songs are available on Apple Music, they're just listed differently (e.g., the same song on a different album version). Be aware, iTunes will actually refuse to sync a playlist if there's a song included that can't be found, so you'll have to check them once you have finished the import.

Note that I did try the free version of STAMP, which copies playlists from Rdio, Google Music, or Spotify to Apply Music or Spotify. I couldn't get STAMP to work and it required move work to run than Move to Apple Music. It also costs a few bucks more.

Update: After the import, I noticed a lot of the songs are not the album version. I haven't tested this theory, but I think I know why it's happening. When a live version, or a remix of a song is available, it's a common format to add "(live...)" or "(...remix)" to the song title. I believe the open bracket results in these versions appearing first in the Apple Music API search results. The upshot is you'll need to go and switch the versions if you're not a fan of live versions and remixes. 

Tuesday, September 08, 2015

Araxis File and Directory Comparison Utility

As part of my role, I'm writing, editing, and managing technical product documentation. One of the challenges in that area is incremental translation to multiple languages. Running a Microsoft Word compare between two versions of a document is easy, so any documentation written in Word can be sent to a translator and the compare will show what's changed—and therefore what needs to be translated since the previous translation. However, some of our documentation is written in XHTML so that it can be compiled to CHM and also provided as web-based help with our server product. How we cost-effectively manage an incremental translation update on these files has been an open question. I now have a reasonable solution.

Free tools such as KDiff will perform a differential analysis on files and even show exactly which lines have changed. However, KDiff doesn't provide any ability to separate the changed files from the ones that don't need to be translated again. Fortunately, there is another application called Araxis Merge (Windows and MacOS supported) that does allow for this ability. At the time of writing, it's $129 for one standard licence.


Like Kdiff, you can run a recursive directory diff to find all the changes in all the files. However, once you have done your folder comparison, you can also select all the altered files (using Select Rows > Selected Changed) and copy them to a new "specified folder." Using this method, I was able to grab all of the XHTML files that have changed since we last did a complete document translation.

Note that this method DOES NOT copy new files. You will need to go through manually and copy the files that have been added. These files appear green in the Araxis folder comparison view.

And if that's not enough, you can even generate an HTML report of all the file changes with links to reports on the changes in each file… so cool.


I did run into some hiccups in Araxis, For example, a bug that often causes the right-click context menu to not appear and consequently hang the application. However, I was able to work around it and get my work done.

Tuesday, August 04, 2015

DocBook 5 Install and Setup for Windows

It has been a long time since I used a system such as DocBook. When writing Pragmatic Augmented Reality I used the Pragmatic PML framework, which is essentially a simplified version of DocBook.

Currently, I only want to set up DocBook to publish HTML--I may be adding PDF later. Finding the installation and set up instructions for DocBook on Windows was not easy. I discovered a couple of old (and short) versions of this and that's where I started. 

Unlike most Windows applications, there is no installer for DocBook. Installing is the same as downloading the executables (and other files), copying them to the location you want and then adding that location to your Windows Path. The Windows DocBook setup essentially has three pieces: 
  1. DocBook DTD (optional)
  2. DocBook XSL stylesheets
  3. Tools: 
    • libxml2
    • libxsl 
    • iconv
    • zlib1
1. Unless you're using a tool that supports DocBook (such as XMetal), you'll need to use one or more of the DocBook schemas. To do this, download and unzip the DocBook XML 5.x.x DTD from: http://docbook.org/schemas/5x.html. This is optional since the stylesheets reference web versions of the DTD by default and you can edit DocBook files in any XML/text editor--I prefer Sublime Text because it's cross-platform and awesome.

2. Download and unzip the DocBook XSL 1.x.x stylesheets from: http://sourceforge.net/projects/docbook/files/docbook-xsl/

I copied the files into C:\docbook\xsl

3. Download the tools. You can get versions of all 4 from here: ftp://ftp.zlatkovic.com/libxml/

A. XSLTPROC: Download xsltproc: libxslt-1.1.26.win32 from ftp://ftp.zlatkovic.com/libxml/

Unzip the folders and copy the files to c:\windows or another location that's in your Windows path. I prefer to copy them somewhere else (e.g., C:\docbook and add that directory to the path variable):

B. LIBXML2: I downloaded libxml2-2.7.8.win32.

If you want the newer libxml2 kit to convert your XML to HTML, you can get it from:
ftp://xmlsoft.org/libxml2/win32/64bit/, or ftp://xmlsoft.org/libxml2/win32/. But I'd try to get the old one working first. I haven't bothered to upgrade.

C. ICONV: I download iconv-1.9.2.win32

D: ZLIB1: I downloaded zlib-1.2.5.

After grabbing the tools, make sure you set up your Windows Path Variable. To set up the path for my system, I appended this: C:\docbook\libxslt-1.0.9-bin\bin;C:\docbook\libxml2-2.7.8.win32\bin;C:\docbook\iconv-1.9.2.win32\bin;C:\docbook\zlib-1.2.5\bin;

Once you have the tools installed. Run this command: xsltproc -version

The results should look something like this:

stephen.cawood@OLIFANTS /s/GitHub
$ xsltproc -version
Using libxml 20708, libxslt 10126 and libexslt 815
xsltproc was compiled against libxml 20706, libxslt 10126 and libexslt 815
libxslt 10126 was compiled against libxml 20706
libexslt 815 was compiled against libxml 20706

You will need a sample file to test your setup. Start with something dead simple like this (testDocBook.xml):


And the successful output should like like the image below.


To add a CSS stylesheet to your HTML output, use a command similar to this:

stephen.cawood@OLIFANTS /c/docbook
$ xsltproc --output outputFile.html --stringparam html.stylesheet help.css /c/docbook/docbook-xsl
-1.79.0/html/docbook.xsl testDocBook.xml

Note: If you want to build PDFs, you'll need to download  and install FOP for Windows.

References:


Friday, June 12, 2015

Error Starting Ubuntu Desktop on Chromebook After Upgrade

As I've mentioned in previous posts, I'm very pleased with the Toshiba Chromebook I picked up last year. Like many Chromebook users, I decided to install Crouton and have access to a full install of Ubuntu Linux. I followed the instructions in the article How to Easily Install Ubuntu on Chromebook with Crouton and all went smoothly. Switching between Chrome O/S and Ubuntu is as easy as a key combination--you just have to remember those keys: ctrl+shift+alt+forward (or backward).

Unfortunately, the version of Ubuntu installed was 12. As fun and nostalgic as that was, I immediately set about upgrading to the latest stable build. Running the upgrade was simple enough.

sudo apt-get update
sudo apt-get upgrade
sudo apt-get dist-upgrade
sudo apt-get install update-manager-core
sudo do-release-upgrade

Everything worked at first, I even went through the process of installing some applications such as Gnome Terminal, Gimp and Git (Crouton installs the minimal release--so barely any applications). However, I ran into a snag when I rebooted. The sudo startunity command would fail with a nasty message.

...
[   727.514] (WW) The directory "/usr/share/fonts/X11/75dpi" does not exist.
[   727.514] Entry deleted from font path.
[   727.514] (==) FontPath set to:
/usr/share/fonts/X11/misc,
/usr/share/fonts/X11/Type1,
built-ins
...
727.526] (EE) Segmentation fault at address 0x0
[   727.526] (EE) 
Fatal server error:
[   727.526] (EE) Caught signal 11 (Segmentation fault). Server aborting
...
[   727.526] (EE) Please also check the log file at "/tmp/Xorg.crouton.1.log" for additional information.
[   727.527] (EE) 

I prefer the Unity desktop, so that's the one I had originally installed. To work around the error, I reinstalled Unity using the same command in the original setup article:

sudo sh ~/Downloads/crouton -t unity.

To be clear, this simply reinstalls the desktop. I still had the latest version of Ubuntu and the applications I had installed after running the Crouton install. 

Thursday, February 26, 2015

Fairchild TV Interview about the Vancouver Tech Scene

I was recently interviewed by Fairchild TV (a national Chinese language station) for a segment about the Vancouver tech scene.

FairchildTVInterview2015

If you’re interested in the story, here are links to the video. Note that it’s a Cantonese language station.

(You can download the video if you find it's playing too slowly on the site.)
Part 1:
http://www.fairchildtv.com/newsarchive_detail.php?n=27&topic=375&episode=690
Part 2:
http://www.fairchildtv.com/newsarchive_detail.php?n=27&topic=375&episode=691

Monday, December 08, 2014

Chromebook 2 Feedback and Review

Now that I've had my Chromebook 2 for a reasonable amount of time, I thought I'd post some more details about my experience.

chromeos

In general, I'm still thrilled with the machine. It's an inexpensive computer with a full laptop typing experience. The audio and video are good, the battery life and charge times are fantastic, and so much is available via web apps these days that I can almost use it for everything. I also like that the operating system is simpler than a traditional desktop O/S. For all the reasons I mentioned in my previous post (Why I Just Bought a Chromebook), I think it's a fantastic device and I'm recommending it to people.

My issues pretty much stem from the fact that Chrome OS has a tiny web app store at this point. There are two ways to fix these issues, either more web apps in the Chrome Web Store or enabling Android (Google Play) apps on Chromebooks. There are rumours of Google Play capability coming to Chromebooks, but I'm not optimistic that will happen on my Chromebook 2. However, I sincerely hope my pessimism is poorly placed.

Here are the main issues I've encountered:

1. GoToMeeting doesn't work (even the web version only allows you to listen--you can't share your video or talk). This is a deal breaker for using my Chromebook as my only computer. Whether it's GoToMeeting or WebEx, I have to be able to participate in meeting using the technology that my employer and customers are using. Yes, Google Hangouts and Sqwiggle work--that's great--but it doesn't solve the problem. (As I pointed out in my last post, I'm not trying to replace my phone with my laptop and I can actually use WebEx or GoToMeeting on my phone, so that mitigates this problem.)

2. Skype doesn't work. This isn't a work problem for me, so I'm putting it in a different point. I use Skype with family, so I want it on my laptop. (Again, I can use this on my phone.)

3. Torrent files. I'm working on this one, but I have yet to find a good solution for downloading files via torrents. There are apps in the Chrome Web Store, but I tried one and it just didn't work. I'll have to try another. There's one that costs a few dollars--I might have to resort to actually paying for an app.

4. Heat. I'm not actually using a thermometer, but the Chromebook feels hot to me when I'm using it on my lap. By comparison, my wife's MacBook Air doesn't seem to get as warm, but my old Acer laptop is actually hotter than the Chromebook.

5. Google Cloud Print. I was pleased to learn about the Google Cloud Print option. It allows me to print to a printer connected to another machine (because you can't install print drivers on Chrome OS). However, it simply doesn't work very well. My printer isn't that old (it's wireless), but printing with Google Cloud Print results in such bad results that it's almost useless. For example, it's common for my documents to print with the last few characters of every line cut off.

6. SD Card. This is a minor annoyance, but every time I open my Chromebook, I'm told to safely remove my SD card--not on reboot mind you, but literally every time I login. I don't want to remove the card and I shouldn't get that error all the time. I just ignore it, but I'm not the only one seeing this issue and I hope it gets resolved in an update.

Saturday, November 08, 2014

Why I Just Bought a Chromebook

I’m sure some people would see the title of this post and say, “Why wouldn't you buy a Chromebook? They’re a steal!” Ultimately, I agreed with this view and bought one. However, I went through a period of uncertainty when I looked to replace my current laptop. Here are the main factors that swayed me in favour of the Chromebook 2.

toshiba chromebook 2 geeklit cawood blog

But before I get to that, I think it’s important to mention that I took my time with this decision. What else did I consider? I weighed the pros and cons of many different options: MacBook Air, MacBook Pro, Windows laptop, Ubuntu laptop, Microsoft Surface, Windows tablet, Android tablet, and iPad. We already have a MacBook Air, Windows desktop and iPad in the house, so that also played into my decision.

1. Affordability -- Chromebooks are remarkably affordable. Unlike a MacBook Air, or a Surface 3, they're cheap. I bought my new Toshiba CB35-B3340 Chromebook 2 for $329.99. That's about a third of what I would have paid for the others. Even if it turns out that I don't like the Chromebook, I've made a small investment to find that out.

2. Getting my work done -- I don't care about brands very much and I'm not a zealot when it comes to technology. I just want to get my work done and spend more time with my wife and daughter. If I can do everything I need to do on the Chromebook, I'm happy. These days, I spend most of my time either in email and Word documents. I can use web versions of Outlook, Gmail and Word to do all that. If I need something else, I can remote into my Windows Server at home or my Windows desktop at work, or just use my Wife's MacBook Air. An obvious example is Visual Studio for coding. However, these is a web version that I can try even for that. I'm very curious what the dev experience will be like on a Chromebook.

3. I’m not replacing my phone -- While it's true the Chrome App Store doesn't offer the millions of apps in the iOS Store, or the Google Play store, or even the Windows App Store, that's not what I need in a laptop. I have my phone with me at all times and I don't need to send text messages or play Flappy Bird on my laptop. (BTW -- Angry birds is in the Chrome App Store)

4. ‘Traditional’ operating systems are too much work -- I was already thinking this way, but a few weeks ago, I picked up a Windows 8 tablet I use at work and found that it was running Windows Update. I just wanted to write a note in OneNote, and I couldn't because the operating system is huge and powerful and therefore takes time to update. This is just one example of the ways that large traditional operating systems (Windows, MacOS, Linux) are just too much work for my use case (see "Getting my work done" above). Chrome O/S is simple and I like the sound of that.

Update: Now that I have my Chromebook (I'm writing this update on it), I can say that I'm impressed. I ran into a minor issue during set up (Chromebook setup freezes at Determining Device Configuarion) but restarting was enough to quickly resolve the issue. Since then I haven't hit any hurdles and I'm really enjoying the experience.

Thursday, July 10, 2014

Turn off Image or Video Prompt in Snagit 12

If you haven’t tried Snagit, you should check it out. It’s much better than relying on the old school screen capture mechanisms. When I was taking screenshots for my books, Snagit saved me a great deal of time. As just one example, try capturing an open dropdown menu using just Windows screen capture shortcuts—it’s like trying to catch a greased pig.

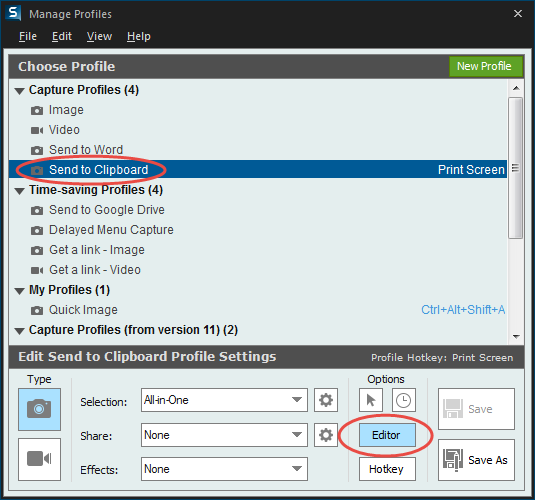
I just upgraded to Snagit 12 and found that every time I take an image capture, I’m prompted to select either a video or image capture (see the big blue buttons in the screenshot below). I rarely use the video capture, so this is a waste of time. Here’s how to turn it off.

image

First, check if you’ve got an old version of Snagit installed. I had 11 and 12 installed and was not getting the behaviour I wanted. I had to uninstall Snagit 11 to get rid of the old editor.

Next, go to the preferences window and check the hotkey associated with the default capture profile. I like to use print screen, so I’m going to change the “Global capture” shortcut key to something else. To get to the preferences window, you can right-click the icon in the task menu (bottom right corner of your screen with the hidden icons), then choose Preferences and the Hotkeys tab.

image

After I’ve freed up the right shortcut key, I’m going to associate that key (PrtScn) with a profile that doesn’t ask if I want to take video.

To do this, choose the “Send to Clipboard” profile from the Manage Profiles dialog, and then click the Hotkey button at the bottom to associate this with the keyboard shortcut you’d like to use. Note that I wanted to go directly to the Snagit editor, so I have that enabled.

image

Now I’m back to the lightning fast capture that I’ve come to love. When I use the hotkey, I go straight to the Snagit editor. If I wanted, I could add styles (such as borders) as part of the profile and they would be automatically applied.

image

p.s., If you’re wondering how I captured the Snagit windows. I cheated. I used Alt+PrtScn to do it old school.

Thursday, May 29, 2014

Windows XP End of Life Update: Win a Microsoft Gift Card for Commenting on This Post

A while back, I wrote a post about the Windows XP End of Support date (yes, it has already passed). Microsoft has generously donated a Microsoft Store Gift Card to help get the message out that it's time to upgrade.

Leave a comment below and let me know what you think is the single most important reason to upgrade from Windows XP, or your favourite new feature of Windows 8.1 and you will be entered to a random draw for a $100 Microsoft Store Gift Card. Winners will be selected on July 15th.

Wednesday, April 09, 2014

Add Wikipedia App to Microsoft Word 2013

Office 2013 and SharePoint apps are great, but I have to admit that I haven’t done much with them yet. Today, I found myself wondering what I’d have to do to get Wikipedia to open when I right-clicked on a word or phrase in Word 2013.

image

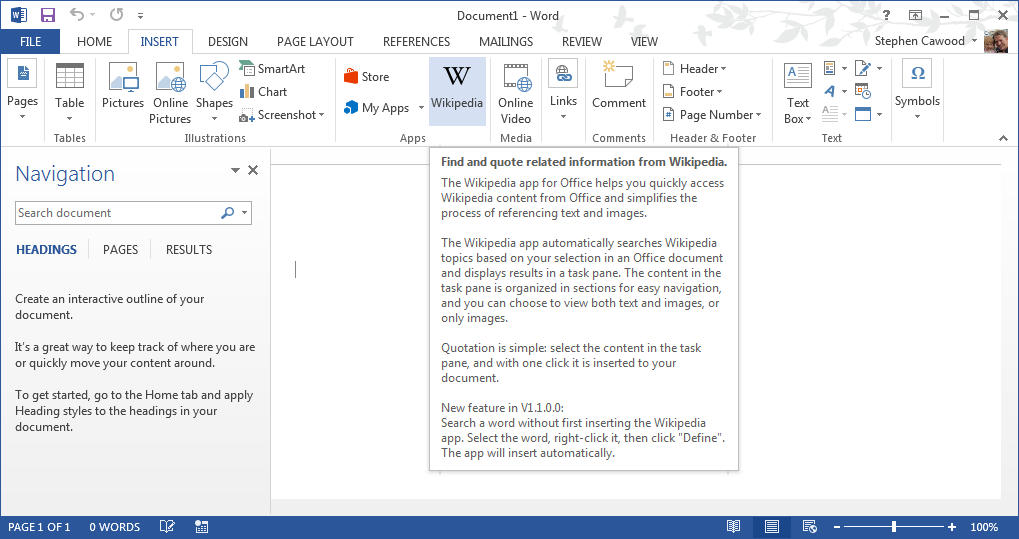
To add Wikipedia, all I had to do was choose Insert from the Ribbon menu at the top of the screen and then click the Wikipedia icon. If you click “My Apps,” you can navigate to the Office 2013 app store and check out what other interesting apps are available.

image

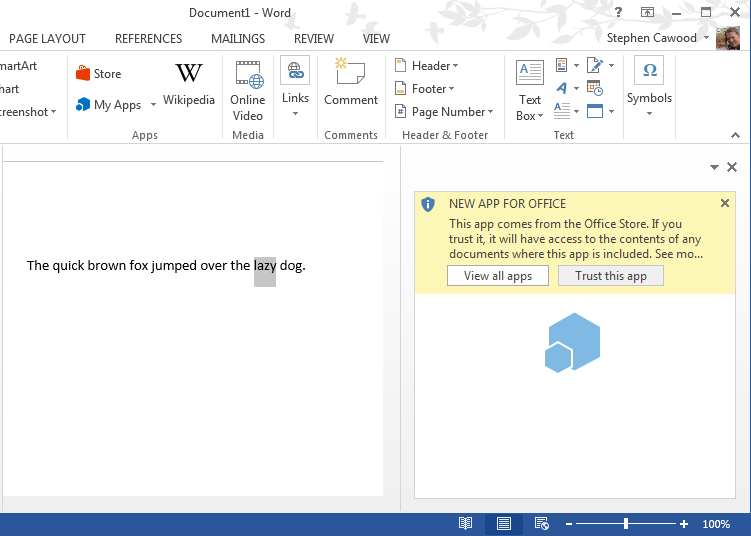
Once you click the icon, you’ll need to confirm that you trust this new app.

image

After you’ve trusted the app, you can now quickly look up words or phrases from your Word documents in Wikipedia. Very cool!

image

Switching the app that opens by default when you choose the “Define” option is not obvious. To choose a different app, you first need to hide the Wikipedia app my clicking “My Apps” in the Ribbon and then clicking “Manage My Apps.”

image

For example, let’s say you wanted to use the Bing dictionary for the Define option. You can add the Bing app, then choose Manage My Apps—which opens a web page—and hide Wikipedia from that page. Once you hide an app, you should be able to click the “Refresh” button in the My Apps view and see that the app is no longer there.

After you’re done, you can unhide Wikipedia. Note that some people have reported that they had to restart Word after hiding Wikipedia.

I should mention that it’s also possible to have multiple apps running. In the screenshot below, I have both the Bing dictionary and the Wikipedia app open.

image

Wednesday, February 26, 2014

Windows XP End of Life is Coming

It's time to move on. Although Windows XP was an important release when it came out, and a surprising number of people and organizations are still running it, it's time to upgrade.


If you know someone still running XP, you should remind him or her in no uncertain terms that 2001 is over. On April 8th, 2014, Windows XP support will end. After that date, there will not be any updates--most notably security updates--for the O/S that should probably be called Windows Classic at this point.

One of my responsibilities at Aquatic Informatics is the supported systems matrix for our software. We had deprecated support for Windows XP a couple of releases ago, but as of our next release, we'll officially be dropping support. There's no doubt that most software companies have already done the same or will be dropping XP support in the near future. So boldly step into the present and take a look at Windows 8.1.

Update: Microsoft has generously donated a Microsoft Store Gift Card to help get the message out that it's time to upgrade.

Leave a comment on my update post and let me know what you think is the single most important reason to upgrade from Windows XP, or your favourite new feature of Windows 8.1 and you will be entered to a random draw for a $100 Microsoft Store Gift Card. Winners will be selected on July 15th.

Wednesday, September 18, 2013

Convert Broken HTML to XHTML

I recently made the decision to refactor a 600 page software manual. That’s a daunting task, so why did I do it? The old format was barely working, inflexible, required a truly awful propriety tool, and cost the company considerable time and money when changes (such as translations) were required.
The underlying pages were in HTML, or at least the closest thing to HTML that still actually worked. In reality, the code was awful; there were broken tags and redundant tags all over the place. The editor in question (developed by a small company in Hawaii) is nothing more than a wrapper around Microsoft’s free HTML Help Workshop tool. I decided to clean up the HTML (read: convert it to XHTML), dump the editor and dynamically build the manual the same way I’ve done at companies in the past. This is an ongoing project, but here’s how I handled the task of cleaning up ~600 HTML files, so they were in valid XHTML.
Resources:
HTML - Special Entity Codes
HTML Tidy
Online RegExr Test Tool and Interactive Tutorial
Sublime Text Editor
image
- running a Regular Expression replace in the Sublime Text editor
Step 1: Clean up the HTML with HTML Tidy
HTML Tidy is convenient way to repair poor HTML. It doesn’t fix everything, but it does help and it makes the code look a lot better since it will fix much of indentation. So the first thing I did was run this HTML Tidy command on all the files.
I ran this in Git Bash after turning off word wrap in tidy settings file. Even with the word wrap option, HTML Tidy inserted more newlines than you’d expect, so it isn’t perfect, but it made a big difference.
$ find /C/Manual -type f -name "*.htm" -exec tidy -f errors.txt -m -utf8 -i {} \;
Note that you can remove the HTML Tidy watermark pretty easily using find/replace in Sublime. And that is a nice segue to the next step.
Step 2: Simple Find/Replace in Sublime
Using the “Find in Files…” feature, it’s easy to make simple text substitutions in Sublime. For example, to be XHTML compliant, I need to convert &nbsp; to &#160;, <BR> to <br/>, and many other examples.
I also needed to simply remove some tags. For example, tags added when someone pasted text from Microsoft Word into the editor (e.g., <o:p> and </o:p>).
Sublime will help you figure out the syntax to match just the current open file, all open files, or a whole directory structure. For example, in the “Where” box for Replace, you might enter c:\directory\test,*.htm to match all .htm files.
Step3: RegEx Find/Replace in Sublime
Simple find/replace actions got me part way there, but they wouldn’t solve all the issues I had to deal with in the broken HTML. The next step was to use Regular Expressions to enable some more sophisticated corrections.
One example, was attributes within HTML tags (such as size, height, etc.) that weren’t enclosed in quotation marks. Browsers will deal with that transgression, but it’s not valid XHTML. I had to find a quick way to add the quotes around these attributes in ~600 files. The answer was find/replace using regular expressions in Sublime.
Find: (size=)([0-9])
This creates two capturing groups with “size=” as the first and any number of 0-9 characters as the second.
Replace: $1"$2"
This replace command encloses the second capturing group in quotation marks. For example, size=100 becomes size=”100”.
Well that’s all for now. I hope you found this helpful. I encourage you to try the RegExr online tool; it’s helpful when refining regular expressions.

Friday, September 13, 2013

Scripting Regular Expressions Find/Replace in Sublime Text

Just like everyone in the software industry, I’ve used many, many different text editors over the years.  vi, Emacs, Notepad, Notepad++, TextPad, nano, gedit… to name a few. But, of course, there is a ridiculously long list of text editors and I haven’t tried that many of them. The one that I’ve been working in for most of this year is Sublime Text. Sublime’s tag line is “Sublime Text: The text editor you’ll fall in love with.” I may not be in love yet, but I’m definitely checking it out a lot.

In addition to having excellent functionality built-in, Sublime also supports a plug-in model. There is the GoSublime plug-in for golang code and there’s the RegReplace plug-in that allows one to write find/replace commands using regular expressions and save them in script as Command Palette commands.

To install RegReplace on Windows:

Step 1: Install Package Control for Sublime Text

As you can see in the installation instructions for Package Control  for Sublime Text, all you have to do is open a Sublime Text console (Ctrl+`) and paste in the install code.

Step 2: Install RegReplace for Sublime Text

image

Option 1: After installing package manager, download RegReplace, unzip it and paste the unzipped folder into your Packages folder (e.g., C:\…\Sublime Text 3\Packages). Next, go to Preferences > Package Control and choose “Package Control: Install Package.” Then choose the package you want to install from the list.

Option 2: This requires you have Git. Open a command prompt. CD to your Sublime Text 3 packages directory, then enter the following command:

git clone -b ST3 https://github.com/facelessuser/RegReplace.git RegReplace

Step 3: Add a Default.sublime-commands file -- with your command added

I had to manually create the folder: C:\Users\username\AppData\Roaming\Sublime Text 3\Packages\RegReplace

Once you have the file, you can add your own custom commands. (Remember to add a comma to the command above.)

   // Test RegReplace
     {
         "caption": "Reg Replace: Test",
         "command": "reg_replace",
         "args": {"replacements": ["test_reg_replace"]}
     },

Step 4: Add your custom command to the Command Palette

To do this, choose Tools > Command Palette > Then type “setting” and you’ll see “Preferences: Reg Replace Settings – User.” Choose this option and paste the example one that comes with RegReplace into the new file that’s created.

This will create the file: /C/Users/username/AppData/Roaming/Sublime Text 3/Packages/RegReplace/reg_replace.sublime-settings

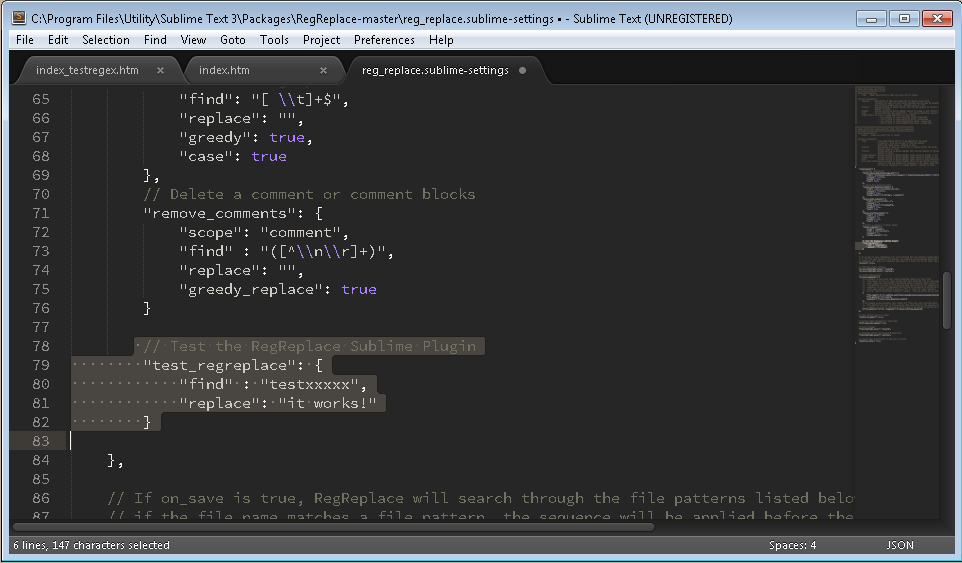
After the file is created, add a new command to reg_replace.sublime.settings. For example:

// Test the RegReplace Sublime Plugin
    "test_reg_replace": {
    "find" : "testxxxxx",
    "replace": "it works!"
   }

image

Step 5: Try it out!

Once you have everything set up, you can use the Command Palette to run your new custom find/replace regular expressions scripts.

image

Note: After installing RegReplace, I received the an error when trying to add my test code to reg_replace.sublime.settings. The error was something like “Cannot save. Can’t create .tmp file in RegReplace folder.” To work around the issue, I opened the security settings for the folder and added write permissions for all users. A bit overkill, but in my case, it’s a secure machine.

Wednesday, August 08, 2012

Enabling Remote Access to SQL Server on an Azure VM

The basic requirements for enabling remote access to SQL Server are pretty straightforward:

1. Ensure that “Allow Remote Connections” is enabled in SQL Server Management Studio.

2. Open your firewall to allow communication (by default TCP port 1433).

To get access to your SQL Server running on a Windows Azure Virtual Machine (VM), you need to take some additional steps—just as you would using an Amazon Web Services virtual machine. The same is true for opening HTTP access (e.g., over port 80), or any other port for that matter.

Note: This post is not about SQL Azure. This applies to an install of SQL Server on a Windows Azure Virtual Machine.

  1. First login to the new Azure Management Portal (currently in “Preview).

image

2. Click on the Virtual Machine you want to configure and then click “Endpoints.”

image

3. By default, SQL Server will use TCP port 1433, so add an endpoint with any name (using the allowed characters and character limit).

(I haven’t read up on it yet, but I’m assuming the public port is what you’ll be using from the outside and the private port is the one that will actually be forwarded to the VM. To keep it simple, I left them the same in my test.)

That’s it, you’re done! Now you can connect from a client machine to your remote SQL Server machine.