Showing posts with label coding. Show all posts

Thursday, December 29, 2022

Debugging Pygame Zero Games in VSCode

As part of my ongoing effort to expose my kids to various science topics, I picked up a Python game development book for kids and I'm working through it with my youngest. As part of that process, I was just setting up Pygame and Visual Studio Code (VSCode) over the holidays.

The setup didn't take long, but I did run into an issue. When I ran our code from the terminal, the games worked fine. However, when we tried to debug from VSCode, the Pygame Zero game window wouldn't--Pygame opened on the taskbar but just closed again. I did find the solution, so I thought I'd same some other people some Googling and document it here. The book just references IDLE, so it doesn't get into running the example games in an IDE such as VSCode.

The book I chose is Coding Games in Python*. It's specifically targeted at kids, so it's a colourful book filled with a basic introduction to coding and some simple game examples. I highly recommend it.


Getting back to the issue, I could successfully set breakpoints, but as soon as they were done, Pygame would close, and the game window would never appear. The answer is on page 25 of the book (which I skipped because I already had the setup done :) and it's also in the Pygame Zero doc page about IDEs. Here's the solution (paraphrased):

Pygame Zero includes a way of writing a full Python program that can be run using python. To set up VSCode for debugging, add this line at the top of your file:

import pgzrun

Then add this line to the end of your file:

pgzrun.go()

* Coding Games in Python was written by Carole Vorderman MBE, Craig Steele, Dr. Claire Quigley, Daniel McCafferty, and Dr. Martin Goodfellow.

Tuesday, October 27, 2020

Cypress.io testing with Auth0 and Angular 10

I read the documentation on both the Auth0 site and the Cypress.io site about using the two technologies together with the Angular framework, but I simply couldn't get it to work.

For example, the tutorial on the Auth0 Blog called The Complete Guide to Angular User Authentication with Auth0 got me most of the way there and the same was true for the Cypress.io "real-world app" code and documentation on GitHub (which is written for React BTW).

These two resources (plus some community posts) allowed me to set up all the underpinnings of a working test system but didn't resolve all my issues. In the past, my Angular project exclusively used Google Authentication, so my Cypress tests required me manually login first, and then run all the tests that needed an authenticated user. It wasn't perfect, but it was workable. However, his manual login option did not work with Auth0 (and Angular 10). Google Authentication would not allow the login window to open in an iFrame when running in the context of a Cypress test (i.e., Cypress was automating/controlling the browser).

- Auth0 authenticated tests running successfully in Cypress.io and Angular 10


This is what I ultimately did to get it working:

1.  Switch my Node.js API from Google tokens to Auth0 authentication tokens by following the Auth0 quickstart for Node.js (Express) backends.

2. Set up a test SPA Application in Auth0 with lower security than my production app. This allowed me to enable username/password logins and turn on the Password Grant Types (under Application > Advanced Settings).

3. Follow the Cypress real-world app section called "Cypress Setup for Testing Auth0) to add a Login function to my Cypress.io setup.

Under Cypress > support > commands.ts, I now have the code below. You can also use plain JavaScript of course. The configuration for the variables is found under src > cypress.env.json.

/// <reference types="cypress" />

/// <reference types="jwt-decode" />

import jwt_decode from 'jwt-decode';


Cypress.Commands.add('login', (overrides = {}) => {

  const username = Cypress.env('auth0_username');

  cy.log(`Logging in as ${username}`);

    cy.request({

      method: "POST",

      url: Cypress.env('auth0_url'),

      body: {

        grant_type: 'password',

        username: Cypress.env('auth0_username'),

        password: Cypress.env('auth0_password'),

        audience: Cypress.env('auth0_audience'),

        scope: Cypress.env('auth0_scope'),

        client_id: Cypress.env('auth0_client_id'),

        client_secret: Cypress.env('auth0_client_secret'),  

      },

    }).then(({ body }) => {

      const claims: any = jwt_decode(body.id_token);

      const { nickname, name, picture, updated_at, email, email_verified, sub, exp } = claims;


      const item = {

        body: {

          ...body,

          decodedToken: {

            claims,

            user: {

              nickname,

              name,

              picture,

              updated_at,

              email,

              email_verified,

              sub,

            },

            audience: '',

            client_id: '',

          },

        },

        expiresAt: exp,

      };


    window.localStorage.setItem('auth0Cypress', JSON.stringify(item));

    return body;

  });

});


let LOCAL_STORAGE_MEMORY = {};

Cypress.Commands.add("saveLocalStorageCache", () => {

  Object.keys(localStorage).forEach(key => {

    LOCAL_STORAGE_MEMORY[key] = localStorage[key];

  });

});


Cypress.Commands.add("restoreLocalStorageCache", () => {

  Object.keys(LOCAL_STORAGE_MEMORY).forEach(key => {

    localStorage.setItem(key, LOCAL_STORAGE_MEMORY[key]);

  });

});


4. With this command added to Cypress.io, I can now login programmatically to Auth0 using the following code in my first test. You'll note that the authenticated user details are being written in local storage (but only during testing), and the Auth0 authenticated token is being stored as a cookie--this is the token that I use with my backend API.


describe('Login', () => {

  beforeEach(() => {

    cy.restoreLocalStorageCache();

  });


  it('Should successfully login', () => {

    cy.login2()

      .then((resp) => {

        return resp;

      })

      .then((body) => {

        const {access_token, expires_in, id_token} = body;

        const auth0State = {

          nonce: '',

          state: 'some-random-state'

        };


        // write access token to user-token cookie

        cy.setCookie('user-token', access_token);


        const callbackUrl = `/callback#access_token=${access_token}&scope=openid&id_token=${id_token}&expires_in=${expires_in}&token_type=Bearer&state=${auth0State.state}`;

        cy.visit(callbackUrl, {

          onBeforeLoad(win) {

            win.document.cookie = 'com.auth0.auth.some-random-state=' + JSON.stringify(auth0State);

          }

        });

      })

  });

  afterEach(() => {

    cy.saveLocalStorageCache();

  });

});


6. This all seemed to work great, however, Auth0 still would not recognize that the user is authenticated. The Auth0 client would always return false for isAuthenticated. To get around this issue, I had to hack my AuthGuard.

This is what I had before adding Cypress.io:

return this.auth.isAuthenticated$.pipe(

  tap(loggedIn => {

    if (!loggedIn) {

       this.auth.login(state.url);

    }

 })

);


To get around the issue, I simple added another option. If the code is being run by Cypress, I check for the stored user credential and token. I even added a check that it's the right authenticated user, but that's really not needed.


    // @ts-ignore

    if (window.Cypress) {

      const auth0credentials = JSON.parse(localStorage.getItem("auth0Cypress")!);

      const user = auth0credentials.body.decodedToken.user;

      const access_token = auth0credentials.body.access_token;


      if(user.name === 'youtestuser@yourdomain.com' && access_token) {

        return true;

      } else {

        return this.auth.isAuthenticated$.pipe(

          tap(loggedIn => {

            if (!loggedIn) {

              } else {

                this.auth.login(state.url);

              }

            })

          );

      };

    } else {

      return this.auth.isAuthenticated$.pipe(

        tap(loggedIn => {

          if (!loggedIn) {

            this.auth.login(state.url);

          }

        })

      );

    }


Well, I think that's everything. I hope there is a better answer coming as this hack around the AuthGuard is not a prefect solution, but it does let me move forward and that's promising.


Wednesday, January 18, 2017

Building Video Games with My Daughter and LEGO

I asked my (then) 4-year-old daughter if she wanted to make a video game, and her response was exactly what I expected, "We can't make a game." "Actually, " I said, "we can! Want to do it?" She emphatically said yes, so we set out to make an iOS game. Of course, I had already done some playing around with Unity 3D, so I knew that a 2D game wouldn't be too much work.

I wanted her to have the best experience possible, so I devised a plan to take her ideas and convert them into the game without changing much along the way. I used a sample 2D game as a starting point so we wouldn't have to spend too much time writing code before she saw her creations in a working game. Note that if you don't deploy your app to the store, you can do all of this for free (plus the cost of LEGO of course).

We started by drawing out the main elements of the game by hand. Here are the villain and hero characters as my daughter drew them.


After that, it was off to the LEGO store so we could get enough 2x2 pieces to build whatever we wanted. Here's the villain LEGO version my daughter created from her original drawing.


We designed the rest of the game elements including a tree and an egg, and then I used photos of the LEGO concepts to convert her creations to simple sprite versions. Here's another character before reducing the pixels down to a simple sprite.


My daughter building LEGO versions of the game sprites.


This is a screenshot from the first build I deployed to my iPhone (just for fun, I threw in a photo of my daughter as the player). Not bad for a 4-year-old with some LEGO!


We had a great time on this project and I was prompted to write this post when she recently asked if we could play the game again.

Saturday, February 06, 2016

Google Drive API JavaScript App Running in App Engine

I worked through the JavaScript quickstart guide of the Google Drive V3 API and modified it slightly so I could host and run the whole thing in the Google App Engine . I suggest you work through the quickstart once (following all the steps) before you read on--unless you're already familiar with App Engine and the Google Cloud Console, it may be difficult to follow what needs to change. The quickstart is a simple one-page app that allows the user to authorize access to their Google Drive and then shows ten files and/or folders in that Drive.

Why would you want to do this? It's great to be able to create your app that uses the Google Apps APIs, but even better is to host that app within the Google App Engine so that you don't have to worry about maintaining any of the infrastructure that runs your app. You also get the benefit of sophisticated App Engine features such as performance scaling.


The steps in the Drive V3 quickstart (https://developers.google.com/drive/v3/web/quickstart/js) will get you most of the way, but with a few changes, you can serve the app from the Google App Engine, which is super powerful and a more modern mechanism for running a web application.

One thing you'll have to change is the URL that your client ID will accept. The quickstart expects you to host and run the app on your local machine, and therefore use http://localhost as the URL. You can enter that when you work through the tutorial, but you'll have to change the URL for "Authorized JavaScript origins" later to the URL for your particular app. However, you won't have that URL until you try running your app from the Google Cloud Shell.

Your client ID should look something like this (I've edited it so as not to disclose my client ID):
111111-gchjkdptqt15lp89s229jo8h25omel4e.apps.googleusercontent.com

Here are some notes to clarify how to get the quickstart running in Google App Engine from the Google Developer Console:

  • You'll likely want to create your own GitHub repo and clone it to your local machine.
  • When you get to the step in the tutorial, you can connect your app project to your new Git repo. You'll have to authorize Google App Engine to use your repo. By connecting the two, it is super easy to manage (and even edit) your code from within the Google Developer Console.
  • Create the sample file (with code provided) in the local repo and push it to master that is synching with GitHub.
  • Don't forget to change your client ID in the sample code: var CLIENT_ID = '';
  • Once you have everything ready. Make sure you have your new quickstart project selected and then open the developer cloud console. The console is a Linux based shell.
  • Change directory (CD) to the src directory for your quickstart project.

cawood@definite-destiny-999999:~$ cd src/definite-destiny-999999/master

  • Start a web server using Python to host your application: python -m SimpleHTTPServer 8080

cawood@definite-destiny-999999:~/src/definite-destiny-999999/master$ python -m SimpleHTTPServer 8080
Serving HTTP on 0.0.0.0 port 8080 ...10.240.0.145 - - [12/Jan/2016 00:11:56] "GET /?authuser=0/ HTTP/1.1" 200 -10.240.0.150 - - [12/Jan/2016 00:11:58] "GET /quickstart.html HTTP/1.1" 200 -

  • Open the Web preview from the console window in port 8080. When you navigate to the quickstart.html file, you will get the URL you need to add to your client ID credentials. The Web preview option is in the top-left corner of the cloud console. 
  • Find your client ID in the credentials section of the dev console and edit it to add the URL you just opened in web preview. (To stop the app (quit the web server), press Ctrl+C.)

That's it! You should now have the quickstart running in Google App Engine! Sweet.


Note: I do not cover deploying your app for production use. Perhaps that can be a future post.

Note: If you've made a change and pushed it from your local machine, but the file isn't updating, try closing and reopening the console. I've found that it doesn't pick up changes to the files unless I do this.

I've made the project public on GitHub: https://github.com/stephencawood/WebHelpEditor/tree/master/WebHelpEditor

Wednesday, December 18, 2013

Installing Ruby on Rails in Ubuntu 12.04 on Azure

In previous posts, I covered installing Ubuntu on Windows Azure, remotely accessing Linux from Windows Azure, installing LAMP and installing Git on Linux and a few other topics. The next subject I’ll be writing about is the Ruby on Rails web development platform.

There are some great resources out there for learning Ruby and Rails, and when the install goes smoothly, it’s very easy. I’m not an expert on Ruby, but the install didn’t go swimmingly for me, so I’m writing this post.

Step 1 – Install RVM and Ruby

\curl -L https://get.rvm.io | bash -s stable --ruby

Ruby Version Manager (RVM) is a great tool for working with Ruby. You can even run multiple versions of Ruby and easily switch back and forth.

image

Step 2 – Install Rails

Finally, you can use RubyGems to install rails:

gem install rails (may need sudo, I had to run it with both, see note below)

Note: if you see the error, ERROR:  Error installing rails: activesupport requires Ruby version >= 1.9.3.”, (or some other version) install Ruby 1.9.3 (Yes, even if you have a newer version installed) then use RVM to set the old version as the default using: rvm use ruby-1.9.3. This caused me much angst today. You can use ruby –v to see which version you’re running and rvm list to see the installed versions.

I also ran into this ugly error:

cawood@cawood:~$ rails --version
/usr/lib/ruby/1.9.1/rubygems/dependency.rb:247:in `to_specs': Could not find railties (>= 0) amongst [activesupport-4.0.2, atomic-1.1.14, bigdecimal-1.1.0, bundler-1.3.5, bundler-unload-1.0.2, executable-hooks-1.2.6, gem-wrappers-0.9.2, i18n-0.6.9, io-console-0.3, json-1.5.5, minitest-4.7.5, minitest-2.5.1, multi_json-1.8.2, rake-0.9.2.2, rdoc-3.9.5, rubygems-bundler-1.4.2, rvm-1.11.3.8, thread_safe-0.1.3, tzinfo-0.3.38] (Gem::LoadError)
        from /usr/lib/ruby/1.9.1/rubygems/dependency.rb:256:in `to_spec'
        from /usr/lib/ruby/1.9.1/rubygems.rb:1210:in `gem'
        from /usr/local/bin/rails:18:in `<main>'

I had to run gem install rails (with no sudo) to get all the gems to install properly. After I did that, I could see that Rails was installed properly:

cawood@cawood:~$ rails --version
Rails 4.0.2

Of course, my list of installed gems was much longer because the missing gems had been installed. It should look like this:

cawood@cawood:~$ gem list

*** LOCAL GEMS ***

actionmailer (4.0.2)
actionpack (4.0.2)
activemodel (4.0.2)
activerecord (4.0.2)
activerecord-deprecated_finders (1.0.3)
activesupport (4.0.2)
arel (4.0.1)
atomic (1.1.14)
bigdecimal (1.1.0)
builder (3.1.4)
bundler (1.3.5)
bundler-unload (1.0.2)
erubis (2.7.0)
executable-hooks (1.2.6)
gem-wrappers (0.9.2)
hike (1.2.3)
i18n (0.6.9)
io-console (0.3)
json (1.5.5)
mail (2.5.4)
mime-types (1.25.1)
minitest (4.7.5, 2.5.1)
multi_json (1.8.2)
polyglot (0.3.3)
rack (1.5.2)
rack-test (0.6.2)
rails (4.0.2)
railties (4.0.2)
rake (0.9.2.2)
rdoc (3.9.5)
rubygems-bundler (1.4.2)
rvm (1.11.3.8)
sprockets (2.10.1)
sprockets-rails (2.0.1)
thor (0.18.1)
thread_safe (0.1.3)
tilt (1.4.1)
treetop (1.4.15)
tzinfo (0.3.38)

Alternate Method—This didn’t work for me on Ubuntu 12.04

Step 1 – Install Ruby

You can either install the standard version: sudo apt-get install ruby-full build-essential
or the minimal requirements with: sudo aptitude install ruby build-essential libopenssl-ruby ruby1.8-dev (note the version number – you’ll have to update that).

I’m going with the first option to install ruby-full.

image

Step 2 – Install the Ruby Version Manager

CAUTION: Normally you would just run: sudo apt-get install ruby-rvm

However, there is an issue with the Ubuntu RVM package, so you should run this instead: \curl -L https://get.rvm.io | bash -s stable --ruby --autolibs=enable --auto-dotfiles

If you do run into issues with RVM. For example, using rvm use doesn’t change to the version you want, you can run these commands to clean your system (see this thread).

sudo apt-get --purge remove ruby-rvm
sudo rm -rf /usr/share/ruby-rvm /etc/rvmrc /etc/profile.d/rvm.sh


Then, open new terminal and validate environment is clean from old RVM settings (should be no output):


env | grep rvm


Step 3 – Check that You’re Using the Latest Version of Ruby


ruby –v will show you which version you’re using.


If you’re not using the one you want, you can use RVM to upgrade. This will download the source that is then used by RVM in the next step to compile and install Ruby; it is not a quick command.


sudo rvm install ruby-1.9.3-p125


or


sudo rvm install ruby-1.9.3 (Note version number)


However, if you do the second option, you may need to workaround an issue before updating. If you try to install ruby-1.9.3, you might get the error: “ERROR: The requested url does not exist: 'ftp://ftp.ruby-lang.org/pub/ruby/1.9/ruby-1.9.3-.tar.bz2' from RVM. You can workaround this by downloading the package yourself.”


sudo curl -o /usr/share/ruby-rvm/archives/ruby-1.9.3-.tar.bz2 \http://ftp.ruby-lang.org/pub/ruby/1.9/ruby-1.9.3-p0.tar.bz2


Check that you’re using the latest Ruby: ruby -v

If not, switch to the latest using RVM: rvm use 1.9.3


Step 4 – Install Rails


Finally, you can use RubyGems to install rails:


sudo gem install rails


Step 5 – Install a Web Server


I use Apache and MySQL, so the LAMP install works for me, but there are other options such as WEBrick or Lighttpd.


Other posts on this topic:


RubyOnRails.org getting started


Ubuntu documentation – Ruby on Rails


Sunday, December 01, 2013

Using jsTree with ASP.NET MVC

When I wanted to use a pure JavaScript treeview control for a recent ASP.NET MVC5 project, I looked around and found jsTree; it’s a popular and rich solution, so I decided to try it. I ran into a few customization hurdles, so here are my lessons learned.

Note that this is for jsTree 1.0; at the time of writing, 3.0 has not been released.

Step 1: The HTML in the view. Pretty simple…

<div id="FileTree"></div>


Step 2: Loading the tree dynamically from the MVC controller using jQuery.

<script type="text/javascript"> 
// Begin JSTree: courtesy Ivan Bozhanov: http://www.jstree.com:

$('#FileTree').jstree({
"json_data": {
"ajax": {
"url": "/Home/GetTreeData",
"type": "POST",
"dataType": "json",
"contentType": "application/json charset=utf-8"
}
},
"themes": {
"theme": "default",
"dots": false,
"icons": true,
"url": "/jstree/themes/default/style.css"
},

"contextmenu": {
"items": {
"create": false,
"rename": false,
"remove": false,
"ccp": false,
}
},

"plugins": ["themes", "json_data", "dnd", "contextmenu", "ui", "crrm"]
})

</script>


Step 3: Server-side code to populate the tree. This code is based on desalbres’s Simple FileManager with jsTree. (The model code is below.)

// Begin JSTree (Controller code courtesy desalbres: http://www.codeproject.com/Articles/176166/Simple-FileManager-width-MVC-3-and-jsTree)
[HttpPost]
public ActionResult GetTreeData()
{
if (AlreadyPopulated == false)
{
JsTreeModel rootNode = new JsTreeModel();
rootNode.attr = new JsTreeAttribute();
rootNode.data = "Root";
string rootPath = Request.MapPath(dataPath);
rootNode.attr.id = rootPath;
PopulateTree(rootPath, rootNode);
AlreadyPopulated = true;
return Json(rootNode);
}
else
{
return null;
}
}

/// <summary>
/// Populate a TreeView with directories, subdirectories, and files
/// </summary>
/// <param name="dir">The path of the directory</param>
/// <param name="node">The "master" node, to populate</param>
public void PopulateTree(string dir, JsTreeModel node)
{
if (node.children == null)
{
node.children = new List<JsTreeModel>();
}
// get the information of the directory
DirectoryInfo directory = new DirectoryInfo(dir);
// loop through each subdirectory
foreach (DirectoryInfo d in directory.GetDirectories())
{
// create a new node
JsTreeModel t = new JsTreeModel();
t.attr = new JsTreeAttribute();
t.attr.id = d.FullName;
t.data = d.Name.ToString();
// populate the new node recursively
PopulateTree(d.FullName, t);
node.children.Add(t); // add the node to the "master" node
}
// loop through each file in the directory, and add these as nodes
foreach (FileInfo f in directory.GetFiles("*.htm"))
{
// create a new node
JsTreeModel t = new JsTreeModel();
t.attr = new JsTreeAttribute();
t.attr.id = f.FullName;
t.data = f.Name.ToString();
// add it to the "master"
node.children.Add(t);
}
}

// Don't load the jsTree treeview again if it has already been populated.
// Note: this causes a bug where the tree won't repaint on browser refresh
public bool AlreadyPopulated
{
get
{
return (Session["AlreadyPopulated"] == null ? false : (bool)Session["AlreadyPopulated"]);
}
set
{
Session["AlreadyPopulated"] = (bool)value;
}

}
// End JSTree

First I had to resolve the issue that a browser refresh would repaint the whole treeview. It’s possible that I simply missed this when I cherry picked code from the FileManager codeproject example.


public ActionResult Test(string returnUrl)
{
ViewBag.ReturnUrl = returnUrl;
Session["AlreadyPopulated"] = false;
return View();
}

Next, I had to customize jsTree the way I wanted it to behave. Getting the tree to start collapsed (closed) instead of expanded (open) was the first order of business. The jsTree API took care of the problem.


$('#FileTree').bind("loaded.jstree", function (event, data) { 
$(this).jstree("close_all");
})


Next, I wanted the leaf nodes to use a different background image than the folder nodes. This required changing the server-side code to actually write the leaves (files) as leaf nodes and then add the right CSS to style the jstree-leaf class.


namespace FileEditor.Models 
{
public class JsTreeModel
{
public string data;
public JsTreeAttribute attr;
// this was "open" but changing it to “leaf” adds “jstree-leaf” to the class
public string state = "leaf";
public List<JsTreeModel> children;
}

public class JsTreeAttribute
{
public string id;
}
}


And then styling the leaf nodes with a different background image than the folders.


<style type="text/css"> 
#FileTree .jstree-leaf > a > ins {
background: url("/jstree/themes/default/d.gif");
background-position: -2px -19px !important;
}
</style>


Finally, I wanted to disable the right-click context menu options since I’m not using them. (This code appears in the code above.)

"contextmenu": {
"items": {
"create": false,
"rename": false,
"remove": false,
"ccp": false,
}
},

That’s it. jsTree is not working the way I want. I expect that version 3 will be great when it is released.

Other posts on this topic:
jsTree – Few examples with ASP.Net/C#
Simple FileManager width MVC 3 and jsTree

Wednesday, November 27, 2013

Continuous Deployment to Azure Web Sites via Visual Studio 2013 and VS Online

In principle, I appreciate the value of test-driven development (TDD) and continuous integration (CI) builds; I just didn’t think they would be entirely practical for my solo, side projects. Well, I don’t have any excuses anymore, I’ve been working on a quick project and in just a few hours, I had an AngularJS single page application (SPA) remotely building and deploying to an Azure web site. All for free. Every time I check-in a change, the source is copied to the cloud, my test runs and it triggers a CI build remotely and then is deployed automatically to the host server. Pretty slick.

image

One change was that testing web applications has come along from the dark days of having to wrangle with the HTTP context. Maybe the situation isn’t totally resolved, but it’s easier these days to write tests because the HTTP context isn’t so much of a stumbling block in newer frameworks.

I only ran into two issues setting everything up, and one was pretty much my fault. First, I created an ASP.NET MVC project using Visual Studio 2013 and added it to Visual Studio Online (which supports both Git and Team Foundation Services [TFS] online). As I wrote in a previous post, you can get free private Git repositories via Visual Studio Online.  I also created an Azure website and linked it to the project. I created a CI build profile and the build triggered correctly on check-in. No problems, no errors. However, the project was not being deployed. The issue was simple, I chose the wrong deployment template. I should have been using the AzureContinuousDeployment.11.xaml template.

The other issue was that the Visual Studio Online build machine wasn’t in sync with the NuGet updates, I had installed on my local box. To resolve these issues with package management, I Enabled NuGet Package Restore feature and then check-in the entire “packages” directory to resolve missing DLL errors.

To get this working for your project, you can start by reading the MSDN article about a continuous deployment setup.

BTW - If you don’t check in the package files, you’ll get error such as these (and more) because the remote build machine won’t be able to find the DLLs. To help with search, I'll paste in a bunch of the errors here.

Models\AccountModels.cs (11): The type or namespace name 'DbContext' could not be found (are you missing a using directive or an assembly reference?)App_Start\WebApiConfig.cs (5): The type or namespace name 'Newtonsoft' could not be found Controllers\AccountController.cs (7): The type or namespace name 'DotNetOpenAuth' could not be found Controllers\TodoController.cs (3): The type or namespace name 'Infrastructure' does not exist in the namespace 'System.Data.Entity' Controllers\TodoListController.cs (4): The type or namespace nam 'Infrastructure' does not exist in the namespace 'System.Data.Entity' Filters\InitializeSimpleMembershipAttribute.cs (3): The type or namespace name 'Infrastructure' does not exist in the namespace 'System.Data.Entity' Areas\HelpPage\SampleGeneration\HelpPageSampleGenerator.cs (14): The type or namespace name 'Newtonsoft' could not be found (are you missing a using directive or an assembly reference?) Models\TodoListDto.cs (6): The type or namespace name 'Newtonsof' could not be found Models\TodoList.cs (6): The type or namespace name 'Newtonsoft' could not be found Models\TodoItemContext.cs (16): The type or namespace name 'DbContext' could not be found Models\AccountModels.cs (18): The type or namespace name 'DbSet' could not be found Models\TodoItemContext.cs (23): The type or namespace name 'DbSet' could not be found C:\Windows\Microsoft.NET\Framework64\v4.0.30319\Microsoft.Common.targets (1605): Could not resolve this reference. Could not locate the assembly "EntityFramework". Check to make sure the assembly exists on disk. If this reference is required by your code, you may get compilation errors.C:\Windows\Microsoft.NET\Framework64\v4.0.30319\Microsoft.Common.targets (1605): Could not resolve this reference. Could not locate the assembly "DotNetOpenAuth.OAuth". Check to make sure the assembly exists on disk. If this reference is required by your code, you may get compilation errors.

C:\Windows\Microsoft.NET\Framework64\v4.0.30319\Microsoft.Common.targets (1605): Could not resolve this reference. Could not locate the assembly "DotNetOpenAuth.OAuth.Consumer".
C:\Windows\Microsoft.NET\Framework64\v4.0.30319\Microsoft.Common.targets (1605): Could not resolve this reference. Could not locate the assembly "DotNetOpenAuth.OpenId". C:\Windows\Microsoft.NET\Framework64\v4.0.30319\Microsoft.Common.targets (1605): Could not resolve this reference. Could not locate the assembly "DotNetOpenAuth.OpenId.RelyingParty". Check to make sure the assembly exists on disk. If this reference is required by your code, you may get compilation errors. C:\Windows\Microsoft.NET\Framework64\v4.0.30319\Microsoft.Common.targets (1605): Could not resolve this reference. Could not locate the assembly "DotNetOpenAuth.Core".
C:\Windows\Microsoft.NET\Framework64\v4.0.30319\Microsoft.Common.targets (1605): Could not resolve this reference. Could not locate the assembly "EntityFramework.SqlServer". C:\Windows\Microsoft.NET\Framework64\v4.0.30319\Microsoft.Common.targets (1605): Could not resolve this reference. Could not locate the assembly "Newtonsoft.Json". C:\Windows\Microsoft.NET\Framework64\v4.0.30319\Microsoft.Common.targets (1605): Could not resolve this reference. Could not locate the assembly "System.Web.Http.OData". C:\Windows\Microsoft.NET\Framework64\v4.0.30319\Microsoft.Common.targets (1605): Found conflicts between different versions of the same dependent assembly.

Wednesday, October 30, 2013

I Miss Compiled Server-side Code

Clearly, we should accept the things we cannot change, but sometimes it's fun to rant for the sake of ranting. This week I was working on a web application using AngularJS/AJAX and it reminded me that I really miss relying on server-side code. I know it's not in vogue, but I'll say it... I liked web development before JavaScript took over as such a heavy part of the code base. Writing this post, I do feel a bit like an old man talking about the "good 'ol days," but I also feel strongly that there must be developers out there suffering under the new fashion of client-side code. (And don't even get me started on running 'scripting' languages server-side. :)

I get the 'why'--I really do. I understand that the IT world is moving to the cloud and web applications heavily lean on script-based client-side frameworks to allow for a powerful user experience across platforms including mobile devices such as phones and tablets. (I also get that the V8 JavaScript VM used in Chrome doesn't include an interpreter--that's just splitting hairs.) Yes, I understand all that and it's great.

The problem is the dev experience. I've been using Sublime and I tried out the web tools in Visual Studio 2013 and they have made some progress to better support JavaScript and client-side frameworks, but the experience is just not as good as the good 'ol days of writing compiled server controls. Client-side code is more fragile because the compiler often won't help you find all sorts of errors. Writing "myvariable" instead of "myVariable" can break your whole application and you likely won't know it until you try to run that piece of code. When debugging issues, there are cases where it's necessary to pull out a tool such as Fiddler which allows you to manually inspect the communication between the client and server. I'm not knocking Fiddler, it's a fantastic asset, but seriously, manually reading JSON to figure out why it's malformed? (Not that I would ever do that.) We may as well be back in the 90s writing VBScript.

To be clear, I'm not some sort of code snob. Code is code and devs should be judged on code quality, not what the language they happen to be using. So I'm not saying that Java, C# or Go is in some way better than JavaScript; that's not my point at all. I'm simply saying that my experience writing code was more enjoyable when I could rely on some well refined tools to improve my productivity.

What's the solution to all this? We clearly need dev tools good enough that the difference between server-side and client-side code is irrelevant. In my mind, the various JavaScript frameworks have improved the situation, but there's lots of room for improvement. Client-side code (or server-side scripts such as Node.js) will be around for a long time and it should be treated as first class.

Friday, September 13, 2013

Scripting Regular Expressions Find/Replace in Sublime Text

Just like everyone in the software industry, I’ve used many, many different text editors over the years.  vi, Emacs, Notepad, Notepad++, TextPad, nano, gedit… to name a few. But, of course, there is a ridiculously long list of text editors and I haven’t tried that many of them. The one that I’ve been working in for most of this year is Sublime Text. Sublime’s tag line is “Sublime Text: The text editor you’ll fall in love with.” I may not be in love yet, but I’m definitely checking it out a lot.

In addition to having excellent functionality built-in, Sublime also supports a plug-in model. There is the GoSublime plug-in for golang code and there’s the RegReplace plug-in that allows one to write find/replace commands using regular expressions and save them in script as Command Palette commands.

To install RegReplace on Windows:

Step 1: Install Package Control for Sublime Text

As you can see in the installation instructions for Package Control  for Sublime Text, all you have to do is open a Sublime Text console (Ctrl+`) and paste in the install code.

Step 2: Install RegReplace for Sublime Text

image

Option 1: After installing package manager, download RegReplace, unzip it and paste the unzipped folder into your Packages folder (e.g., C:\…\Sublime Text 3\Packages). Next, go to Preferences > Package Control and choose “Package Control: Install Package.” Then choose the package you want to install from the list.

Option 2: This requires you have Git. Open a command prompt. CD to your Sublime Text 3 packages directory, then enter the following command:

git clone -b ST3 https://github.com/facelessuser/RegReplace.git RegReplace

Step 3: Add a Default.sublime-commands file -- with your command added

I had to manually create the folder: C:\Users\username\AppData\Roaming\Sublime Text 3\Packages\RegReplace

Once you have the file, you can add your own custom commands. (Remember to add a comma to the command above.)

   // Test RegReplace
     {
         "caption": "Reg Replace: Test",
         "command": "reg_replace",
         "args": {"replacements": ["test_reg_replace"]}
     },

Step 4: Add your custom command to the Command Palette

To do this, choose Tools > Command Palette > Then type “setting” and you’ll see “Preferences: Reg Replace Settings – User.” Choose this option and paste the example one that comes with RegReplace into the new file that’s created.

This will create the file: /C/Users/username/AppData/Roaming/Sublime Text 3/Packages/RegReplace/reg_replace.sublime-settings

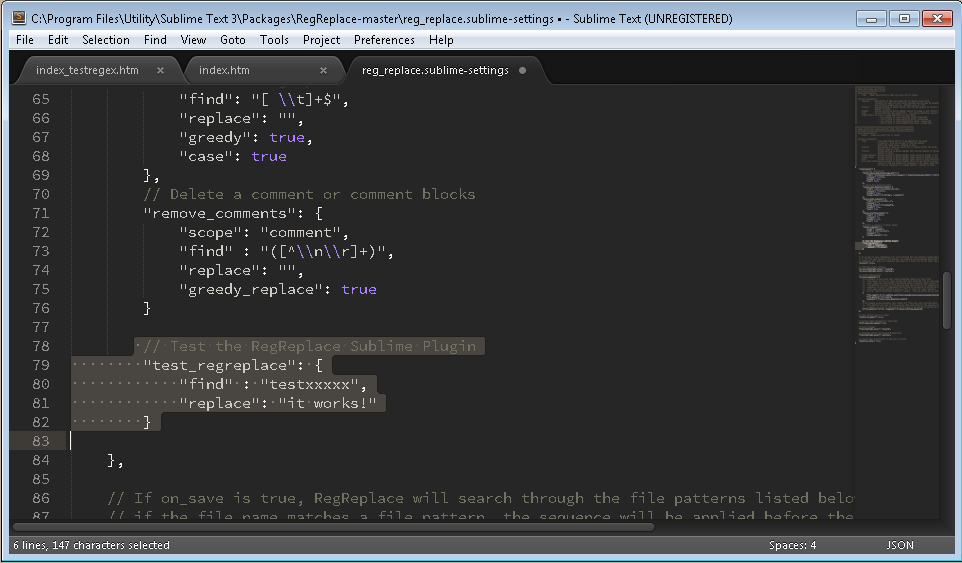
After the file is created, add a new command to reg_replace.sublime.settings. For example:

// Test the RegReplace Sublime Plugin
    "test_reg_replace": {
    "find" : "testxxxxx",
    "replace": "it works!"
   }

image

Step 5: Try it out!

Once you have everything set up, you can use the Command Palette to run your new custom find/replace regular expressions scripts.

image

Note: After installing RegReplace, I received the an error when trying to add my test code to reg_replace.sublime.settings. The error was something like “Cannot save. Can’t create .tmp file in RegReplace folder.” To work around the issue, I opened the security settings for the folder and added write permissions for all users. A bit overkill, but in my case, it’s a secure machine.

Thursday, June 27, 2013

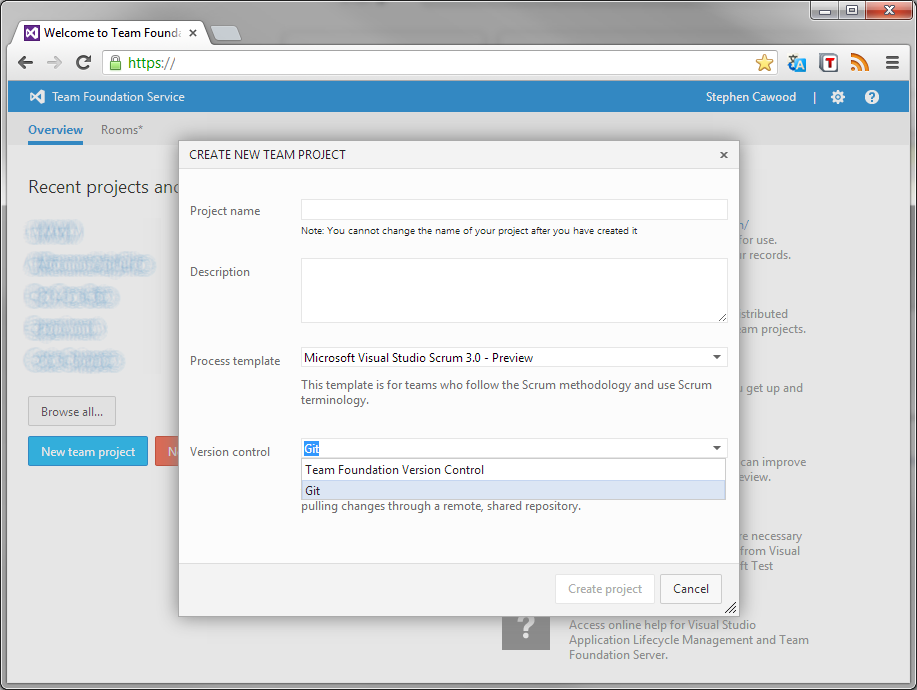
Free Private Git Repository Using TFS Online Git Integration

If you’re looking for a way to have a free private (and hosted) Git repository, Team Foundation Services Online is a great way to go. Last time I checked, GitHub was charging for private repositories.

www.geeklit.com TFS Online Git Integration

You can use Visual Studio if you want, but you can treat your Git repository just like any other, so you don’t have to use VS.

image

Read the detailed instructions for creating a new Git project in TFS online and Getting Started with Git in Visual Studio and Team Foundation Service for more info.

BTW – TFS online also has some really cool project management features (e.g., Kanban board), so it’s not just source control.

Wednesday, February 27, 2013

Running Mono 3.0.5 Beta on Windows

Mono is a really cool concept. It’s a C# compiler/framework that works cross-platform. C# is fantastic, so I really like the idea of being able to develop C# (potentially with Visual Studio) and target any device. Until Mono came along, C# was only used on Windows because it uses the Microsoft .NET framework. (Mono also boasts the MonoGame platform and the MonoDevelop IDE for Linux coding.)

image

Here is the introduction from the Mono Wikipedia page:

Mono is a free and open source project led by Xamarin (formerly by Novell and originally by Ximian) to create an Ecma standard compliant .NET Framework-compatible set of tools including, among others, a C# compiler and a Common Language Runtime.

The stated purpose of Mono is not only to be able to run Microsoft .NET applications cross-platform, but also to bring better development tools to Linux developers.[3] Mono can be run on many software systems including Android (and most other Linux distributions), BSD, iOS, OS X,Windows, Solaris, and some for game consoles such as PlayStation 3, Wii, and Xbox 360.”

So I downloaded Mono to try it out on Windows (I’ll try Ubuntu next) and I ran into an issue right away. Just trying to validate the install using the “Hello World” example on the Mono Basics page didn’t work. It’s really not that complicated, here’s the example program:

using System;
 
public class HelloWorld
{
    static public void Main ()
    {
        Console.WriteLine ("Hello Mono World");
    }
 
}

However, I couldn’t get it to work using the gmcs compiler that’s used in the example. The result was this all too common error:

C:\Mono\Mono-3.0.5>gmcs
'gmcs' is not recognized as an internal or external command, operable program or batch file.

image
This error will occur on Windows when the program actually doesn’t exist, or it can’t be discovered from the location that the console is running. There are two way to fix this issue for any Windows program:

1. Use the full path to the program and use quotes if the path has spaces in it

2. Add the path for the program to the Windows Environment Variable called “Path.”

So I tried to find the executable for gmcs, but I could not even find gmcs.bat or gmcs.exe. In this case, it wasn’t an issue with Windows or Mono, it was simply out of date documentation on the Mono site.

I received this helpful advice from the Mono user community forum, “Have you tried "mcs -sdk:2"? Mono 2.11 merged all the compilers into the one unified compiler, and now gmcs is a shell script that simply calls mcs (at least on Linux).” Ah, that’s good to know!

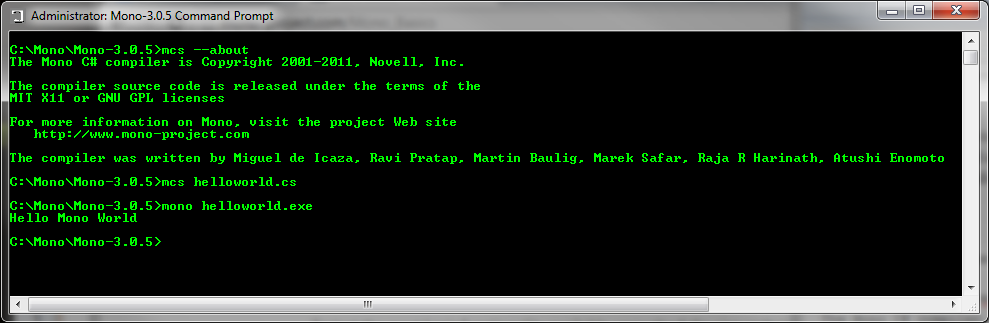
Here is the working version of the “basics” test code:

C:\Windows\System32>mcs --about
The Mono C# compiler is Copyright 2001-2011, Novell, Inc.
The compiler source code is released under the terms of the
MIT X11 or GNU GPL licenses
For more information on Mono, visit the project Web site
  
http://www.mono-project.com
The
compiler was written by Miguel de Icaza, Ravi Pratap, Martin Baulig, Marek Safar, Raja R Harinath, Atushi Enomoto

C:\Windows\System32>cd C:\Mono\Mono-3.0.5

C:\Mono\Mono-3.0.5>mcs helloworld.cs

C:\Mono\Mono-3.0.5>mono helloworld.exe
Hello Mono World

image

Success!

Wednesday, January 09, 2013

SPC12: Developing apps for SharePoint 2013 with Visual Studio 2012

Speakers: Mike Morton, Sean Laberee

This session was an introduction to the new App model for SharePoint and Office. The room accommodated about 3500 people and it was packed.

  • loud cheers from the large crowd for new app dev model experience (e.g., just save and refresh instead of redeploying)
  • the new app model uses 'modern' web dev techniques such as JQuery and knockout.js
  • funny moment: during a demo, a presenter forget to close a quote and many people yelled out from the audience
  • creating web parts is even easier than 2010 visual web parts. (inc. client web parts for office 365)
  • cool that you can 'appetize' existing web apps
  • apps have events
  • use OAuth for security
  • apps can be MVC not just web forms
  • really cool that you can locally debug using a local DB and then deploy to Azure an it will automatically provision SQL Azure DB for you. This uses dacpac under the hood
  • debug uses iisexpress and no app registration is required
  • apps for Office can be packaged somehow to be apps for SharePoint—details pending

Tuesday, October 23, 2012

SharePoint Web Services are Deprecated

After telling everyone who would listen (for years) that they should switch to the SharePoint Client-side Object Model (CSOM), there is finally a clear statement for us to use as evidence.

Buried deep in the article, Choose the right API set in SharePoint 2013, you’ll find this text:

“Two API sets are still supported in the SharePoint 2013 Preview framework for backward compatibility, but we recommend that you not use them for new projects: the ASP.NET (asmx) web services, and direct Remote Procedure Calls (RPC) calls to the owssvr.dll file.”

RPC calls are also deprecated, but few were using those, it’s really the native web services that need to be retired. They served a purpose, but they were never complete and they are now based on what could be called ‘old’ technology.

Sure, the CSOM API isn’t complete either, but hopefully the missing power will come eventually. The features that were added in SharePoint 2013 seem to have all gotten appropriate attention in the CSOM API.

Friday, June 29, 2012

ASP.NET Html.ActionLink Multiple Parameters Not Working

I ran into this issue in ASP.NET MVC 3 (Razor), I believe this ActionLink call should work fine, but it does not. It returns an error because the routeValues aren’t being passed properly. With only one parameter, the issue didn’t occur.

@Html.ActionLink("Delete", "DeleteSomething", "Profile", new { id = ID, something = @item.Name })

The error message: “The parameters dictionary contains a null entry for parameter 'id' of non-nullable type 'System.Int32' for method 'System.Web.Mvc.ActionResult OrderDevice(Int32)' in 'MvcKVteam.Controllers.ImportXMLController'. An optional parameter must be a reference type, a nullable type, or be declared as an optional parameter.”

The solution was to add “null” for the final variable HtmlAttributes.

@Html.ActionLink("Delete", "DeleteSomething", "Profile", new { id = ID, something = @item.Name }, null)

Whether it’s a bug or by design, it sure isn’t intuitive.

Wednesday, April 25, 2012

Twitter Bootstrap, Less and PHP Setup on IIS 7.5 and Windows 7

It’s certainly not news to me that setting up any technology on Windows that’s typically associated with the LAMP stack can be a bit tricky. Today, I found myself wanting to run a Twitter Bootstrap site that was built in PHP. I use Windows 7 and IIS 7.5 on my laptop, so I had to get through a few minor setup considerations. Here are some of them—hopefully, this will help others get going quickly.

Essentially, you need to download PHP (http://windows.php.net/download or http://php.iis.net/), configure it to work with IIS. Download Twitter bootstrap, configure it to work with IIS… etc. etc. etc. Here are some quick tips for getting going. The PHP.net article on Enabling FastCGI support in IIS was helpful. There are some steps that are optional, so you might want to first check whether the handler mapping is already in IIS, but for the most part, it’s a useful page to follow. For example, installing the CGI component for IIS is required. Without that feature, you won’t be able to run any PHP code in IIS.

If you want to use the short form of the PHP server-side tag (“<? … ?>” instead of “<?php … ?>” ), you’ll need to turn the option on in your php.ini configuration file. Since this file is typically being used, you can’t just open it and save change. The easiest way to edit it is to search for the php.ini file, copy it to some other location, then open the file and search for the “short_open_tag =” line. Change it to On to use the short form and then copy the PHP.ini file back to it’s original location and restart IIS.

; This directive determines whether or not PHP will recognize code between
; <? and ?> tags as PHP source which should be processed as such. It's been
; recommended for several years that you not use the short tag "short cut" and
; instead to use the full <?php and ?> tag combination. With the wide spread use
; of XML and use of these tags by other languages, the server can become easily
; confused and end up parsing the wrong code in the wrong context. But because
; this short cut has been a feature for such a long time, it's currently still
; supported for backwards compatibility, but we recommend you don't use them.
; Default Value: On
; Development Value: Off
; Production Value: Off
;
http://php.net/short-open-tag
short_open_tag = On

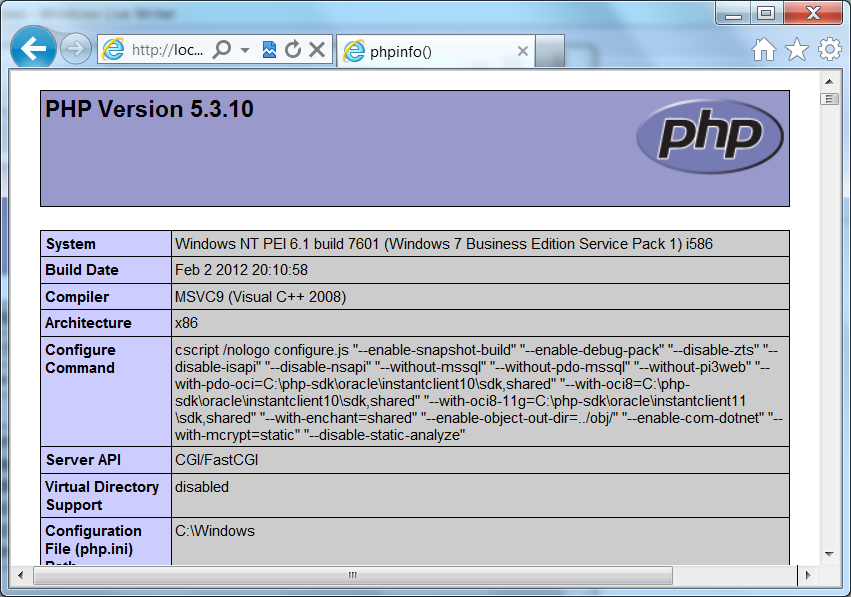
To test whether PHP is working, you can run <?php phpinfo() ?> or <? phpinfo() ?> in a .php file under wwwroot. Call it whatever you want .php. Then open the page (e.g., http://localhost/phpinfo.php) and see what’s displayed. If everything is working, you’ll see a page that shows verbose information about your environment (see screen below). If you try to run the command with the short form notation, and you haven’t enabled that option, the page will be completely blank.

image
- PHPINFO() shown in Internet Explorer

If you have any issues getting Less or Bootstrap files to load, open up your site in Chrome or IE and use the developer tools to inspect what’s going on with the scripts.

image
- Chrome developer tools showing Resources (scripts)

For example, I had to add an IIS mime type for “.less” files to get Less to work on my machine (IIS 7.5). Without setting the mime type, I was getting a 404.3 error for the file bootstrap.less. This isn’t difficult to do, just open Internet Information Services (IIS) Manager and find the “Mime Types” feature under “HTTP Features.” Make sure you’ve selected the website in the left panel before you look for this option on the right side. I just add a new mime type for .less files and set it to “text/plain” and everything worked.

image

Monday, March 26, 2012

ASP.NET MVC 3: A default document is not configured

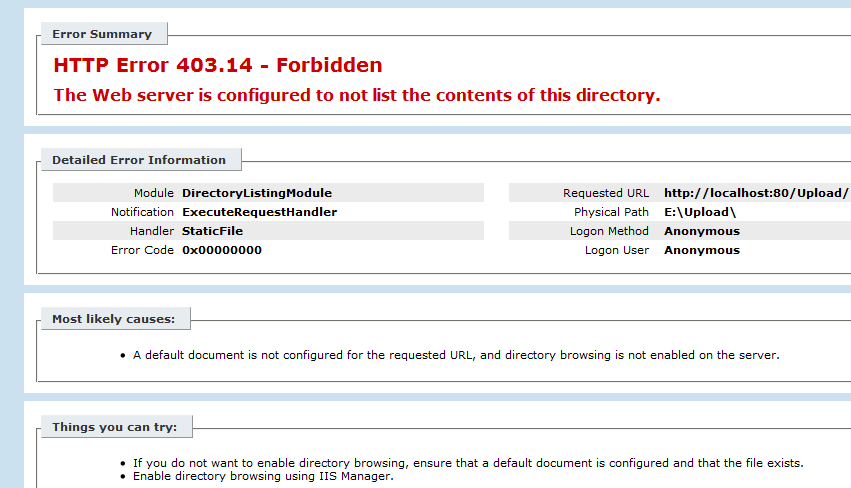
I ran into a strange issue and so many different solutions have been posted online that I thought I’d add what worked for my scenario. I have an ASP.NET MVC 3 “Razor” web application which I ran successfully on W2K8 R2 and when I tried to open it on Windows 7  (IIS 7.5), it wouldn’t run. The error message was “HTTP Error 403.14 – Forbidden. A default document is not configured for the requested URL.” I know that I don’t need to set a default document, so what is wrong?

image

There are an awful lot of posts about this error, but the key here is that this solution worked fine on one machine and wouldn’t run on another. I found the solution that worked for me on StackOverflow.com. It was the suggestion from Dommer that helped with my issue. (Note that there is a 32bit version of the same fix.)

“did you try running the aspnet_regiis -i command in the Visual Studio 64 bit command prompt (with admin privileges)? When I did that it fixed it for the 64-bit mode. To clarify, I right clicked on Visual Studio x64 Win64 Command Prompt (2010) and chose Run as Administrator. Then I went here: C:\Windows\Microsoft.NET\Framework64\v4.0.30319
And did this: aspnet_regiis –i And now it works perfectly.”

image

Yes, yes it does. Thanks!