Monday, August 30, 2010

SharePoint Web Part Property Default Value

I’ve been working on the final touches of my SharePoint 2010 taxonomy ‘Game of Life’ web part. I showed this web part during my SharePoint Enterprise Metadata Management (EMM or taxonomy) talk at SharePoint Saturday in New York earlier this year.

One of the final changes is taking the settings out of the ASPX page (and also removing the hard-coded ones), and moving them into the web part properties pane. This isn’t difficult to do, but I ran into a minor snag when I tried to set the default value of the properties. For example, most people playing with this control will be using the default term store name, so I may as well have that name, "Managed Metadata Service", already in the property box.

You can see these properties working in the image below (bottom, right).

WebPartProperties

At first, I thought the format was pretty obvious. I specified the default value like this: [DefaultValue("Managed Metadata Service")]. However, that didn’t work—the default property value was blank. I also tried adding a const string variable and using that to set the value: private const string m_TermStoreDefault = "Managed Metadata Service"; and then [DefaultValue(c_TermStoreDefault)]. But that didn’t work either—I still had an empty default value.

The solution was to set the member variable for the property to the default value. So instead of private string m_termStoreName; I used private string m_termStoreName = "Managed Metadata Service";. This sets the member variable that’s used for the property get method to the default value I want.

Note that if you don’t specify where you want your custom properties stored (see “XmlRoot(Namespace” below), you will see an error when you try to edit a property. Something like “Cannot save the property settings for this Web Part.”

For clarity, here’s what the file looks like (I’ve cut out some stuff that isn’t useful to this post) :

using System;
using System.ComponentModel;
using System.Web;
using System.Web.UI;
using System.Web.UI.WebControls;
//using System.Web.UI.WebControls.WebParts;
using Microsoft.SharePoint;
using Microsoft.SharePoint.WebControls;

//Added references
using Microsoft.SharePoint.WebPartPages;
using System.Xml.Serialization;

namespace GameOfLifeWebPartProject.GameOfLifeWebPart
{
    [ToolboxItemAttribute(false)]
    [DefaultProperty("Text"), ToolboxData("<{0}:GameOfLifeWebPart  runat=server></{0}:GameOfLifeWebPart>"), XmlRoot(Namespace = "GameOfLifeWebPart")]
   
public class GameOfLifeWebPart : WebPart
    {
        // Visual Studio might automatically update this path when you change the Visual Web Part project item.
        private const string _ascxPath = @"~/_CONTROLTEMPLATES/GameOfLifeWebPartProject/GameOfLifeWebPart/GameOfLifeWebPartUserControl.ascx";

        protected override void CreateChildControls()
        {
            Control control = Page.LoadControl(_ascxPath);
            Controls.Add(control);
        }

        // Set the default value
       private string m_termStoreName = "Managed Metadata Service";
        // Create a custom category in the property sheet
        [Category("Game of Life Settings")]
        // Property is available in both Personalization and Customization mode
        [WebPartStorage(Storage.Personal)]
        // The caption that appears in the property sheet.
        [FriendlyNameAttribute("Term Store Name")]
        [Browsable(true)]
        [Description("The name of the term store you'll use.")]
        [DisplayName("Term Store Name")]
        [XmlElement(ElementName = "TermStoreName")]
        public string TermStoreName
        {
            get { return m_termStoreName; }
            set { m_termStoreName = value; }
        }
   …
    }
}

Friday, August 27, 2010

Web Part Error -- The type is not registered as safe

I’ve been working on a SharePoint 2010 web part project and when I pressed F5 to debug, I ran across the error: “A Web Part or Web Form Control on this Page cannot be displayed or imported. The type is not registered as safe.”

webparterrorondebug

This can be caused by innocently renaming your assembly/namespaces/classes. The first thing to check is: SharePointProjectItem.spdata. Your web part should be properly referenced in the SafeControl section.

<ProjectItemFile Source="VisualWebPart1UserControl.ascx" Target="CONTROLTEMPLATES\VisualWebPartProject2\VisualWebPart1\" Type="TemplateFile" />
  </Files>
  <SafeControls>
    <SafeControl Name="SafeControlEntry1" Assembly="$SharePoint.Project.AssemblyFullName$" Namespace="VisualWebPartProject2.VisualWebPart1" TypeName="*" IsSafe="true" IsSafeAgainstScript="false" />
  </SafeControls>
</ProjectItem>

You can also get this error if you've added a web part to a page (e.g., debugging) and then the web part has been removed from the gallery.

If that doesn't resolve it, check your other files.

e.g. VisualWebPart1.webpart file:
<type name="VisualWebPartProject2.VisualWebPart1.VisualWebPart1, $SharePoint.Project.AssemblyFullName$" />
 
VisualWebPart1.ascx.cs namespace name
namespace VisualWebPartProject2.VisualWebPart1
{
    public partial class VisualWebPart1UserControl : UserControl
    {
   
VisualWebPart1.ascx
<%@ Control Language="C#" AutoEventWireup="true" CodeBehind="VisualWebPart1UserControl.ascx.cs" Inherits="VisualWebPartProject2.VisualWebPart1.VisualWebPart1UserControl" %>

VisualWebPart1.cs
namespace VisualWebPartProject2.VisualWebPart1
{
    [ToolboxItemAttribute(false)]
    public class VisualWebPart1 : WebPart
   
Elements.xml
<File Path="VisualWebPart1\VisualWebPart1.webpart" Url="VisualWebPartProject2_VisualWebPart1.webpart" Type="GhostableInLibrary" >
 
Assemblyinfo.cs
[assembly: AssemblyTitle("VisualWebPartProject2")]
...
[assembly: AssemblyProduct("VisualWebPartProject2")]

Windows Live Writer 2011 Beta

Last year, I posted a message about Windows Live Writer for blog Authoring and I mentioned that I had heard a rumour that Live Writer would soon have the Office ribbon UI. Well the future is now.

The Windows Live Writer 2011 Beta is out and it does indeed have the ribbon interface.

WindowsLiveWriterBeta2011

I’ve only written one post so far (this one), but I really am happy to see that ribbon. I have to say though that a couple of things seem to be missing in this Beta. For example, pasting in a picture from the clipboard isn’t working for me (I use that all the time), so I had to use the ribbon Insert option. Also, I don’t see the Format Painter. I dig the Format Painter.

You can read my original Live Writer post if you’re curious why I choose to use this great app. But the short list is: access to multiple blog accounts, easy editing and image handling with my FTP server and having the power of a rich-client.

Friday, August 20, 2010

Outlook 2010 Quick Steps

So I finally got around to adding some quick steps in Outlook 2010 and I’m glad that I took the time to discover the value of this feature. I work at Metalogix Software and anyone who works in a technology company will get a lot of e-mail. I previously posted about how I use Outlook Quick Parts, Outlook Safe Senders and how I manage my inbox (Don’t be an E-Mail Hoarder).

Quick steps allow you to create an action that contains a number of other actions. For example, you might want to move a message to a particular folder and mark it as done at the same time. The quick steps saves you the time of having to complete each action individually. In this way, you could say that Quick Steps are like macros.

I didn’t jump right on this feature because I didn’t initially appreciate that it could save me time. However, when playing around with it, I discovered that I can associate a keyboard shortcut with a Quick Step. Now, that’s interesting to me. Perhaps I only want to perform one action, such as moving messages to a folder, but now I can do it with a keyboard shortcut. That will save me time.

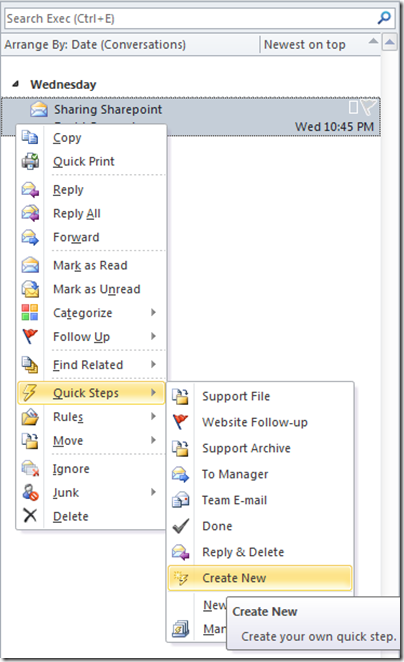
To create a Quick Step, you can go up to the ribbon, or you can right-click a message and find the option in the context menu.

OutlookQuickSteps1

With the context menu open, choose Create New to bring up the Edit Quick Step dialog. In this window, you can give your new Quick Step a name and choose the actions that you’d like to apply. Some of the options include moving, copying, deleting, marking as read or unread, setting the message importance, flagging the message, etc.

image 

Once you have your Quick Step defined, you can go to the bottom of the dialog and choose a shortcut key and you can even add a tooltip to remind you how this Quick Step is meant to be used.

OutlookQuickSteps3

That’s it! You’re all sort to start streamlining your Outlook mail management.

Wednesday, August 18, 2010

SharePoint Web Services in Visual Studio 2010

When you want to add a reference to your SharePoint 2010 web services, you might be confused by the “Add Service Reference” option in Visual Studio 2010. If you choose this option, everything will seem to generate fine, but you won’t end up with what you want.

To use the SharePoint 2010 (or MOSS) web services in VS 2010, you should choose Add Service Reference, but don’t enter the URL into the address box. Instead, click the Advanced button at the bottom.

image 

Once you get to the Service Reference Settings dialog, click Add Web Reference at the bottom. This will open the familiar Web Reference dialog that you would have used in Visual Studio 2005.

image

With the good ‘ol Add Web Reference dialog open, you can feel free to enter the URL of your web services (e.g., http://servername/_vti_bin/Webs.asmx). Now you can use the same code you had previously used to leverage SharePoint web services in your applications.

image

Update: If you right-click on Web References, and choose Add Web Reference you can get to this option right away. However, you may need to create one the other way to get the Web Reference folder to appear.

If you do try to add a service reference to the SharePoint web services (e.g., http://servername/_vti_adm/Webs.asmx), you may see this error message:

There was an error downloading 'http://servername/_vti_adm/Webs.asmx'.
The request failed with the error message:
<html><head>
<title>The file you are attempting to save or retrieve has been blocked from this Web site by the server administrators.<nativehr>0x800401e6</nativehr>

WPF DockPanel and StatusBar Gotcha

I’ve only recently started to work with Windows Presentation Foundation (WPF) on an actual project. WPF is the new Microsoft technology for building powerful user interfaces.

I ran into this simple gotcha with the DockPanel control and thought I’d share. The issue was that my status bar would not dock properly at the bottom of the UI.

I wanted to add a toolbar, then some controls underneath that which are contained in a StackPanel control, and then the StatusBar control at the bottom. From an XML/HTML perspective, the following code made sense to me.

<DockPanel HorizontalAlignment="Stretch" Width="Auto" Height="Auto">
     <ToolBarTray HorizontalAlignment="Stretch" DockPanel.Dock="Top">
        <ToolBar Name="toolBarMain" Height="28" HorizontalAlignment="Stretch">
            …
        </ToolBar>
    </ToolBarTray>

    <StackPanel DockPanel.Dock="Top">
        <StackPanel Orientation="Horizontal">
            …
        </StackPanel>
    </StackPanel>
    <TabControl DockPanel.Dock="Left" TabStripPlacement="Bottom">
        …   
          </TabControl>

     <StatusBar DockPanel.Dock="Bottom" HorizontalAlignment="Stretch">
        <StatusBarItem>
            <TextBlock Text="Status..."/>
        </StatusBarItem>
    </StatusBar>
</DockPanel>

However, this didn’t work. The other controls messed up the StatusBar even though it was the only one set to dock to the bottom. The solution was to move the StatusBar all the way to the beginning of the DockPanel control. The reason this was happening makes sense to me now (for example, you might want the control on the left to go all the way to the bottom), but I assumed that if controls weren’t nested, then they wouldn’t affect one another.

<DockPanel HorizontalAlignment="Stretch" Width="Auto" Height="Auto">
    <StatusBar DockPanel.Dock="Bottom" HorizontalAlignment="Stretch">
        <StatusBarItem>
            <TextBlock Text="Status..."/>
        </StatusBarItem>
    </StatusBar>

    <ToolBarTray HorizontalAlignment="Stretch" DockPanel.Dock="Top">
        <ToolBar Name="toolBarMain" Height="28" HorizontalAlignment="Stretch”>
            …
        </ToolBar>
    </ToolBarTray>

    <StackPanel DockPanel.Dock="Top">
        <StackPanel Orientation="Horizontal">
            …
        </StackPanel>
    </StackPanel>
    <TabControl DockPanel.Dock="Left" TabStripPlacement="Bottom">
        …   
          </TabControl>
</DockPanel>

Monday, August 02, 2010

Adding Senders to Outlook 2010 Safe Sender List

To save time having to choose to download pictures in Microsoft Outlook messages from outside the Metalogix GAL, I often add addresses to the Outlook safe senders list. Unfortunately, I have found that this isn’t as straightforward as it used to be in Outlook 2007.

The Outlook 2007 method for adding a sender to the Outlook 2010 safe list does not work for me. Despite the follow note in the Outlook documentation, I do not get the option when I right-click a message or go up to the Junk E-mail option in the ribbon.

“To quickly add a sender, domain name, or mailing list name to the Safe Senders or Safe Recipients Lists, right-click the message you consider safe, and then on the shortcut menu, point to Junk E-mail, and then click Add Sender to Safe Senders List, Add Sender's Domain (@example.com) to Safe Senders List, or Add Recipient to Safe Recipients List.”

It appears that the option has simply been removed from the context menu and wasn’t added to the ribbon. You might be tricked into thinking that “Never Block Sender” achieves the same effect, but I’ve tried it and that option does not add the sender to the safe senders list.

Outlook 2010 Safe Sender

The longer method (from the same documentation page) will work, but it’s cumbersome:

  1. On the Home tab of the ribbon, click the dropdown arrow next to Junk
  2. Select Junk Email Options...
  3. Click the Safe Senders or Safe Recipients tab.
  4. Click Add.
  5. In the Enter an e-mail address or Internet domain name to be added to the list box, enter the name or address you want added, and then click OK.
  6. Repeat steps 4 and 5 for each name or address that you want to add.

In previous versions of Outlook:

  1. On the Tools menu, click Options.
  2. On the Preferences tab, under E-mail, click Junk E-mail.
  3. Click the Safe Senders or Safe Recipients tab.
  4. Click Add.
  5. In the Enter an e-mail address or Internet domain name to be added to the list box, enter the name or address you want added, and then click OK.
  6. Repeat steps 4 and 5 for each name or address that you want to add.

These is however, a faster way to do it. If the message contains images—which is my main use case anyway—you can use the “Click here to download pictures” bar to quickly add the sender to the safe list. To do this, right-click on the bar at the top of the message preview and choose “Add Sender to Safe Senders List.” Quick and easy. Now you don’t need to choose to download images from senders you trust.

Add Outlook sender to safe senders list

Update: As you can see in the comments below (thanks Drake!), there is also a way to automatically add people you mail to the Safe Senders list:

“From the Junk E-mail Options window, navigate to the Safe Senders tab and check the Automatically add people I e-mail to the Safe Senders List option. You can also Add E-mail from addresses or domain names on your Safe Senders List and this will never be treated as junk e-mail.” - From www.oracle-forums.com