Showing posts with label C#. Show all posts

Thursday, December 05, 2013

Using Wyzz Web-based HTML editing control in ASP.NET MVC

I recently had to put out a web-based single page application (SPA) on short notice. To make that happen, I knew I had to use some open-source controls. One was the jsTree treeview control (which I wrote about on this blog - Using jsTree with ASP.NET MVC) and another was the Wyzz WYSIWYG web-based editing control for HTML.
From their site, “Wyzz is an ultra-small, very light WYSIWYG (What You See Is What You Get) Editor for use in your web applications. It's written in JavaScript, and is free (as in speech and as in beer) for you to use in your web applications and/or alter to your needs (see the license conditions).
image
Naturally, the first step to add a reference to the wyzz.js script file. Once you have that, you just need to add the control to an HTML <textarea> element. Finally, it’s a simple matter of adding some JavaScript to “make_wyzz” the control.
<script language="JavaScript" type="text/javascript" src="~/Home/wyzz.js"></script>


<textarea name="textEditor" id="textEditor" rows="10" cols="40">No file loaded...</textarea><br />
<script language="javascript1.2">
    make_wyzz('textEditor');
</script> <div ng-controller="EditorCtrl"> <form novalidate class="simple-form"> <button ng-click="saveFileContent()">save</button> </form> </div>

As you can see in the example above, I’ve chosen to use an AngularJS control to define the behaviour of the save button. In the JavaScript I define a server-side controller function (ASP.NET in this case) and I send it the content of the control by accessing the HTML element that the control is using.

$scope.saveFileContent = function () { 
        $http.post('/Home/SaveFileContent', { filePath: document.getElementById("multilingualfile").innerHTML, content: document.getElementById("wysiwyg" + "textEditor").contentWindow.document.body.innerHTML, title: document.getElementById("titleHtml").value })
            .then(
            function (response) {
                alert("File Save Result: " + response.data.Result);
            },
            function (data) {
                alert("Error saving file content");
            }
        );
    }

Update: Here’s the basic format of the server-side part:


[HttpPost]
public ActionResult SaveFileContent(string filePath, string content, string title)
{
    try
    {
        ...
        
        return Json
            (
                new
                {
                    Result = "Success",
                }
            );
    }
    catch (Exception ex)
    {
       ...

        return Json
            (
                new
                {
                    Result = "Error saving content: " + ex.ToString(),
                }
            );
    }
}

To customize your Wyzz controls, you can edit the wyzz.js file. If you have any issues, refer to the Wyzz discussion forum.

Sunday, December 01, 2013

Using jsTree with ASP.NET MVC

When I wanted to use a pure JavaScript treeview control for a recent ASP.NET MVC5 project, I looked around and found jsTree; it’s a popular and rich solution, so I decided to try it. I ran into a few customization hurdles, so here are my lessons learned.

Note that this is for jsTree 1.0; at the time of writing, 3.0 has not been released.

Step 1: The HTML in the view. Pretty simple…

<div id="FileTree"></div>


Step 2: Loading the tree dynamically from the MVC controller using jQuery.

<script type="text/javascript"> 
// Begin JSTree: courtesy Ivan Bozhanov: http://www.jstree.com:

$('#FileTree').jstree({
"json_data": {
"ajax": {
"url": "/Home/GetTreeData",
"type": "POST",
"dataType": "json",
"contentType": "application/json charset=utf-8"
}
},
"themes": {
"theme": "default",
"dots": false,
"icons": true,
"url": "/jstree/themes/default/style.css"
},

"contextmenu": {
"items": {
"create": false,
"rename": false,
"remove": false,
"ccp": false,
}
},

"plugins": ["themes", "json_data", "dnd", "contextmenu", "ui", "crrm"]
})

</script>


Step 3: Server-side code to populate the tree. This code is based on desalbres’s Simple FileManager with jsTree. (The model code is below.)

// Begin JSTree (Controller code courtesy desalbres: http://www.codeproject.com/Articles/176166/Simple-FileManager-width-MVC-3-and-jsTree)
[HttpPost]
public ActionResult GetTreeData()
{
if (AlreadyPopulated == false)
{
JsTreeModel rootNode = new JsTreeModel();
rootNode.attr = new JsTreeAttribute();
rootNode.data = "Root";
string rootPath = Request.MapPath(dataPath);
rootNode.attr.id = rootPath;
PopulateTree(rootPath, rootNode);
AlreadyPopulated = true;
return Json(rootNode);
}
else
{
return null;
}
}

/// <summary>
/// Populate a TreeView with directories, subdirectories, and files
/// </summary>
/// <param name="dir">The path of the directory</param>
/// <param name="node">The "master" node, to populate</param>
public void PopulateTree(string dir, JsTreeModel node)
{
if (node.children == null)
{
node.children = new List<JsTreeModel>();
}
// get the information of the directory
DirectoryInfo directory = new DirectoryInfo(dir);
// loop through each subdirectory
foreach (DirectoryInfo d in directory.GetDirectories())
{
// create a new node
JsTreeModel t = new JsTreeModel();
t.attr = new JsTreeAttribute();
t.attr.id = d.FullName;
t.data = d.Name.ToString();
// populate the new node recursively
PopulateTree(d.FullName, t);
node.children.Add(t); // add the node to the "master" node
}
// loop through each file in the directory, and add these as nodes
foreach (FileInfo f in directory.GetFiles("*.htm"))
{
// create a new node
JsTreeModel t = new JsTreeModel();
t.attr = new JsTreeAttribute();
t.attr.id = f.FullName;
t.data = f.Name.ToString();
// add it to the "master"
node.children.Add(t);
}
}

// Don't load the jsTree treeview again if it has already been populated.
// Note: this causes a bug where the tree won't repaint on browser refresh
public bool AlreadyPopulated
{
get
{
return (Session["AlreadyPopulated"] == null ? false : (bool)Session["AlreadyPopulated"]);
}
set
{
Session["AlreadyPopulated"] = (bool)value;
}

}
// End JSTree

First I had to resolve the issue that a browser refresh would repaint the whole treeview. It’s possible that I simply missed this when I cherry picked code from the FileManager codeproject example.


public ActionResult Test(string returnUrl)
{
ViewBag.ReturnUrl = returnUrl;
Session["AlreadyPopulated"] = false;
return View();
}

Next, I had to customize jsTree the way I wanted it to behave. Getting the tree to start collapsed (closed) instead of expanded (open) was the first order of business. The jsTree API took care of the problem.


$('#FileTree').bind("loaded.jstree", function (event, data) { 
$(this).jstree("close_all");
})


Next, I wanted the leaf nodes to use a different background image than the folder nodes. This required changing the server-side code to actually write the leaves (files) as leaf nodes and then add the right CSS to style the jstree-leaf class.


namespace FileEditor.Models 
{
public class JsTreeModel
{
public string data;
public JsTreeAttribute attr;
// this was "open" but changing it to “leaf” adds “jstree-leaf” to the class
public string state = "leaf";
public List<JsTreeModel> children;
}

public class JsTreeAttribute
{
public string id;
}
}


And then styling the leaf nodes with a different background image than the folders.


<style type="text/css"> 
#FileTree .jstree-leaf > a > ins {
background: url("/jstree/themes/default/d.gif");
background-position: -2px -19px !important;
}
</style>


Finally, I wanted to disable the right-click context menu options since I’m not using them. (This code appears in the code above.)

"contextmenu": {
"items": {
"create": false,
"rename": false,
"remove": false,
"ccp": false,
}
},

That’s it. jsTree is not working the way I want. I expect that version 3 will be great when it is released.

Other posts on this topic:
jsTree – Few examples with ASP.Net/C#
Simple FileManager width MVC 3 and jsTree

Wednesday, February 27, 2013

Running Mono 3.0.5 Beta on Windows

Mono is a really cool concept. It’s a C# compiler/framework that works cross-platform. C# is fantastic, so I really like the idea of being able to develop C# (potentially with Visual Studio) and target any device. Until Mono came along, C# was only used on Windows because it uses the Microsoft .NET framework. (Mono also boasts the MonoGame platform and the MonoDevelop IDE for Linux coding.)

image

Here is the introduction from the Mono Wikipedia page:

Mono is a free and open source project led by Xamarin (formerly by Novell and originally by Ximian) to create an Ecma standard compliant .NET Framework-compatible set of tools including, among others, a C# compiler and a Common Language Runtime.

The stated purpose of Mono is not only to be able to run Microsoft .NET applications cross-platform, but also to bring better development tools to Linux developers.[3] Mono can be run on many software systems including Android (and most other Linux distributions), BSD, iOS, OS X,Windows, Solaris, and some for game consoles such as PlayStation 3, Wii, and Xbox 360.”

So I downloaded Mono to try it out on Windows (I’ll try Ubuntu next) and I ran into an issue right away. Just trying to validate the install using the “Hello World” example on the Mono Basics page didn’t work. It’s really not that complicated, here’s the example program:

using System;
 
public class HelloWorld
{
    static public void Main ()
    {
        Console.WriteLine ("Hello Mono World");
    }
 
}

However, I couldn’t get it to work using the gmcs compiler that’s used in the example. The result was this all too common error:

C:\Mono\Mono-3.0.5>gmcs
'gmcs' is not recognized as an internal or external command, operable program or batch file.

image
This error will occur on Windows when the program actually doesn’t exist, or it can’t be discovered from the location that the console is running. There are two way to fix this issue for any Windows program:

1. Use the full path to the program and use quotes if the path has spaces in it

2. Add the path for the program to the Windows Environment Variable called “Path.”

So I tried to find the executable for gmcs, but I could not even find gmcs.bat or gmcs.exe. In this case, it wasn’t an issue with Windows or Mono, it was simply out of date documentation on the Mono site.

I received this helpful advice from the Mono user community forum, “Have you tried "mcs -sdk:2"? Mono 2.11 merged all the compilers into the one unified compiler, and now gmcs is a shell script that simply calls mcs (at least on Linux).” Ah, that’s good to know!

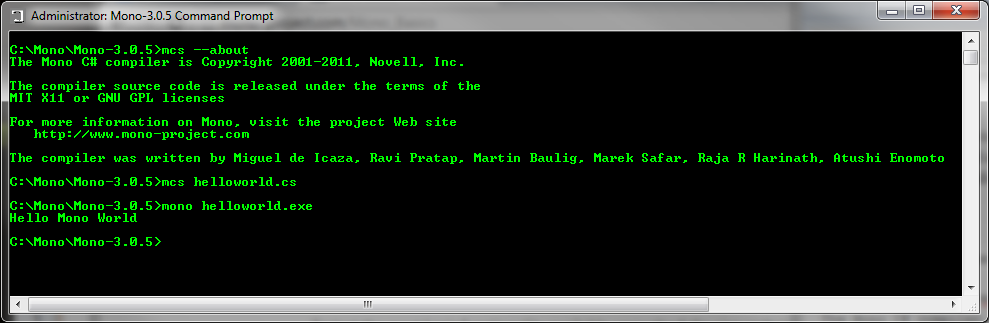
Here is the working version of the “basics” test code:

C:\Windows\System32>mcs --about
The Mono C# compiler is Copyright 2001-2011, Novell, Inc.
The compiler source code is released under the terms of the
MIT X11 or GNU GPL licenses
For more information on Mono, visit the project Web site
  
http://www.mono-project.com
The
compiler was written by Miguel de Icaza, Ravi Pratap, Martin Baulig, Marek Safar, Raja R Harinath, Atushi Enomoto

C:\Windows\System32>cd C:\Mono\Mono-3.0.5

C:\Mono\Mono-3.0.5>mcs helloworld.cs

C:\Mono\Mono-3.0.5>mono helloworld.exe
Hello Mono World

image

Success!

Monday, March 26, 2012

ASP.NET MVC 3: A default document is not configured

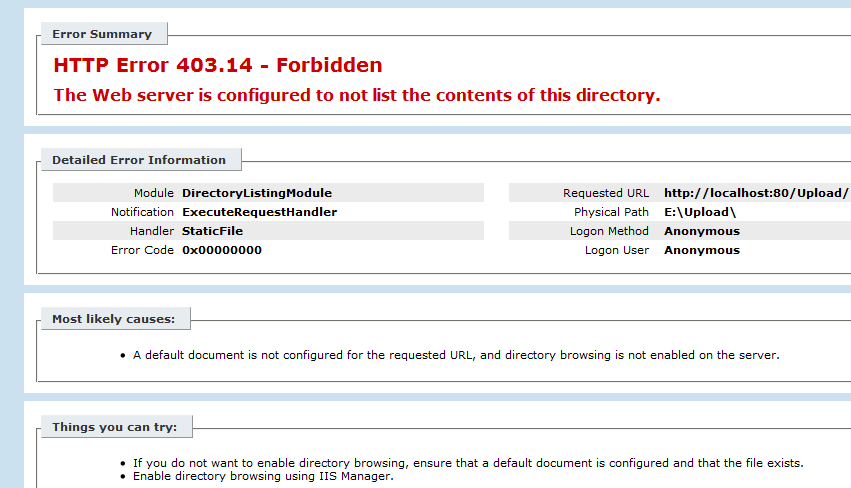
I ran into a strange issue and so many different solutions have been posted online that I thought I’d add what worked for my scenario. I have an ASP.NET MVC 3 “Razor” web application which I ran successfully on W2K8 R2 and when I tried to open it on Windows 7  (IIS 7.5), it wouldn’t run. The error message was “HTTP Error 403.14 – Forbidden. A default document is not configured for the requested URL.” I know that I don’t need to set a default document, so what is wrong?

image

There are an awful lot of posts about this error, but the key here is that this solution worked fine on one machine and wouldn’t run on another. I found the solution that worked for me on StackOverflow.com. It was the suggestion from Dommer that helped with my issue. (Note that there is a 32bit version of the same fix.)

“did you try running the aspnet_regiis -i command in the Visual Studio 64 bit command prompt (with admin privileges)? When I did that it fixed it for the 64-bit mode. To clarify, I right clicked on Visual Studio x64 Win64 Command Prompt (2010) and chose Run as Administrator. Then I went here: C:\Windows\Microsoft.NET\Framework64\v4.0.30319
And did this: aspnet_regiis –i And now it works perfectly.”

image

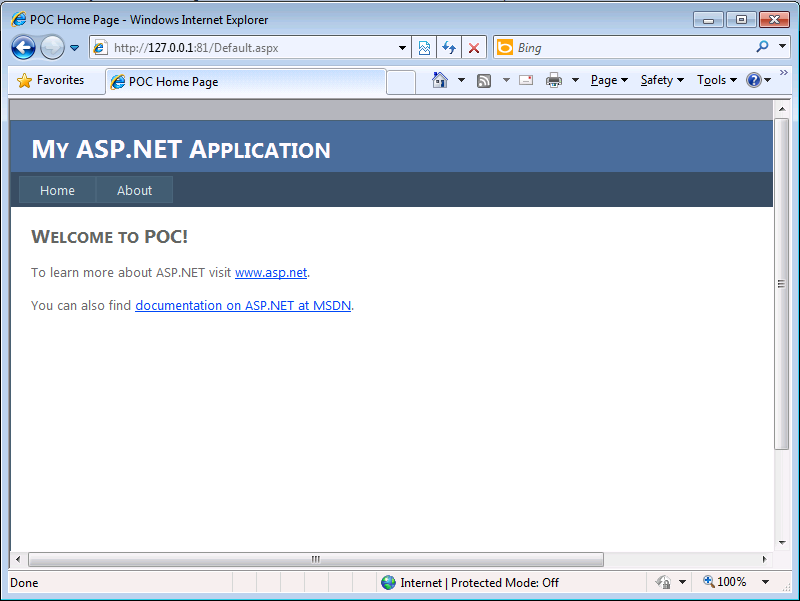
Yes, yes it does. Thanks!

Saturday, August 13, 2011

Announcing GovernanceHx – SharePoint Governance for Everyone!

I recently read an article that proclaimed--without any grey area--that Microsoft SharePoint governance has nothing to do with technology. I certainly understand the sentiment. Governing an enterprise platform such as SharePoint can be complicated and requires planning and buy-in from various people. However, I also believe that giving SharePoint users access to the right tools can empower them to keep track of whether their governance plans are being effectively enforced. To put it succinctly, wouldn’t you rather know right away about issues than wait until someone decides to proactively check for them?


In my vast spare time (for those who don’t know me, that’s a joke), I’ve been working on a SharePoint community application that I’m now ready to start talking about.

GovernanceHx is a web application that is bringing SharePoint governance to the Cloud. The application allows any SharePoint user to run free, read-only reports against their SharePoint servers with the express purpose of combatting SharePoint sprawl. This means that people without admin access, or development skills, can easily generate reports about the growth of their environment and use them to gain an insight into changes over time. This is why I chose to go with the name GovernanceHx. “Hx” is commonly used in the health care field as the abbreviation for history. GovernanceHx shows the governance health of your SharePoint server over time.

image
- A report results page from GovernanceHx

At this time, I’m showing some demos and recruiting a few SharePoint experts to be Governance Advisors on the project. I’m happy to announce that SharePoint expert and prolific conference speaker, Richard Harbridge, has joined the project as the first Governance Advisor.

Custom image

These advisors will help shape the future of the project by using their real-world SharePoint experience to identify the best application of the GovernanceHx framework. Since GovernanceHx tracks growth, the advisors will help figure out which growth reports will be most useful.
image 
And speaking of frameworks, that’s one of the coolest aspects of this project. I’ve developed the GovernanceHx reporting framework using Windows Azure, so users will not need to install anything at all on their SharePoint server to run reports against Office 365 or any SharePoint sites that are accessible over the net.

logo-office-365[1] 

Cloud-based SharePoint governance opens up all sorts of possibilities for Office 365/SharePoint online customers. For example, I’m sure there are plenty of small to medium businesses that would like a solution to help with their governance enforcement but simply can’t afford a large enterprise reporting application for the job. GovernanceHx will be the low friction way for these users to discover sprawl issues before they become unmanageable.

Friday, July 08, 2011

Error Deserializing XML: There is an error in XML document (2, 2)

While working with some XML documents, I ran into this cryptic error: “There is an error in XML document (2, 2).” The problem turned out to be a surprising case sensitivity in the C# code. When I was trying to deserialize from XML to an object, the XML elements didn’t match the case of the class properties.

Here is my original XML file:

<?xml version="1.0" encoding="utf-8" ?>
<test>
  <name>stephen</name>
</test>

Test class:

public class Test
{
  public string Name { get; set; }
}

And the code that I was using to deserialize the XML into the Test class object.

string xmlFile = String.Concat(HttpContext.Current.Request.PhysicalApplicationPath, "test.xml"); System.IO.StreamReader reader = System.IO.File.OpenText(xmlFile);
XmlSerializer xs = new XmlSerializer(typeof(ReportTemplate));
Test testData = (ReportTemplate)xs.Deserialize(reader);

The solution was quite simple. The case of the XML tags did not match the case of the class properties. By changing them to match, I resolved the error. Here is the working XML:

<?xml version="1.0" encoding="utf-8" ?>
<Test>
   <Name>stephen</Name>
</Test>

BTW – If the root element case matches, but one of the sub-elements does not, you will see the beloved error “Object reference not set to an instance of an object.

Sunday, June 19, 2011

Azure Blob.FetchAttributes Throws “The specified blob does not exist.”

I was working on a Windows Azure application this weekend and I ran into a strange error. I was trying to access the metadata associated with blobs using (blob.FetchAttributes()) and received an error message. The problem was actually that the metadata wasn’t being associated properly with the blobs, so there was nothing to return. However, the error thrown was, “The specified blob does not exist.” Needless to say, I found this to be strange.

My solution was to check the metadata count before trying to fetch any metadata. This allowed my code to return blank results rather than throw a misleading error.

// Check for the case where attributes haven't been set
if (blob.Attributes.Metadata.Count > 0)
{
     blob.FetchAttributes();
}

Update: Upon further investigation, I found that this didn’t work even when the BLOB metadata was properly set. If you run into this, check that you’re blob container reference isn’t null.

Sunday, May 01, 2011

Windows Azure Debugging Issue with SQL Server

I was working on a Windows Azure application today and when I tried to debug, I found that I was being stopped by the error below. I happen to have the full version of SQL Server on the machine in question, so my haughty first response was that I wasn’t going to install something else, but after trying the recommended approach, the simplest solution was to just install SQL Server Express.

Windows Azure Tools: Failed to initialize Development Storage service. Unable to start Development Storage. Failed to start Development Storage: the SQL Server instance ‘machinename\SQLExpress’ could not be found. Please configure the SQL Server instance for Development Storage using the ‘DSInit’ utility in the Windows Azure SDK.

I found this blog post that gives a lot of helpful info about the issue: http://blogs.msdn.com/b/sql_protocols/archive/2007/05/13/sql-network-interfaces-error-26-error-locating-server-instance-specified.aspx. I first checked the firewall and that wasn’t the issue. Then I used the utility referenced on this page to check SQL connectivity.


image

Sure enough, the SQL Browser service was disabled (it showed NOT LISTENING). I started the service and was able to get past the original error message. I then ran DSInit to specify my SQL instance.


image

However, after running DSInit and specifying my SQL instance, I got the error below which advised me to install SQL Server Express. Fine. I did and it worked.

Server Error in '/' Application.


A network-related or instance-specific error occurred while establishing a connection to SQL Server. The server was not found or was not accessible. Verify that the instance name is correct and that SQL Server is configured to allow remote connections. (provider: SQL Network Interfaces, error: 26 - Error Locating Server/Instance Specified)

SQLExpress database file auto-creation error:

The connection string specifies a local Sql Server Express instance using a database location within the application's App_Data directory. The provider attempted to automatically create the application services database because the provider determined that the database does not exist. The following configuration requirements are necessary to successfully check for existence of the application services database and automatically create the application services database:

3. Sql Server Express must be installed on the machine.

image

Update: I haven't tried it, but I hear I'm supposed to use "/sqlserverinstance." to use the full version of SQL Server.

Friday, January 07, 2011

Add Push Notification to SharePoint Apps

I’ve been working on an application to help me with some SharePoint 2010 API/web services/client OM performance testing—I’ve given this app the sufficiently geeky name ‘SharePoint Genesis Device.’ The operations that this application runs can take many hours, and I don’t want to have to keep checking if it has completed. For this reason, I’ve added Growl/Prowl support so that I can receive push notifications on my PCs and smart phone.

image

                                                 - A Prowl notification sent to my phone

I’ve just started on this project, but the screenshot below shows what the SharePoint Genesis Device looks like today. I’m going to use Prowl ($2.99) as my mobile app for Growl notifications, but there are other options out there. However, I found Prowl to be easy to set up, so I recommend it.

image

After adding Growl (PC notifications) and Prowl (iPhone notifications) support, I am able to send push notifications both to PCs and smart phones. If you would like to do the same, I suggest you focus on getting Growl working first. It’s a requirement for the Prowl setup, so don’t worry about Prowl until you have Growl notifications working.

Follow these steps to add Growl and Prowl support to your C# application:

1. Download the Growl for Windows client and install it.

2. Download the Growl SDK and read the Growl documentation for details on adding Growl code to your application. Here is the code I used:

using Growl.CoreLibrary;
using Growl.Connector;

DateTime stopTime = DateTime.Now;
wlConnector growl = new GrowlConnector();
Growl.Connector.Application application = new Growl.Connector.Application("SharePoint Genesis Device");
application.Icon = @"\GrowlNetLibraries\growl4windows.jpg";
NotificationType operationComplete = new NotificationType("COMPLETE", "Operation Complete");
growl.Register(application, new NotificationType[] { operationComplete });
Notification notification = new Notification("SharePoint Genesis Device", "COMPLETE", "ID", "Operation Complete", "End time: " + stopTime.TimeOfDay.ToString());
growl.Notify(notification);

After you execute this code, you should see your application registered in Growl and the updates should appear on your PC. To open Growl, right-click on it in the system tray and choose Open Growl.

image

                           - Updates from my SharePoint app in Growl

If you have Growl set up and working, then you can add Prowl to send notifications to your phone. If you only want PC notifications, then you’re done.

3. Register for Prowl.

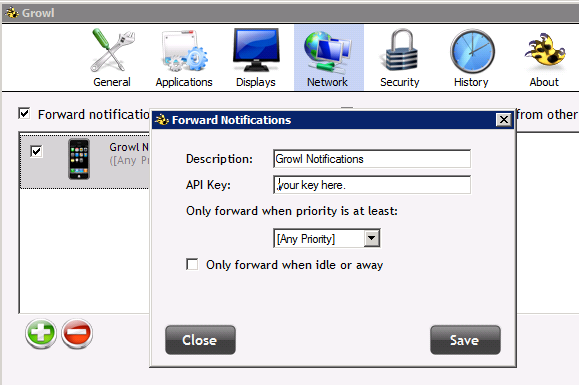
4. Login to the Prowl website and get your Prowl API key. You will need to enter this key into the Growl client so that notifications can be forwarded to your Prowl device.

5. Open the Growl client on your PC and add Prowl as a computer for forwarded notifications. Use the API key from Prowl.

image

6. Install Prowl on your iPhone from the app store and enter your login credentials.

That’s all! You’ve now got push notifications on your PC and smart phone.

Friday, September 10, 2010

SharePoint Incompatible Web Part markup detected

I was working on my Game of Life SharePoint 2010 taxonomy sample, when I suddenly started to get this error message when I tried to add my web part to a page:

“Incompatible Web Part markup detected. Use *.dwp Web Part XML instead of *.webpart Web Part XML.”

image

The problem is that the .NET framework web part and SharePoint web parts are not the same thing. If you’re deriving your web part from System.Web.UI.WebControls.WebParts.WebPart, then you are using the .NET web part. But if you’re using Microsoft.SharePoint.WebPartPages.WebPart, then it’s a SharePoint web part.

As far as I can tell, you can actually use either one inside SharePoint, but there are differences in the way that you code them. If you’re using a SharePoint web part, then you should have a .dwp file in your feature. If you’re using the .NET class, then it should be .webpart. The error about the web part markup occurs when you try to use the wrong one. The .dwp and .webpart files are both XML, but they use a different schema. So if you change from one to the other, you can’t just rename the file, you have to re-write it.

I don’t know why my project suddenly decided that it didn’t want to work. As far as I can remember, all I did was change the assembly version number, but anyway…

To resolve the issue, I had to ensure that I was consistent across my project. I want to use the .NET webpart class, so this is what the beginning of my webpart.cs file looks like. I’ve used the long format for the WebPart class to make things crystal clear:

using System;
using System.ComponentModel;
using System.Web;
using System.Web.UI;
using System.Web.UI.WebControls;
using System.Web.UI.WebControls.WebParts;
using Microsoft.SharePoint;
using Microsoft.SharePoint.WebControls;

//Added references
using System.Xml.Serialization;

namespace GameOfLifeWebPartProject.GameOfLifeWebPart
{   
[ToolboxItemAttribute(false)]  [DefaultProperty("Text"), ToolboxData("<{0}:GameOfLifeWebPart  runat=server></{0}:GameOfLifeWebPart>"), XmlRoot(Namespace = "GameOfLifeWebPart")]
public class GameOfLifeWebPart :
System.Web.UI.WebControls.WebParts.WebPart
    {

Now that I’ve clarified which type of web part I’m using, any custom properties that I add have to be in the correct format for that type of web part. If you add custom properties using the other format, the project may compile and deploy, but the properties won’t appear in the web part property pane.

// Custom web part property for the term group name
private string m_termStoreGroupName = "Game of Life";
[System.Web.UI.WebControls.WebParts.WebBrowsable(true),
System.Web.UI.WebControls.WebParts.WebDisplayName("Term Store Group Name"),
System.Web.UI.WebControls.WebParts.WebDescription("The name of the term store group you'll use."),
System.Web.UI.WebControls.WebParts.Personalizable(
System.Web.UI.WebControls.WebParts.PersonalizationScope.Shared),
System.ComponentModel.Category("Game of Life Settings"),
System.ComponentModel.DefaultValue("Game of Life")]
public string TermStoreGroupName
{
     get { return m_termStoreGroupName; }
     set { m_termStoreGroupName = value; }
}

This is what the same property would have looked like if I was using .dwp and the SharePoint web part class:

private string m_termStoreGroupName = "Game of Life";
[Category("Game of Life Settings")]
[WebPartStorage(Storage.Personal)]
[FriendlyNameAttribute("Term Store Group Name")]
[Browsable(true)]
[Description("The name of the m_group you'll use in your term store.")]
[DisplayName("Term Store Group Name")]
[XmlElement(ElementName = "TermStoreGroupName")]
public string TermStoreGroupName
{
     get { return m_termStoreGroupName; }
     set { m_termStoreGroupName = value; }
}

If you decide to change from .webpart to .dwp or vice versa, you’ll need to add the new file to your project and also update the feature package. If you don’t add the new file to the feature package, your web part won’t appear in the web part gallery because it requires that XML file.

Thursday, September 09, 2010

SharePoint Game of Life Web Part on CodePlex

Earlier this year, I presented a session at SharePoint Saturday New York on the new SharePoint 2010 taxonomy features (Enterprise Metadata Management). At the time, I offered to provide the source code for the visual web part sample I used in the developer portion of the talk.

The sample is a simple SharePoint 2010 visual web part based on John Conway’s Game of Life cellular automaton. I wrote about the SharePoint Game of Life web part previously on this blog. If you’re interested in SharePoint taxonomy, you can also check out my blog series on Enterprise Metadata Management (EMM).

The idea is that each term in the SharePoint taxonomy term store represents an organism. As you run through each generation, terms are added and deleted based on the parameters of the simulation.

image

It took a few months, but I’ve cleaned it up, added better error handling and uploaded the code to the SharePoint 2010 Game of Life Web Part project on CodePlex. This project is written in C#. It requires Visual Studio 2010 and SharePoint 2010 Server.

The Long Tale: This SharePoint 2010 taxonomy sample is actually a port of an old-school ASP code sample that I wrote in 1999 for the NCompass Resolution API. Resolution went on to become Microsoft Content Management Server (MCMS).

image

Wednesday, September 01, 2010

Visual Studio Designer View Doesn’t Work After Adding a Table

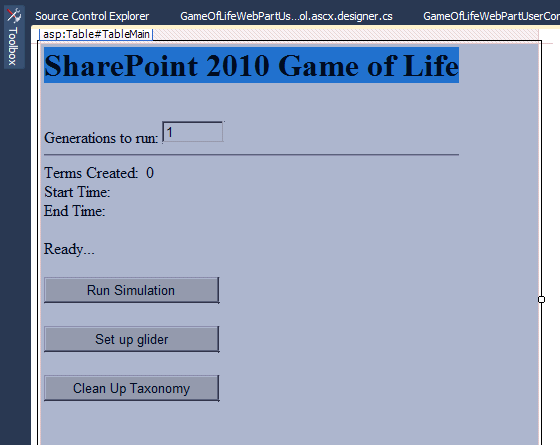
I’ve been working to clean up my SharePoint Game of Life web part so that I can give it out publicly. I found recently that when I added an ASP.NET  Table control to an ASCX page, I could no longer select the individual controls on the page. This is annoying since I you can’t quickly get to their property grids.

In the Visual Studio designer view, I could only select the Table control that now encompassed all of the other controls.  If I clicked on anything, it just selected the large table. The other ways of selecting nested controls that I would use with WinForms don't work either.

image                         - after adding the table, only the whole table could be selected

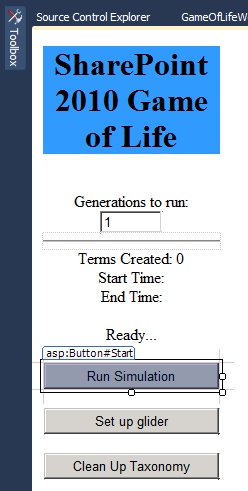
After messing about, I found the solution. Since I don't actually need the main table to be a Table control, all I had to do was change it to a simple HTML table. So instead of <asp:Table><asp:TableRow><asp:TableCell>…. I used: <table><tr><td>…

Now the designer is usable again!

image                                                  - after removing the ASP Table control, controls are accessible again

Wednesday, February 03, 2010

SharePoint Game of Life

I’m sure some SharePoint community folks will remember John Conway’s Game of Life population simulation (cellular automaton) from comp. sci. For my SharePoint 2010 Enterprise Metadata Management (EMM, or taxonomy) talk at SharePoint Saturday in New York last weekend, I decided to create my own version for testing the performance of the new SharePoint taxonomy API.

Update: I have posted the source code for the SharePoint Game of Life web part on CodePlex. If you’re interested in SharePoint taxonomy, you can also check out my blog series on Enterprise Metadata Management (EMM).

Using the rules of the Game of Life, I created a SharePoint 2010 Visual Web Part that creates a new taxonomy term for each organism spawned during the simulation. When the creature dies, the term is deleted from the term store.

SharePointGameofLife

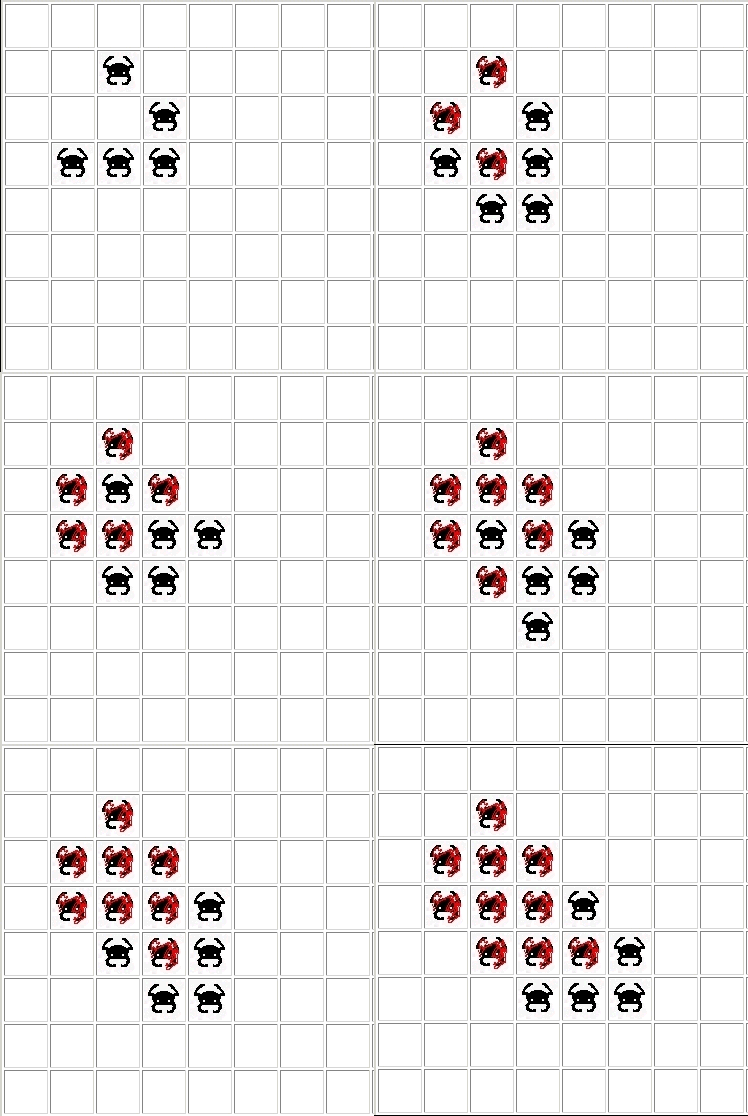
- SharePoint Game of Life running a glider

I actually did this back in 1999 for the NCompass Resolution Publishing API (the software that eventually became Microsoft Content Management Server), so I also had an interesting exercise of porting ASP script to C# code. The SharePoint Game of Life web part tracks the number of terms created and the time it took to run. I’m planning to use this web part as a sample for a SharePoint 2010 book project.

Here are the rules of the game (from Wikipedia):

  • Any live cell with fewer than two live neighbours dies, as if caused by under population.
  • Any live cell with more than three live neighbours dies, as if by overcrowding.
  • Any live cell with two or three live neighbours lives on to the next generation.
  • Any dead cell with exactly three live neighbours becomes a live cell.
  • The most famous pattern in the game is called a glider. This pattern is interesting because over iterations, it will simply continue to move across the grid. The glider configuration has been adopted as the hacker emblem.

    clip_image002

    - the glider starting position

    For dramatic effect, I decided to add an image for a dead organism—as you can see in the animation. This isn’t normally done, so for the Game of Life purists, I’ll probably add an option to disable it in the release version of the code.

    The code isn’t ready for prime time yet, so I don’t have perf numbers to publish yet. But hopefully, I’ll get a chance to polish it up soon.

    BTW – The creature is an homage to Mazogs. A ZX-81 (Timex Sinclair 1000) game I played as a kid.

    Wednesday, December 30, 2009

    SharePoint Managed Metadata Developer Experience

    This post is part four in a series that I’m writing about SharePoint 2010 Enterprise Managed Metadata (EMM or ‘taxonomy’). If you haven’t set up a SharePoint 2010 development environment yet, you may also want to check out SharePoint 2010 Beta 2 install.

    Update: I have posted a video demo on the Metalogix blog showing how to create a SharePoint 2010 Taxonomy Web Part.

    SharePoint Taxonomy Part One – Introduction to SharePoint Managed Metadata
    SharePoint Taxonomy Part Two – End-User Experience
    SharePoint Taxonomy Part Three – Administrator Experience
    (including Using SharePoint Term Stores and SharePoint Taxonomy Hierarchy)
    SharePoint Taxonomy Part Four – Developer Experience
    (including SharePoint 2010 Visual Web Parts and SharePoint 2010 Taxonomy Reference Issues)

    Opening Microsoft.SharePoint.Taxonomy in the Visual Studio Object Browser reveals a long list of objects, but you won’t need to worry about a number of them. In this post, I’m going to start with the most useful and then add others if I find that they’re worth covering.

    image
    - Exploring the Taxonomy DLL in the Object Browser

    But if you’re curious, here’s the full list:

    ChangedGroup
    ChangedItem
    ChangedItemCollection
    ChangedItemType
    ChangedOperationType
    ChangedSite
    ChangedTerm
    ChangedTermSet
    ChangedTermStore
    FeatureIds
    Group (used in the sample below)
    GroupCollection
    HiddenListFullSyncJobDefinition
    ImportManager
    Label
    LabelCollection
    MobileTaxonomyField
    StringMatchOption
    TaxonomyField
    TaxonomyFieldControl
    TaxonomyFieldEditor
    TaxonomyFieldValue
    TaxonomyFieldValueCollection
    TaxonomyItem (base class for classes such as Term and TermSet)
    TaxonomyRights
    TaxonomySession (used in the sample below)
    TaxonomyWebtaggingControl
    Term (used in the sample below)
    TermCollection
    TermSet (used in the sample below)
    TermItem
    TermStore (used in the sample below)
    TermStoreCollection
    TermStoreOperationException
    TreeControl

    TaxonomySession

    The first class to cover is TaxonomySession. To use the taxonomy API to manipulate managed metadata, you’ll first need to instantiate a TaxonomySession object. Microsoft describes the class in this way:

    “The TaxonomySession class creates a new session in which to instantiate objects and commit changes transactionally to the TermStore object. A TaxonomySession object can have zero or more TermStore objects associated with it. TermStore objects are associated with the Web application of the parent SPSite object.”

    I’m going to continue with the example I started in SharePoint 2010 Visual Web Parts, but don’t worry if you’re not interested in building a web part, I just happened to choose that as the example. You can use the same code from a number of different places (e.g., a Windows Form application). I won’t be covering remote access to the taxonomy API in this post since that will topic is worthy of its own attention.

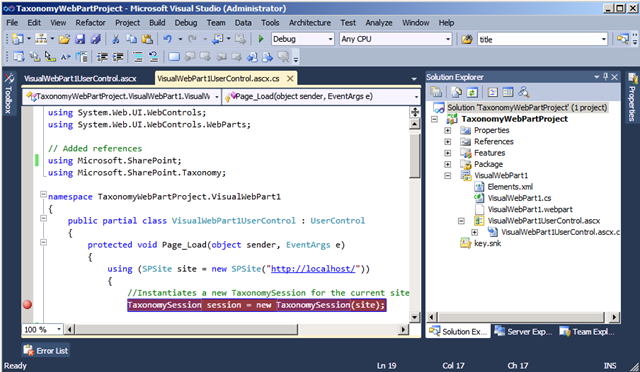
    The starting point for this conversation is VisualWebPart1UserControl.ascx.cs from the simple web part example. I covered issues adding the references in SharePoint 2010 Taxonomy Reference Issues.

    using System;
    using System.Web.UI;
    using System.Web.UI.WebControls;
    using System.Web.UI.WebControls.WebParts;

    // Added references
    using Microsoft.SharePoint;
    using Microsoft.SharePoint.Taxonomy;

    public partial class VisualWebPart1UserControl : UserControl
    {
    protected void Page_Load(object sender, EventArgs e)
    {
    using (SPSite site = new SPSite("
    http://localhost/"))
    {
    //Instantiates a new TaxonomySession for the current site.
    TaxonomySession session = new TaxonomySession(site);

    //Instantiates the connection for the current session
    TermStore termStore = session.TermStores["Managed Metadata Service"];

    // Write out the names of the term stores to a label
    Label1.Text = “”;
    foreach (TermStore termstore in session.TermStores)
    {
    Label1.Text += termstore.Name.ToString() + " … ";
    }

    // Write the name of the term store to a label
    Label1.Text += " Finished";
    }
    }
    }

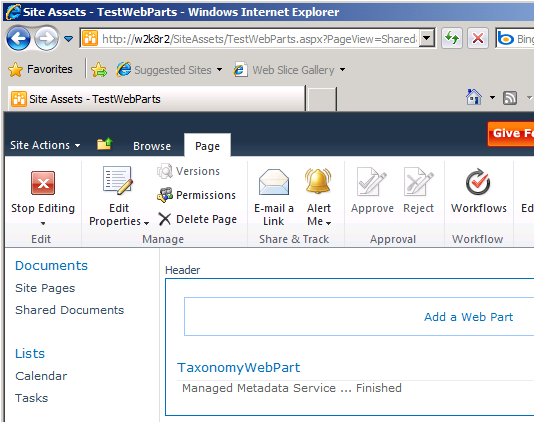
    As you can see, this is a pretty straightforward example of how to get a TaxonomySession object and employ it. Once loaded, this web part will immediately write out the names of each term store available on the server.

    So let’s break it down. The first thing that happens inside the Page_Load method is getting an SPSite object. As mentioned above, TermStore objects are associated with the Web application of the parent SPSite object. By running the code within a using statement, you can rest assured that dispose() will be properly called on your objects. Since this web part project is using the SharePoint Visual Web part template, the only references I had to add were Microsoft.SharePoint (for the SPSite object) and Microsoft.SharePoint.Taxonomy (for the taxonomy objects).

    Now that you have a taxonomy session, you can start to use the taxonomy classes. In this case we’ll loop through each available term store on the server and write the results to a label. The label was simply dragged onto VisualWebPart1UserControl.ascx from the Toolbox onto design view for the web part.

    image
    - After dragging the label from the toolbox

    Pressing F5 will start the debugger and allow you to run the code as described in SharePoint 2010 Visual Web Parts.

    image
    - Running the web part to see the term store name

    In this case, there is only one term store, so only one name is returned. It’s a simple example but useful since you will need to know the name of your term store before you instantiate a term store object and start reading from or writing to your taxonomy.

    Note: If you get the name of your term store wrong, the error you see may not immediately tip you off that you’re fat fingered the text value. The error is:

    System.ArgumentOutOfRangeException was unhandled by user code
    Message=Specified argument was out of the range of valid values.
    Parameter name: index
    Source=Microsoft.SharePoint.Taxonomy
    ParamName=index
    StackTrace: at Microsoft.SharePoint.Taxonomy.Generic.IndexedCollection`1.get_Item(String index)

    The Hierarchy of Managed Metadata

    As explained in SharePoint Taxonomy Part One – Introduction to SharePoint Managed Metadata, the SharePoint 2010 EMM is organized into a hierarchy. The objects within this hierarchy are term stores, groups, term sets, and terms. For more info about the EMM hierarchy, refer to my SharePoint Taxonomy Hierarchy post.

    There are the rules for the taxonomy hierarchy (the latter three are from Microsoft):
    When a Managed Metadata service is created, a term store will be created. Once you have a term store, you can create a group. The Taxonomy API cannot create a term store (it is done through Central Administration or with a PowerShell script). However, the rest of the EMM containers can be created using the Taxonomy API.
    • After a Group object is created, the first TermSet object can be created. A TermSet object must be the child of a single parent Group object.
    • After a TermSet object is created, the first Term object can be created. A Term object can be the child of a TermSet object, or of another Term object.
    • After a Term object is created, another Term object can be created and added as a child Term object.

    Method to the Madness

    Here are some common methods that you’ll use when working with the EMM API:

    termStore.CreateGroup()
    group.CreateTermSet();
    termSet.CreateTerm()
    term.SetDescription()
    term.CreateLabel()
    term.Delete()
    termStore.CommitAll()

    Let’s start with the last one first: the CommitAll method. After performing write operations to a TermStore object, you must call CommitAll to commit the transactions. The taxonomy API is transactional so either every operation will be successfully committed, or none of the changes will be applied. As you saw in the list of classes above, the object model also includes changes. For example, ChangedItem and ChangedGroup. These are used to record what has happened.

    The SetDescription method allows you to create a description for the term and you can use CreateLabel to create synonyms. You can choose whether the label will be the default using a true or false Boolean. Of course, the Delete method will delete an object.

    Note that when creating a term or label, EMM provides the ability to supply the same term in different languages. This provides a number of multilingual features, but it also means that you’ll need to supply a Locale Identifier (LCID) when using some of the create methods. Windows uses the LCID to choose the language and culture when displaying information. The ID for English is 1033.

    Here’s a longer version of the using statement from above--it shows an example of these methods in action:

    using (SPSite site = new SPSite("http://localhost/"))
    {
    //Instantiates a new TaxonomySession for the current site.
    TaxonomySession session = new TaxonomySession(site);

    //Instantiates the connection named "Managed Metadata Service" for the current session.
    TermStore termStore = session.TermStores["Managed Metadata Service"];

    Group group = termStore.CreateGroup("Africa");
    TermSet termSet = group.CreateTermSet("South Africa");
    Term term = termSet.CreateTerm("Cape Town", 1033);
    term.SetDescription("This is the city term for Cape Town", 1033);
    term.CreateLabel("Cape of Good Hope", 1033, false);
    Term termChild = term.CreateTerm("Newlands", 1033);
    termChild.Delete();
    termStore.CommitAll();

    Label1.Text = " Finished";
    }

    image
    - The hierarchy has been created and the description and label were set

    [Disclaimer: This information is based on SharePoint 2010 Beta 2 and may differ from the RTM build.]

    Tuesday, December 29, 2009

    SharePoint 2010 Taxonomy Reference Issues

    If you’re looking to use the new SharePoint 2010 Managed Metadata (Taxonomy) API, you will likely run into one or both of these issues. One of them is mentioned in the known issues for SharePoint 2010 Beta 2, but not in a way that’s conducive to finding the solution with Bing or Google, so I’m including it here as well as a new one I’ve stumbled across.

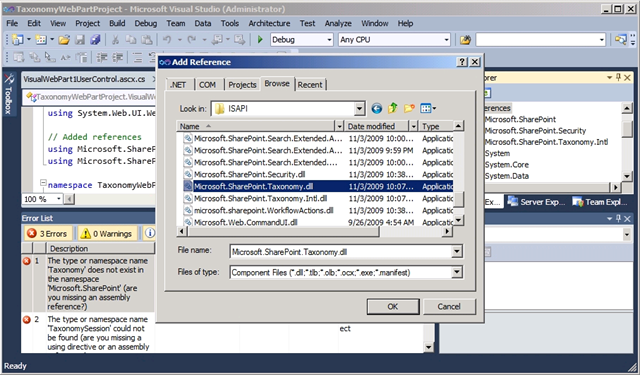
    The first issue is that after adding the Microsoft.SharePoint.Taxonomy reference, your project will not recognize any of the taxonomy classes (e.g., TaxonomySession). The first thing that I noticed is that adding the reference to Microsoft.SharePoint.Taxonomy from the .NET reference list simply did not work. Instead, I got a reference to Microsoft.SharePoint.Taxonomy.Intl—which is obviously a different DLL.

    image 
      - Broken reference to Microsoft.SharePoint.Taxonomy

    To resolve this issue, I simply used the browse option and added the right DLL explicitly from: C:\Program Files\Common Files\Microsoft Shared\Web Server Extensions\14\ISAPI\Microsoft.SharePoint.Taxonomy.dll. I deleted the other Taxonomy reference just for clarity.

    image
    - Browsing to the Taxonomy DLL will resolve the first issue

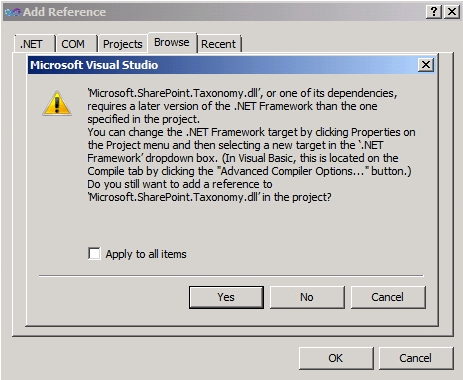
    When you add the right version, you may see the error: “’Microsoft.SharePoint.Taxonomy.dll’ or one of its dependencies, requires a later version of the .NET framework than the one specified in the project. You can change the .NET Framework target by clicking Properties on the Project menu...” You can ignore this error (you want to use .NET 3.5), it is resolved by the next solution.

    image 
      - You can ignore this message

    The second problem is the one mentioned in the known Beta 2 issues:

    “Some assemblies, such as Microsoft.SharePoint.Publishing, appear in some cases to have a dependency on an incorrect version of the System.Web.DataVisualization assembly. The incorrect reference causes build failures. If you see this problem, add a reference to the correct version of System.Web.DataVisualization on your system. If you installation is on the C drive, that assembly will be located here: C:\Program Files (x86)\Microsoft  Chart Controls\Assemblies\System.Web.DataVisualization.dll”

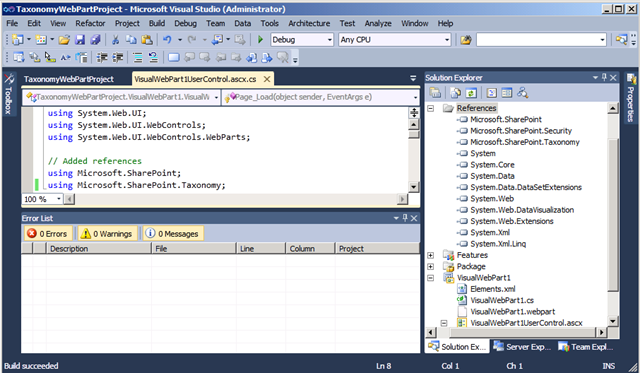
    Evidently, Microsoft.SharePoint.Taxonomy is another one of the assemblies with this issue. Fortunately, the solution is straightforward. Simply add a reference to System.Web.DataVisualization using the path above and your problems are solved.

    image 
      - After fixing the Taxonomy reference and adding DataVisualization, the project compiles

    [Disclaimer: This information is based on SharePoint 2010 Beta 2 and may differ from the RTM build.]

    SharePoint 2010 Visual Web Parts

    One of the new features in SharePoint 2010 that I’m most excited about is the ease with which developers can now create web parts. To distinguish the old from the shiny new, SharePoint 2010 provides the “Visual Web Part” project type. In this post, I’ll quickly cover the basics of getting a new web part working in debug mode--I’ll get into more detail in future posts.

    Update: I have posted a video demo on the Metalogix blog showing how to create a SharePoint 2010 Taxonomy Web Part.

    Obviously, you’ll need a working SharePoint 2010 development machine, so if you don’t have the set up yet, I suggest you refer to my post about SharePoint 2010 Beta 2 Install.

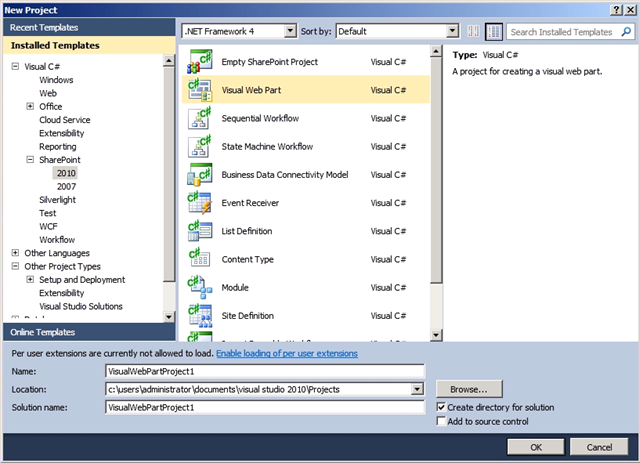
    Once you have everything set up, the first step is to create a new project in Visual Studio 2010 Beta 2.

    image
    - Creating a new project in Visual Studio 2010 Beta 2

    The new project dialog gives you the ability to choose a myriad of project types. You’ll want to choose Visual C# > SharePoint 2010 > Visual Web Part. As usual, you also have the option of choosing a project name, the path for the project files and a solution name.

    image
    - The new project dialog

    When the project is created, you will see that the plumbing of your new web part is provided in the project template.

    image
    - Your blank template for web part creations

    Rather than dive into the code, we’re just going to get this blank web part running, so start the debugger (F5 or click the green arrow).

    At this point, you’ll be asked to create a web part page to associate with your web part. After you choose a name and template for your new web part page, you can save your choices and the page will be created.

    Note: The good news is that if you delete this web page, you will be asked to created another when if you choose to debug your project again. The bad news is that it appears that overwriting the page may be necessary--even if you don't delete the first page.

    Update: Thanks to Peter Holpar who pointed out that I neglected to mention that you can add the debug page URL (once you've created it) into the Debug option of the project properties. This saves the extra steps of creating the page for each subsequent debug run.

    image
    - Creating a web page to run the web part in debug mode

    Depending on which template you choose, click an area where you see “Add web part” to bring up the web part picker. If you chose the default web page template, you will see four options.

    image
    - The web part page has been created

    You’re new web part will appear in the “Custom” category. After you choose to add it, you’ll see the name appear on your web part page.

    image
    - Choosing the new custom web part from the available web parts

    And that’s it. You now have a blank web part project that you can use to build what you want. Sure, it doesn’t actually do anything, but just enjoy how simple it is to get a working web part running in debug mode on your SharePoint server. Now you can drag and drop controls from the Toolbox just like any other ASP.NET page and start your creation.

    image
    - The new visual web part has been added

    Debugging and Breakpoints

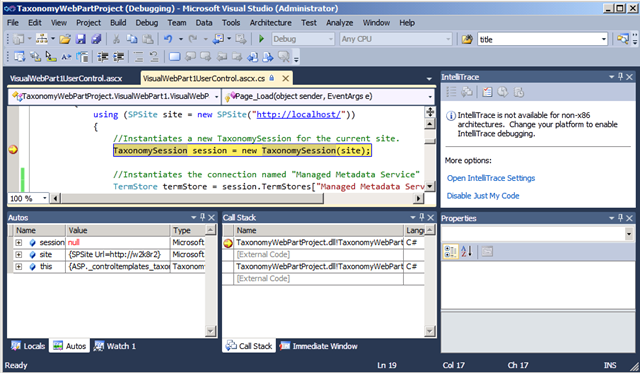
    One of the new advances in web part goodness is ease of debugging. To see how easy it is to debug and step through your code, simply insert a breakpoint into your visual web part.

    image
    - A breakpoint set in the SharePoint web part

    When you now run the debugger, code execution will stop at your breakpoint and let you step into/over or do whatever you desire in debug mode.

    image
    - The debugger has hit the breakpoint

    Now the trick is to figure out what you want to do, but isn’t that better than worrying about the plumbing?

    [Disclaimer: This information is based on SharePoint 2010 Beta 2 and may differ from the RTM build.]