This post has been adapted (abridged) from the Google Cloud Platform (GCP) Debugging an Instance documentation. I wanted to see the file structure that was being deployed to my Angular 5 application for my YouTube video highlight web app (Tunnel Video). These are the steps required.
1. Go to your App Engine instances in the GCP console
https://console.cloud.google.com/appengine/instances
2. Find the instance and choose the SSH option to open a terminal in a browser window
3. Once the terminal window for the instance opens, list the docker containers: $ sudo docker ps
4. Find the docker container in the list with your project name in it and then run: $ container_exec containerId /bin/bash
5. This will open a shell in your container. From there, just list your files as usual: ls app
Showing posts with label Google App Engine. Show all posts
Tuesday, November 14, 2017
Tuesday, September 19, 2017
Google Cloud Platform for a Full-stack Angular Web Application
At first blush, getting a complete Angular web application deployed and running on the Google Cloud Platform (GCP) can be a daunting task. Each quickstart tutorial is reasonable enough, but if you read ahead through all of the various documentation pages you'll need, they can soon begin to snowball.
UPDATE: After I started writing this post, I discovered a Google lab that covers the same topic: Build a Node.js & Angular Web App Using Google Cloud Platform.
I'll just quickly provide an overview of deploying Angular as the front-end app (on Google App Engine) and MySQL with a Node.js API on the backend. MySQL will run on Cloud SQL and Node.js runs on App Engine.
The basic steps involved are:
1. Set up a GCP account and project
2. Download the Angular sample and install the requirements
3. Deploy your Angular front-end app to GCP
4. Set up a MySQL DB on Cloud SQL. I wrote a whole post about setting on MySQL on Google Cloud SQL.
5. Complete the tutorial for using Google Cloud with Node.js
Since these samples aren't linked, you'll have to test the pieces separately until you develop some interaction in your Angular app. You can use Postman to test your Node.js API.
UPDATE: After I started writing this post, I discovered a Google lab that covers the same topic: Build a Node.js & Angular Web App Using Google Cloud Platform.
I'll just quickly provide an overview of deploying Angular as the front-end app (on Google App Engine) and MySQL with a Node.js API on the backend. MySQL will run on Cloud SQL and Node.js runs on App Engine.
The basic steps involved are:
1. Set up a GCP account and project
2. Download the Angular sample and install the requirements
3. Deploy your Angular front-end app to GCP
4. Set up a MySQL DB on Cloud SQL. I wrote a whole post about setting on MySQL on Google Cloud SQL.
5. Complete the tutorial for using Google Cloud with Node.js
Since these samples aren't linked, you'll have to test the pieces separately until you develop some interaction in your Angular app. You can use Postman to test your Node.js API.
Labels:
Angular,
Google App Engine,
Google Cloud Platform,
MySQL,
Node.js,
web development
Saturday, February 06, 2016
Google Drive API JavaScript App Running in App Engine
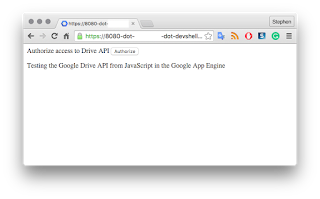
I worked through the JavaScript quickstart guide of the Google Drive V3 API and modified it slightly so I could host and run the whole thing in the Google App Engine . I suggest you work through the quickstart once (following all the steps) before you read on--unless you're already familiar with App Engine and the Google Cloud Console, it may be difficult to follow what needs to change. The quickstart is a simple one-page app that allows the user to authorize access to their Google Drive and then shows ten files and/or folders in that Drive.
Why would you want to do this? It's great to be able to create your app that uses the Google Apps APIs, but even better is to host that app within the Google App Engine so that you don't have to worry about maintaining any of the infrastructure that runs your app. You also get the benefit of sophisticated App Engine features such as performance scaling.
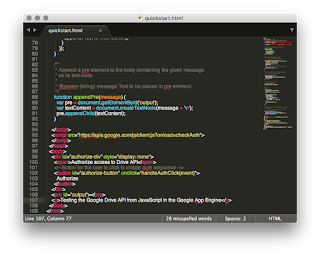
The steps in the Drive V3 quickstart (https://developers.google.com/drive/v3/web/quickstart/js) will get you most of the way, but with a few changes, you can serve the app from the Google App Engine, which is super powerful and a more modern mechanism for running a web application.
One thing you'll have to change is the URL that your client ID will accept. The quickstart expects you to host and run the app on your local machine, and therefore use http://localhost as the URL. You can enter that when you work through the tutorial, but you'll have to change the URL for "Authorized JavaScript origins" later to the URL for your particular app. However, you won't have that URL until you try running your app from the Google Cloud Shell.
Your client ID should look something like this (I've edited it so as not to disclose my client ID):
111111-gchjkdptqt15lp89s229jo8h25omel4e.apps.googleusercontent.com
Here are some notes to clarify how to get the quickstart running in Google App Engine from the Google Developer Console:
cawood@definite-destiny-999999:~$ cd src/definite-destiny-999999/master
cawood@definite-destiny-999999:~/src/definite-destiny-999999/master$ python -m SimpleHTTPServer 8080

Note: I do not cover deploying your app for production use. Perhaps that can be a future post.
Note: If you've made a change and pushed it from your local machine, but the file isn't updating, try closing and reopening the console. I've found that it doesn't pick up changes to the files unless I do this.
I've made the project public on GitHub: https://github.com/stephencawood/WebHelpEditor/tree/master/WebHelpEditor
Why would you want to do this? It's great to be able to create your app that uses the Google Apps APIs, but even better is to host that app within the Google App Engine so that you don't have to worry about maintaining any of the infrastructure that runs your app. You also get the benefit of sophisticated App Engine features such as performance scaling.

The steps in the Drive V3 quickstart (https://developers.google.com/drive/v3/web/quickstart/js) will get you most of the way, but with a few changes, you can serve the app from the Google App Engine, which is super powerful and a more modern mechanism for running a web application.
One thing you'll have to change is the URL that your client ID will accept. The quickstart expects you to host and run the app on your local machine, and therefore use http://localhost as the URL. You can enter that when you work through the tutorial, but you'll have to change the URL for "Authorized JavaScript origins" later to the URL for your particular app. However, you won't have that URL until you try running your app from the Google Cloud Shell.
Your client ID should look something like this (I've edited it so as not to disclose my client ID):
111111-gchjkdptqt15lp89s229jo8h25omel4e.apps.googleusercontent.com
Here are some notes to clarify how to get the quickstart running in Google App Engine from the Google Developer Console:
- You'll likely want to create your own GitHub repo and clone it to your local machine.
- When you get to the step in the tutorial, you can connect your app project to your new Git repo. You'll have to authorize Google App Engine to use your repo. By connecting the two, it is super easy to manage (and even edit) your code from within the Google Developer Console.
- Create the sample file (with code provided) in the local repo and push it to master that is synching with GitHub.
- Don't forget to change your client ID in the sample code: var CLIENT_ID = '
'; - Once you have everything ready. Make sure you have your new quickstart project selected and then open the developer cloud console. The console is a Linux based shell.
- Change directory (CD) to the src directory for your quickstart project.
cawood@definite-destiny-999999:~$ cd src/definite-destiny-999999/master
- Start a web server using Python to host your application: python -m SimpleHTTPServer 8080
cawood@definite-destiny-999999:~/src/definite-destiny-999999/master$ python -m SimpleHTTPServer 8080
Serving HTTP on 0.0.0.0 port 8080 ...10.240.0.145 - - [12/Jan/2016 00:11:56] "GET /?authuser=0/ HTTP/1.1" 200 -10.240.0.150 - - [12/Jan/2016 00:11:58] "GET /quickstart.html HTTP/1.1" 200 -
- Open the Web preview from the console window in port 8080. When you navigate to the quickstart.html file, you will get the URL you need to add to your client ID credentials. The Web preview option is in the top-left corner of the cloud console.
- Find your client ID in the credentials section of the dev console and edit it to add the URL you just opened in web preview. (To stop the app (quit the web server), press Ctrl+C.)
That's it! You should now have the quickstart running in Google App Engine! Sweet.
Note: I do not cover deploying your app for production use. Perhaps that can be a future post.
Note: If you've made a change and pushed it from your local machine, but the file isn't updating, try closing and reopening the console. I've found that it doesn't pick up changes to the files unless I do this.
I've made the project public on GitHub: https://github.com/stephencawood/WebHelpEditor/tree/master/WebHelpEditor
Labels:
coding,
Google App Engine,
Google Drive,
JavaScript,
web development
Subscribe to:
Posts (Atom)