Showing posts with label software. Show all posts

Wednesday, April 25, 2012

Twitter Bootstrap, Less and PHP Setup on IIS 7.5 and Windows 7

It’s certainly not news to me that setting up any technology on Windows that’s typically associated with the LAMP stack can be a bit tricky. Today, I found myself wanting to run a Twitter Bootstrap site that was built in PHP. I use Windows 7 and IIS 7.5 on my laptop, so I had to get through a few minor setup considerations. Here are some of them—hopefully, this will help others get going quickly.

Essentially, you need to download PHP (http://windows.php.net/download or http://php.iis.net/), configure it to work with IIS. Download Twitter bootstrap, configure it to work with IIS… etc. etc. etc. Here are some quick tips for getting going. The PHP.net article on Enabling FastCGI support in IIS was helpful. There are some steps that are optional, so you might want to first check whether the handler mapping is already in IIS, but for the most part, it’s a useful page to follow. For example, installing the CGI component for IIS is required. Without that feature, you won’t be able to run any PHP code in IIS.

If you want to use the short form of the PHP server-side tag (“<? … ?>” instead of “<?php … ?>” ), you’ll need to turn the option on in your php.ini configuration file. Since this file is typically being used, you can’t just open it and save change. The easiest way to edit it is to search for the php.ini file, copy it to some other location, then open the file and search for the “short_open_tag =” line. Change it to On to use the short form and then copy the PHP.ini file back to it’s original location and restart IIS.

; This directive determines whether or not PHP will recognize code between
; <? and ?> tags as PHP source which should be processed as such. It's been
; recommended for several years that you not use the short tag "short cut" and
; instead to use the full <?php and ?> tag combination. With the wide spread use
; of XML and use of these tags by other languages, the server can become easily
; confused and end up parsing the wrong code in the wrong context. But because
; this short cut has been a feature for such a long time, it's currently still
; supported for backwards compatibility, but we recommend you don't use them.
; Default Value: On
; Development Value: Off
; Production Value: Off
;
http://php.net/short-open-tag
short_open_tag = On

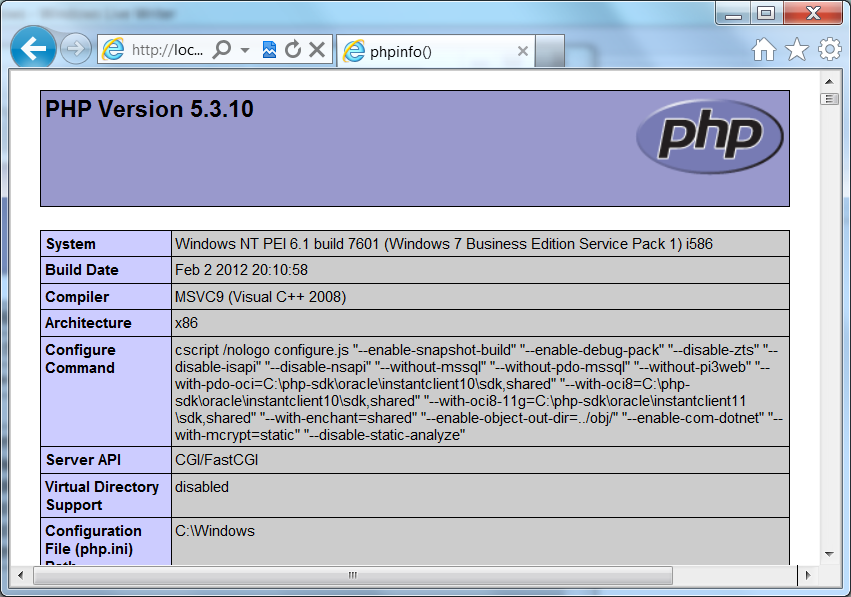
To test whether PHP is working, you can run <?php phpinfo() ?> or <? phpinfo() ?> in a .php file under wwwroot. Call it whatever you want .php. Then open the page (e.g., http://localhost/phpinfo.php) and see what’s displayed. If everything is working, you’ll see a page that shows verbose information about your environment (see screen below). If you try to run the command with the short form notation, and you haven’t enabled that option, the page will be completely blank.
image
- PHPINFO() shown in Internet Explorer

If you have any issues getting Less or Bootstrap files to load, open up your site in Chrome or IE and use the developer tools to inspect what’s going on with the scripts.

image
- Chrome developer tools showing Resources (scripts)

For example, I had to add an IIS mime type for “.less” files to get Less to work on my machine (IIS 7.5). Without setting the mime type, I was getting a 404.3 error for the file bootstrap.less. This isn’t difficult to do, just open Internet Information Services (IIS) Manager and find the “Mime Types” feature under “HTTP Features.” Make sure you’ve selected the website in the left panel before you look for this option on the right side. I just add a new mime type for .less files and set it to “text/plain” and everything worked.

image

Monday, March 05, 2012

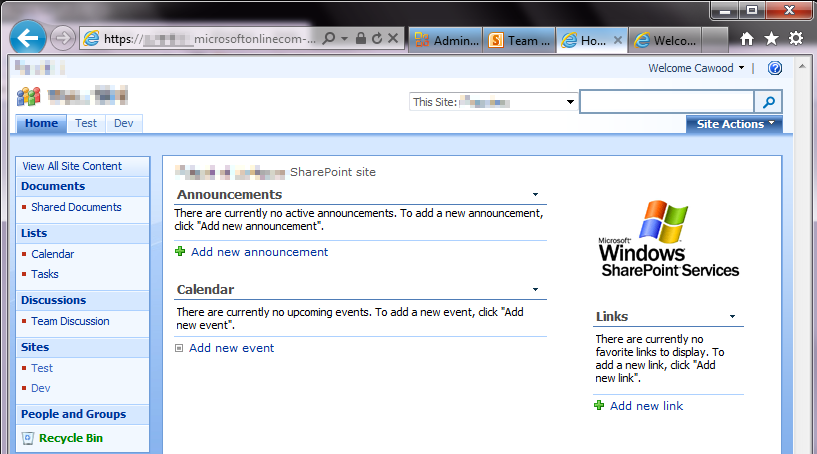
BPOS Upgraded to Office 365–Why Does it Look the Same?

Obviously, there’s a lot more to Office 365 than SharePoint Online. The Microsoft Online Services offering also includes Exchange Online for email, Lync Online for communication, the Office Web Apps, and some plans even include a copy of Office Professional Plus. But I’ll let others blog about the various pieces—this post is about SharePoint Online.

If you have a Business Productivity Online Suite (BPOS) account, you’ll know that BPOS comes with Microsoft Office SharePoint Server 2007 (MOSS) and Office 365 comes with SharePoint Server 2010. Since I work for a Microsoft Partner, Metalogix Software, my GovernanceHx project is part of the BizSpark program, and I’m a Microsoft MVP, I have a few different SharePoint Online accounts—including both BPOS and Office 365. One of these accounts was recently upgraded from BPOS to Office 365, so I’ve experienced the SharePoint upgrade firsthand.

BPOS Site Upgraded Office 365 geeklit.com stephen cawood
- A BPOS SharePoint site upgraded to Office 365

The funny thing about the SharePoint Online portion of the upgrade is that it’s really hard to tell that anything has happened. Sure, you get an email that advises you that your site is ready for upgrade, but when you actually visit your SharePoint Online site, it looks exactly the same. Well, we all know that looks can be deceiving.

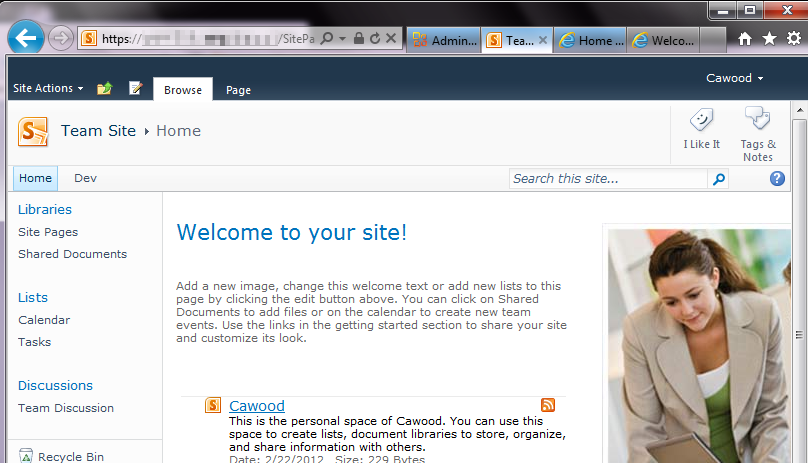
If, however, you enter using the Team Site link from the Office 365 customer portal, you’ll be taken to a spanky new SharePoint Server 2010 site. This is actually a new page; the BPOS content retains the same URL after the upgrade and a link will be added to your new home page.

Office365SharePointOnline_Edit
- The SharePoint “Team Site” home page after BPOS (MOSS 2007) is upgraded to Office 365 (SharePoint 2010)

So why does the BPOS SharePoint Online content still look like MOSS? It’s actually a feature of SharePoint Server 2010. Specifically, the “Visual Upgrade” feature. Visual Upgrade allows MOSS sites to be upgraded to 2010 without changing the look and feel. This is meant to ease the transition to the new version of SharePoint. A site admin can go to the site settings and choose to upgrade to the SharePoint 2010 look and feel. When a BPOS site is upgraded to Office 365, the SharePoint Online content is put in a site collection under the Office 365 account.

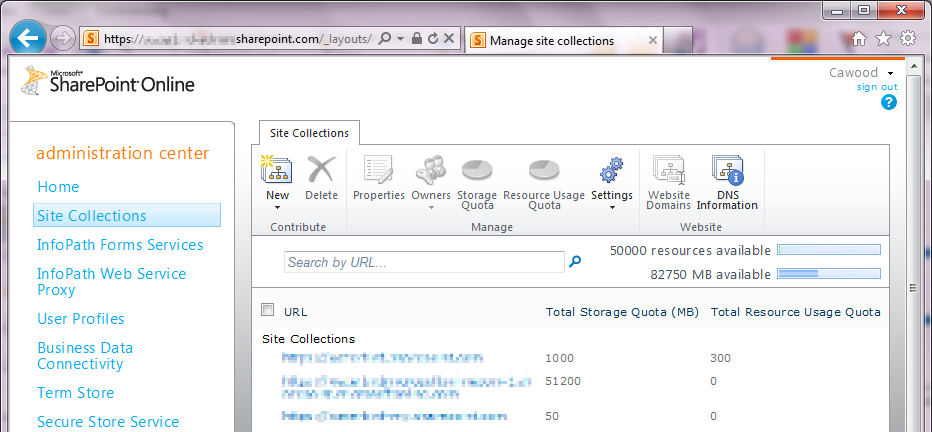
To see the site collections, go to the Microsoft Online Services (Office 365) Administration portal and scroll down to SharePoint Online. Once there, click the “Manage” link. This opens the SharePoint Online Administration Center. Next, click on “Site Collections” to see the Office 365 site collections that were provisioned for you during the upgrade.

Office 365 Admin geeklit.com stephen cawood
- The Office 365 administration interface

Here you’ll see that there’s a new site collection under your Office 365 domain name (yes, the Office 365 URLs are much nicer than the old BPOS mouthful), and that there’s one for your MySites (a feature that wasn’t available in BPOS), as well as one for your old BPOS content. If you don’t want to use the new SharePoint 2010 interface, that’s your choice, but personally, I’d go for it.

Office 365 SharePoint Online geeklit.com stephen cawood
- The new SharePoint Online Administration Center interface

I only wanted one site collection, so I used Metalogix Migration Manager for SharePoint, to migrate the old BPOS content to the main Office 365 site collection.

Having my site (and my MySite) on SharePoint 2010 means I can take advantage of great features that are only available in SharePoint 2010. For example, Enterprise Metadata Management (a.k.a. SharePoint taxonomy), the new SharePoint UI with the fluent ribbon and a tighter integration with Microsoft Office.

Saturday, August 13, 2011

Announcing GovernanceHx – SharePoint Governance for Everyone!

I recently read an article that proclaimed--without any grey area--that Microsoft SharePoint governance has nothing to do with technology. I certainly understand the sentiment. Governing an enterprise platform such as SharePoint can be complicated and requires planning and buy-in from various people. However, I also believe that giving SharePoint users access to the right tools can empower them to keep track of whether their governance plans are being effectively enforced. To put it succinctly, wouldn’t you rather know right away about issues than wait until someone decides to proactively check for them?


In my vast spare time (for those who don’t know me, that’s a joke), I’ve been working on a SharePoint community application that I’m now ready to start talking about.

GovernanceHx is a web application that is bringing SharePoint governance to the Cloud. The application allows any SharePoint user to run free, read-only reports against their SharePoint servers with the express purpose of combatting SharePoint sprawl. This means that people without admin access, or development skills, can easily generate reports about the growth of their environment and use them to gain an insight into changes over time. This is why I chose to go with the name GovernanceHx. “Hx” is commonly used in the health care field as the abbreviation for history. GovernanceHx shows the governance health of your SharePoint server over time.

image
- A report results page from GovernanceHx

At this time, I’m showing some demos and recruiting a few SharePoint experts to be Governance Advisors on the project. I’m happy to announce that SharePoint expert and prolific conference speaker, Richard Harbridge, has joined the project as the first Governance Advisor.

Custom image

These advisors will help shape the future of the project by using their real-world SharePoint experience to identify the best application of the GovernanceHx framework. Since GovernanceHx tracks growth, the advisors will help figure out which growth reports will be most useful.
image 
And speaking of frameworks, that’s one of the coolest aspects of this project. I’ve developed the GovernanceHx reporting framework using Windows Azure, so users will not need to install anything at all on their SharePoint server to run reports against Office 365 or any SharePoint sites that are accessible over the net.

logo-office-365[1] 

Cloud-based SharePoint governance opens up all sorts of possibilities for Office 365/SharePoint online customers. For example, I’m sure there are plenty of small to medium businesses that would like a solution to help with their governance enforcement but simply can’t afford a large enterprise reporting application for the job. GovernanceHx will be the low friction way for these users to discover sprawl issues before they become unmanageable.

Wednesday, August 03, 2011

Why I FINALLY became a OneNote User—and I’m not turning back

I’ve been meaning to write a post about how Microsoft Office OneNote has improved my productivity, but really, who has the time? OK, sorry no more of that. Today, Microsoft announced that the Office OneNote iPhone app will be free for a limited time. (It was published to the Canadian app store last week). Now I can use the same TODO list on my PC, online and on my phone--all nicely synchronized.

image
- the new OneNote iPhone app

I only recently became a devoted OneNote user. I know, I know… What took me so long? Well, I don’t have a great excuse. When I tried the first OneNote Beta build, it wasn’t able to create tables—obviously, it had far fewer features than the current release—but the inability to create tables was a deal breaker for me. Since then, I’ve seen a flood of people adopt OneNote and sing its praises. I often questioned if I was missing out, but I kept holding back. I’m a big Outlook fan and I just kept using Outlook for everything. E-mail, appointments, reminders… Why not keep notes in there as well? That’s what I did, but lately my inbox was getting the best of me and despite my best efforts, I could use some help. (I wrote about managing my Outlook inbox in my post, Don’t be an E-mail Hoarder–Improve Your Outlook Productivity.)

So what was I waiting for? It turns out that the killer feature for me was the ability to use Windows Live SkyDrive to synchronize my OneNote notebooks across multiples machines and the OneNote Web App. And, of course, as of today, my phone as well.

For me, the ability to share OneNote notebooks effortlessly across devices is a game changer. I can make notes at work, update them online and then when I grab my laptop, I can rest assured that it will update automatically when I go online. The cloud-based synchronization also means that my notebooks are automatically backed up for me—a hard drive crash isn’t going to mean any note data loss at all. The fact that SkyDrive, the OneNote web app, and the iPhone app are all free is a nice bonus.

If you’re still not sold on OneNote, take a look at the OneNote blog post about using OneNote notebooks to plan a vacation.

image
- Use the Office Web Apps version of OneNote to work with your notebooks online.

I’m happy that I finally took the time to investigate what OneNote can do and I don’t see myself giving up this excellent productivity tool. If nothing else, it will as least give my Outlook inbox a bit of a break.

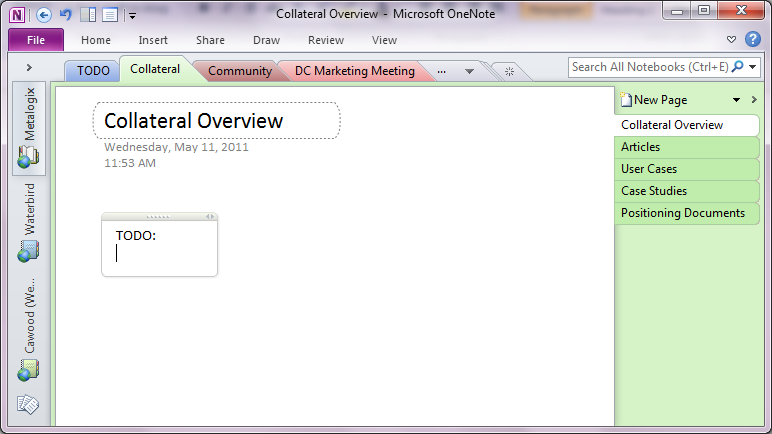
image
- The Office client version of OneNote

Sunday, July 10, 2011

Windows Azure Table has Phantom Columns

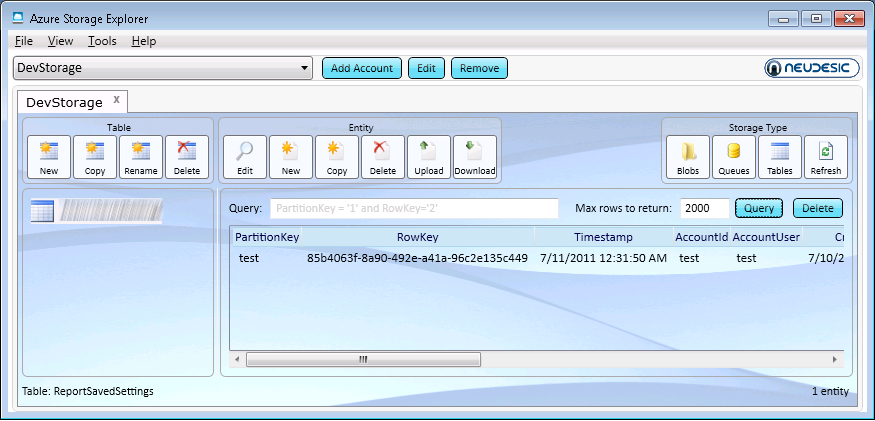
While working on my Windows Azure application this weekend, I ran into an issue that had me stumped for a few minutes until Neudesic’s Azure Storage Explorer helped me attain the moment of clarity that brought the resolution to me.

The issue I was running into was that one of my Azure tables was showing a number of columns that I wasn’t using. The answer was quite simple—I WAS using them in the past. Therefore, even if I deleted all the rows in the table, I wasn’t removing those old columns and they were showing null data.

image

- You can download Neudesic’s Azure Storage Explorer from www.codeplex.com.

In this case, it didn’t show my anything other than my Azure table had empty columns that I didn’t think I was adding, but that was enough for me to ‘see’ the issue.

Friday, July 08, 2011

Error Deserializing XML: There is an error in XML document (2, 2)

While working with some XML documents, I ran into this cryptic error: “There is an error in XML document (2, 2).” The problem turned out to be a surprising case sensitivity in the C# code. When I was trying to deserialize from XML to an object, the XML elements didn’t match the case of the class properties.

Here is my original XML file:

<?xml version="1.0" encoding="utf-8" ?>
<test>
  <name>stephen</name>
</test>

Test class:

public class Test
{
  public string Name { get; set; }
}

And the code that I was using to deserialize the XML into the Test class object.

string xmlFile = String.Concat(HttpContext.Current.Request.PhysicalApplicationPath, "test.xml"); System.IO.StreamReader reader = System.IO.File.OpenText(xmlFile);
XmlSerializer xs = new XmlSerializer(typeof(ReportTemplate));
Test testData = (ReportTemplate)xs.Deserialize(reader);

The solution was quite simple. The case of the XML tags did not match the case of the class properties. By changing them to match, I resolved the error. Here is the working XML:

<?xml version="1.0" encoding="utf-8" ?>
<Test>
   <Name>stephen</Name>
</Test>

BTW – If the root element case matches, but one of the sub-elements does not, you will see the beloved error “Object reference not set to an instance of an object.”

Tuesday, June 28, 2011

Microsoft’s SharePoint, Office 365 and ‘Cloud’ Terminology

With today’s launch of Office 365, I have cloud computing on the brain. It’s no exaggeration to say that “cloud” is the hottest buzz word in IT these days. According to IDC, the cloud market will hit $72.9 billion in 2015. However, there isn’t just one flavour of cloud. From cumulus to Office 365, clouds come in all sorts of varieties. So what does “cloud” actually mean? Here’s a run-down of the terminology currently being used by the SharePoint community and Microsoft in its SharePoint Online (SharePoint in the cloud) messaging.

logo-SharePoint-270_40[1]

SharePoint Online

The term “SharePoint Online” has been used to refer to any hosted versions of SharePoint—but the image above shows that Microsoft has really claimed the name. Office 365, BPOS and SharePoint hosted by a provider (e.g., Rackspace, SharePointHosting.com or Fpweb) all fall under the loose use of this term. I liked the general usage, but I guess I should stick with the fact that SharePoint Online is part of Office 365/BPOS and therefore refers to SharePoint hosted by Microsoft.

Office 365

Office 365 launched today! According to Microsoft, Office 365 is “where Office meets the cloud.” What that actually means is that it’s hosted versions of Exchange Server, SharePoint 2010 Server, and Lync Server. The previous version was called the Business Productivity Online Suite (BPOS). Users will have access to the web versions of Office products and some users will actually get a copy of Office Professional included.

Private Cloud

This is a mildly controversial term. According to Gartner, IT should be planning to move to private clouds. But if cloud computing is applications hosted online, then a private cloud is what exactly? According to a growing number of influences, a private cloud is not necessarily on the Internet at all—it’s any version of SharePoint that’s accessed over a network. A private cloud is usually SharePoint hosted in a private data center.

So what’s controversial about that? Well, cloud computing is meant to free organizations from the IT overhead of running their own systems. If a company is running SharePoint in a private data center then they’re not decreasing their overhead; they’re actually adding a complicated infrastructure.

Public Cloud

If the private cloud is a version of SharePoint that’s available to a restricted group and accessible over a private network, then a public cloud is a SharePoint system that’s accessible publicly across the Internet. Office 365 is an example of a public cloud since all you need is the right URL, username and password, and you’ll be able to access it from anywhere.

Hybrid Cloud

If you needed any proof that Microsoft is walking the walk when it comes to their “all in” cloud messaging. All you need to do is read the four-page Microsoft cloud ad in last month’s edition of Wired magazine. The main focus of that add is the hybrid cloud: part private cloud and part public cloud. Hybrid clouds are being promoted because they allow companies to get their feet wet in the cloud (pardon the mixed metaphor) without jumping all in.

I recently co-presented a SharePoint webinar with Bob Fahey, Senior Director at Avanade, on the subject of migrating to SharePoint online and hybrid clouds.

Business Productivity Online Suite (BPOS)

The Business Productivity Online Suite (BPOS) from Microsoft is a cloud computing subscription offering and the first version of what’s now called Office 365. BPOS includes hosted versions of LiveMeeting, Exchange, SharePoint (it was Microsoft Office SharePoint Server 2007 [MOSS]) and Office Communications Server. BPOS has two flavours: Standard (BPOS-S) and Dedicated (BPOS-D).

I’ve heard it through the grapevine that this was never meant to be a public name. It’s an awful acronym that has already been abandoned, so I wouldn’t be surprised if that little piece of gossip is true. Office 365 is a much better name.

BPOS-S

BPOS-S stands for “Business Productivity Online Suite – Standard Edition.” some people say “Shared Edition” but that’s incorrect.

From www.microsoft.com, “Microsoft Business Productivity Online Standard Suite is a set of messaging and collaboration tools, delivered as a subscription service, that gives your business rich capabilities without the need to deploy and maintain software and hardware on-premise. These online services are designed to help meet your needs for robust security, all-day every-day reliability, and user productivity.”

The difference between dedicated and standard editions is covered in the BPOS – What is it? blog post on TechNet. Basically, the standard edition is a multi-tenant environment with multiple customers sharing the same hardware and dedicated installs are reserved hardware for one account. In order to subscribe to the dedicated version, an organization needs to sign-up 5000 users.

BPOS-D

As mentioned above, the difference between dedicated and standard editions is covered in the BPOS – What is it? blog post on TechNet.

Shared Cloud

This is a general term for any multi-tenant cloud environment. As already mentioned, some people erroneously assumed that BPOS-S stood for BPOS “Shared” edition. BPOS and Office 365 both provide shared offerings. In fact, almost all BPOS and Office 365 customers use the shared cloud version of those offerings.

Standard Cloud

This refers to BPOS-S--Business Productivity Online Standard Suite--which is Microsoft’s shared cloud offering.

Microsoft Online Services

Microsoft Online Services (MOS) offers hosted applications such as Office 365. These services include Dynamics CRM Online, Windows Azure and SQL Azure.


Companies generally move to the cloud because they are looking to reduce overhead, so it can be all about saving money, but there are other reasons to move all or part of your applications to the cloud. Many BPOS customers moved to the cloud because they wanted to use Exchange Online. However, there will be plenty of cases where companies will move to Office 365 to use SharePoint online.

Furthermore, many companies will have a hybrid solution of SharePoint on-premises and SharePoint online. In closing, I’ll just mention that Metalogix Migration Manager for SharePoint is the only solution Microsoft has approved for migrating SharePoint content to Office 365 or BPOS dedicated.

Happy Birthday Office 365

Today, Microsoft is launching Office 365, which includes SharePoint 2010 online.

I wrote a SharePoint 2010 birthday post when SharePoint 2010 launched that included the image below of the Metalogix office cake.

Metalogix has announced Office 365 support in Migration Manager for SharePoint.

From the Metalogix website:

“Whether you are using SharePoint on-premises, or SharePoint online in the cloud, Migration Manager for SharePoint (formerly SharePoint Site Migration Manager) is the best-of-breed solution for your needs. You might be moving to Office 365, or upgrading from SharePoint 2003 or 2007 to SharePoint 2010, moving between SharePoint servers, managing a hybrid cloud environment, or re-organizing your SharePoint content--regardless of your use case, Migration Manager for SharePoint is an easy-to-use and convenient way of moving, synchronizing or managing your SharePoint data. With its familiar copy-and-paste-style user interface, you can quickly migrate and manage all SharePoint sites, libraries, lists, web parts and permissions between servers.”

Sunday, June 19, 2011

Azure Blob.FetchAttributes Throws “The specified blob does not exist.”

I was working on a Windows Azure application this weekend and I ran into a strange error. I was trying to access the metadata associated with blobs using (blob.FetchAttributes()) and received an error message. The problem was actually that the metadata wasn’t being associated properly with the blobs, so there was nothing to return. However, the error thrown was, “The specified blob does not exist.” Needless to say, I found this to be strange.

My solution was to check the metadata count before trying to fetch any metadata. This allowed my code to return blank results rather than throw a misleading error.

// Check for the case where attributes haven't been set
if (blob.Attributes.Metadata.Count > 0)
{
     blob.FetchAttributes();
}

Update: Upon further investigation, I found that this didn’t work even when the BLOB metadata was properly set. If you run into this, check that you’re blob container reference isn’t null.

Saturday, May 21, 2011

Microsoft Online Services Client Sign-in Issue

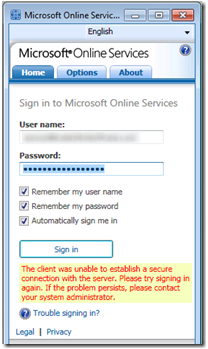
I ran into an interesting error last week. I’ve rarely had issues with computers clocks, but for some inexplicable reason, two of my machines were on the wrong time last week. One of the consequences of this fact was that the Microsoft Online Service (MOS) sign-in tool for BPOS (now called Office 365) failed to work. This is one of my public service announcement posts—hopefully, this will help the next person quickly resolve the problem.

image

The error didn’t give me any indication that it was an issue with the clock: “The client was unable to establish a secure connection with the server. Please try signing in again.”

The solution was simply to set the computer clock correctly and change the server that I was using for online synchronization.

The full error is below. it was also reproducible on the MOS customer portal web page.

image

This issue is discussed on the Microsoft Online: Services Sign In for Windows forums here: http://social.technet.microsoft.com/Forums/en/onlineservicessigninapplication/thread/3a5bd983-935b-4610-8cb4-6e11972cf3ee

Full Error:

The client was unable to establish a secure connection with the server. Please try signing in again. If the problem persists, please contact your system administrator.

The page requires a valid SSL client certificate

Your client certificate has expired or is not yet valid. A Secure Sockets Layer (SSL) client certificate is used for identifying you as a valid user of the resource.


Please try the following:

  • Contact the site administrator to establish client certificate permissions.
  • If you already have a valid client certificate, use your Web browser's security features to ensure that your client certificate is installed properly. (Some Web browsers refer to client certificates as browser or personal certificates.)
  • Change your client certificate and click the Refresh button, if appropriate.

HTTP Error 403.17 - Forbidden: Client certificate has expired or is not yet valid.
Internet Information Services (IIS)


Technical Information (for support personnel)

  • Go to Microsoft Product Support Services and perform a title search for the words HTTP and 403.
  • Open IIS Help, which is accessible in IIS Manager (inetmgr), and search for topics titled About Certificates, and About Custom Error Messages.

Thursday, March 17, 2011

HTDE SharePoint Book Supplement–History of MCMS and SharePoint

Last year, my SharePoint 2010 end-user book came out: How to Do Everything: Microsoft SharePoint 2010. To keep the momentum going, I’ve decided to write some short supplements. My goal is to add in things that I either didn’t have the time or the pages to do it in the printed book. After all, the express goal of the book was to not overwhelm end-users with too much information—as used to be common in the SharePoint world. The added topics might include background information, more examples, or maybe just colourful anecdotes about working on the Microsoft Content Management Server (MCMS) and SharePoint teams at Microsoft. I’ll try and follow the chapter order, but if something compelling comes along that’s out of order, I won’t hold back the content just to keep the posts in sequence.

The first chapter of the book is an introduction to SharePoint and a history of the evolution of the platform (written by former Director of Marketing for SharePoint, Arpan Shah). It’s also one of my versions of answering the question, “what’s SharePoint?”—although you don’t hear that so much anymore. In this first supplement, I’ve decided to add a history of MCMS and talk about how publishing features from MCMS were added to SharePoint.

First off, if you look to the right-hand side of this page, you’ll see a logo that looks like the one below. (My apologies to those of you in the future who are reading this after I’ve changed my blog template or migrated to some sort of solar-powered blogging platform.) This logo was created for NCompass Resolution 3.0 and also used for v. 3.1—the last major release before Resolution became MCMS.


Prior to the Microsoft acquisition, NCompass Labs was a small company based in Vancouver, Canada. We worked in an old Hudson’s Bay Company  fur warehouse in Gastown; it was the classic '”bricks and sticks” style that was popular during the .com boom. The office was on Water St. (so near the famous steam-powered clock that we could hear it form our desks) and boasted a view of the mountains and Burrard Inlet. I spent most of my time there facing Water St., but for a short time, I did enjoy that mountain view.

After Microsoft acquired NCompass Labs, Resolution 3.1 became MCMS 2001. The .NET initiative was on every dev manager’s mind at Microsoft and MCMS 2002 was released to add support for .NET. One of my tasks with the MCMS team was to port the Woodgrove Bank sample site to Woodgrove.NET. As you may have guessed, SharePoint 2003 was released the next year.

I’ve heard some revisionist history accounts of what happened during this period. So here’s my take. Since SharePoint and MCMS were both used to create websites, people often chose to do this using the erroneous distinction that SharePoint was for internal sites and MCMS was for public facing sites. In truth, SharePoint was focused on team collaboration and the fact that it wasn’t being used for public facing sites had a lot to do with the licensing model. MCMS could be used for any website but it didn’t ship with templates out of the box the way SharePoint did. However, MCMS was built from day one with public facing sites in mind and later versions had been tuned extensively for optimal performance on heavily trafficked sites.

- In honour of it’s Canadian roots, the MCMS box and screens featured images of the Vancouver library.

The two products weren’t even in the same business unit. SharePoint was in the Office Server Group and MCMS was in the now defunct E-Business servers group that was working on an e-business suite codenamed “Jupiter.” Jupiter was meant to include BizTalk, Host Integration Server, Commerce Server and MCMS. However, as time went on Jupiter remained a far-out idea and the confusion around which Microsoft product customers should use for building their site still remained. Microsoft knew that a change was in order. The resolution (pardon the pun) came when MCMS was retired and the MCMS team was folded in the Office Server Group. We were quickly set out to add more publishing features to SharePoint. Before I left Microsoft, I was working on SharePoint 2007 (MOSS) navigation, but I moved back to Canada before the release.

SharePoint today is a popular and rich platform for building websites. If someone asks, “what’s SharePoint?” feel free to use that line.

Friday, January 07, 2011

Add Push Notification to SharePoint Apps

I’ve been working on an application to help me with some SharePoint 2010 API/web services/client OM performance testing—I’ve given this app the sufficiently geeky name ‘SharePoint Genesis Device.’ The operations that this application runs can take many hours, and I don’t want to have to keep checking if it has completed. For this reason, I’ve added Growl/Prowl support so that I can receive push notifications on my PCs and smart phone.

image

                                                 - A Prowl notification sent to my phone

I’ve just started on this project, but the screenshot below shows what the SharePoint Genesis Device looks like today. I’m going to use Prowl ($2.99) as my mobile app for Growl notifications, but there are other options out there. However, I found Prowl to be easy to set up, so I recommend it.

image

After adding Growl (PC notifications) and Prowl (iPhone notifications) support, I am able to send push notifications both to PCs and smart phones. If you would like to do the same, I suggest you focus on getting Growl working first. It’s a requirement for the Prowl setup, so don’t worry about Prowl until you have Growl notifications working.

Follow these steps to add Growl and Prowl support to your C# application:

1. Download the Growl for Windows client and install it.

2. Download the Growl SDK and read the Growl documentation for details on adding Growl code to your application. Here is the code I used:

using Growl.CoreLibrary;
using Growl.Connector;

DateTime stopTime = DateTime.Now;
wlConnector growl = new GrowlConnector();
Growl.Connector.Application application = new Growl.Connector.Application("SharePoint Genesis Device");
application.Icon = @"\GrowlNetLibraries\growl4windows.jpg";
NotificationType operationComplete = new NotificationType("COMPLETE", "Operation Complete");
growl.Register(application, new NotificationType[] { operationComplete });
Notification notification = new Notification("SharePoint Genesis Device", "COMPLETE", "ID", "Operation Complete", "End time: " + stopTime.TimeOfDay.ToString());
growl.Notify(notification);

After you execute this code, you should see your application registered in Growl and the updates should appear on your PC. To open Growl, right-click on it in the system tray and choose Open Growl.

image

                           - Updates from my SharePoint app in Growl

If you have Growl set up and working, then you can add Prowl to send notifications to your phone. If you only want PC notifications, then you’re done.

3. Register for Prowl.

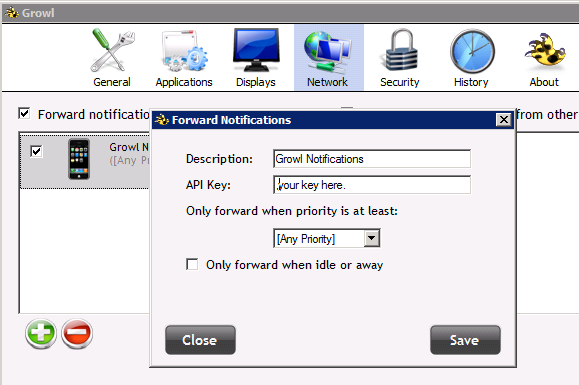
4. Login to the Prowl website and get your Prowl API key. You will need to enter this key into the Growl client so that notifications can be forwarded to your Prowl device.

5. Open the Growl client on your PC and add Prowl as a computer for forwarded notifications. Use the API key from Prowl.

image

6. Install Prowl on your iPhone from the app store and enter your login credentials.

That’s all! You’ve now got push notifications on your PC and smart phone.

Thursday, December 23, 2010

Free Motion Chart Visualization

If you’re not familiar with Hans Rosling's work, you should take a look at The Economist’s rollup of his TED talks about infant mortality. His style is engaging enough for the article to be entitled “Hans Rosling's greatest hits.” Hans is a great speaker and his presentations are interesting unto themselves, however, another interesting aspect of his talks is that you can leverage his cool visualization software for your own purposes.

The software that powers the bubble motion charts was purchased by Google and is free at Google Motion Chart—you just need to enter your data and run the HTML on any web server.

I have the sample data running on my web server and I’ve also entered the data for the Metalogix support team so that people can visualize how our support workload has fluctuated over time.

Friday, August 27, 2010

Web Part Error -- The type is not registered as safe

I’ve been working on a SharePoint 2010 web part project and when I pressed F5 to debug, I ran across the error: “A Web Part or Web Form Control on this Page cannot be displayed or imported. The type is not registered as safe.”

webparterrorondebug

This can be caused by innocently renaming your assembly/namespaces/classes. The first thing to check is: SharePointProjectItem.spdata. Your web part should be properly referenced in the SafeControl section.

<ProjectItemFile Source="VisualWebPart1UserControl.ascx" Target="CONTROLTEMPLATES\VisualWebPartProject2\VisualWebPart1\" Type="TemplateFile" />
  </Files>
  <SafeControls>
    <SafeControl Name="SafeControlEntry1" Assembly="$SharePoint.Project.AssemblyFullName$" Namespace="VisualWebPartProject2.VisualWebPart1" TypeName="*" IsSafe="true" IsSafeAgainstScript="false" />
  </SafeControls>
</ProjectItem>

You can also get this error if you've added a web part to a page (e.g., debugging) and then the web part has been removed from the gallery.

If that doesn't resolve it, check your other files.

e.g. VisualWebPart1.webpart file:
<type name="VisualWebPartProject2.VisualWebPart1.VisualWebPart1, $SharePoint.Project.AssemblyFullName$" />
 
VisualWebPart1.ascx.cs namespace name
namespace VisualWebPartProject2.VisualWebPart1
{
    public partial class VisualWebPart1UserControl : UserControl
    {
   
VisualWebPart1.ascx
<%@ Control Language="C#" AutoEventWireup="true" CodeBehind="VisualWebPart1UserControl.ascx.cs" Inherits="VisualWebPartProject2.VisualWebPart1.VisualWebPart1UserControl" %>

VisualWebPart1.cs
namespace VisualWebPartProject2.VisualWebPart1
{
    [ToolboxItemAttribute(false)]
    public class VisualWebPart1 : WebPart
   
Elements.xml
<File Path="VisualWebPart1\VisualWebPart1.webpart" Url="VisualWebPartProject2_VisualWebPart1.webpart" Type="GhostableInLibrary" >
 
Assemblyinfo.cs
[assembly: AssemblyTitle("VisualWebPartProject2")]
...
[assembly: AssemblyProduct("VisualWebPartProject2")]

Windows Live Writer 2011 Beta

Last year, I posted a message about Windows Live Writer for blog Authoring and I mentioned that I had heard a rumour that Live Writer would soon have the Office ribbon UI. Well the future is now.

The Windows Live Writer 2011 Beta is out and it does indeed have the ribbon interface.

WindowsLiveWriterBeta2011

I’ve only written one post so far (this one), but I really am happy to see that ribbon. I have to say though that a couple of things seem to be missing in this Beta. For example, pasting in a picture from the clipboard isn’t working for me (I use that all the time), so I had to use the ribbon Insert option. Also, I don’t see the Format Painter. I dig the Format Painter.

You can read my original Live Writer post if you’re curious why I choose to use this great app. But the short list is: access to multiple blog accounts, easy editing and image handling with my FTP server and having the power of a rich-client.

Friday, August 20, 2010

Outlook 2010 Quick Steps

So I finally got around to adding some quick steps in Outlook 2010 and I’m glad that I took the time to discover the value of this feature. I work at Metalogix Software and anyone who works in a technology company will get a lot of e-mail. I previously posted about how I use Outlook Quick Parts, Outlook Safe Senders and how I manage my inbox (Don’t be an E-Mail Hoarder).

Quick steps allow you to create an action that contains a number of other actions. For example, you might want to move a message to a particular folder and mark it as done at the same time. The quick steps saves you the time of having to complete each action individually. In this way, you could say that Quick Steps are like macros.

I didn’t jump right on this feature because I didn’t initially appreciate that it could save me time. However, when playing around with it, I discovered that I can associate a keyboard shortcut with a Quick Step. Now, that’s interesting to me. Perhaps I only want to perform one action, such as moving messages to a folder, but now I can do it with a keyboard shortcut. That will save me time.

To create a Quick Step, you can go up to the ribbon, or you can right-click a message and find the option in the context menu.

OutlookQuickSteps1

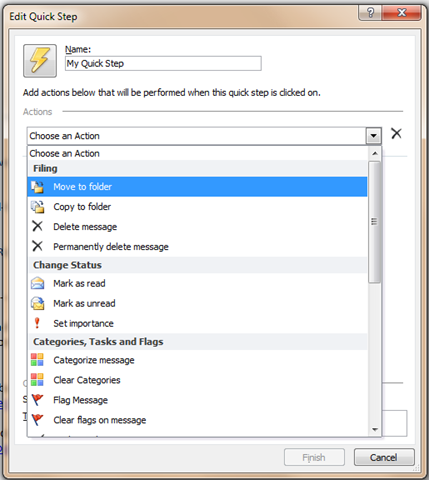
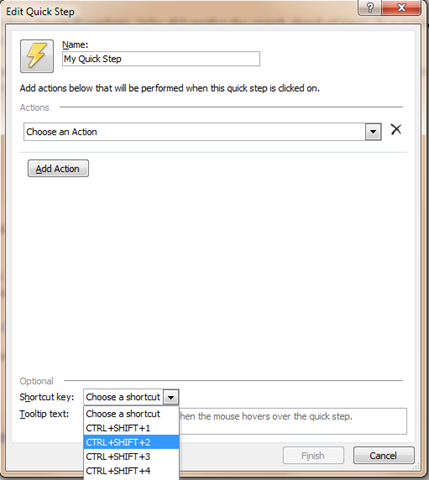
With the context menu open, choose Create New to bring up the Edit Quick Step dialog. In this window, you can give your new Quick Step a name and choose the actions that you’d like to apply. Some of the options include moving, copying, deleting, marking as read or unread, setting the message importance, flagging the message, etc.

image 

Once you have your Quick Step defined, you can go to the bottom of the dialog and choose a shortcut key and you can even add a tooltip to remind you how this Quick Step is meant to be used.

OutlookQuickSteps3

That’s it! You’re all sort to start streamlining your Outlook mail management.

Monday, August 02, 2010

Adding Senders to Outlook 2010 Safe Sender List

To save time having to choose to download pictures in Microsoft Outlook messages from outside the Metalogix GAL, I often add addresses to the Outlook safe senders list. Unfortunately, I have found that this isn’t as straightforward as it used to be in Outlook 2007.

The Outlook 2007 method for adding a sender to the Outlook 2010 safe list does not work for me. Despite the follow note in the Outlook documentation, I do not get the option when I right-click a message or go up to the Junk E-mail option in the ribbon.

“To quickly add a sender, domain name, or mailing list name to the Safe Senders or Safe Recipients Lists, right-click the message you consider safe, and then on the shortcut menu, point to Junk E-mail, and then click Add Sender to Safe Senders List, Add Sender's Domain (@example.com) to Safe Senders List, or Add Recipient to Safe Recipients List.”

It appears that the option has simply been removed from the context menu and wasn’t added to the ribbon. You might be tricked into thinking that “Never Block Sender” achieves the same effect, but I’ve tried it and that option does not add the sender to the safe senders list.

Outlook 2010 Safe Sender

The longer method (from the same documentation page) will work, but it’s cumbersome:

  1. On the Home tab of the ribbon, click the dropdown arrow next to Junk
  2. Select Junk Email Options...
  3. Click the Safe Senders or Safe Recipients tab.
  4. Click Add.
  5. In the Enter an e-mail address or Internet domain name to be added to the list box, enter the name or address you want added, and then click OK.
  6. Repeat steps 4 and 5 for each name or address that you want to add.

In previous versions of Outlook:

  1. On the Tools menu, click Options.
  2. On the Preferences tab, under E-mail, click Junk E-mail.
  3. Click the Safe Senders or Safe Recipients tab.
  4. Click Add.
  5. In the Enter an e-mail address or Internet domain name to be added to the list box, enter the name or address you want added, and then click OK.
  6. Repeat steps 4 and 5 for each name or address that you want to add.

These is however, a faster way to do it. If the message contains images—which is my main use case anyway—you can use the “Click here to download pictures” bar to quickly add the sender to the safe list. To do this, right-click on the bar at the top of the message preview and choose “Add Sender to Safe Senders List.” Quick and easy. Now you don’t need to choose to download images from senders you trust.

Add Outlook sender to safe senders list

Update: As you can see in the comments below (thanks Drake!), there is also a way to automatically add people you mail to the Safe Senders list:

“From the Junk E-mail Options window, navigate to the Safe Senders tab and check the Automatically add people I e-mail to the Safe Senders List option. You can also Add E-mail from addresses or domain names on your Safe Senders List and this will never be treated as junk e-mail.” - From www.oracle-forums.com

Thursday, May 13, 2010

How to Do Everything SharePoint 2010

I’m thrilled to announce that my latest book project is an end-user SharePoint 2010 book called How to Do Everything: Microsoft SharePoint 2010. My good friend, Arpan Shah, Microsoft Director of Technical Product Management for SharePoint, has contributed a section on the history of SharePoint and also written the foreword.

What I tried to do in this book is focus on the most important cases for the day-to-day user, but also provide an insight into power user and administrative tasks. With only ~315 pages, there’s only so much that I could cover. I trust readers are conscious of the fact that the “How to Do Everything” series name doesn’t mean that all of SharePoint can be summed up in one book. This book is squarely focused at the end-user.

image

The publisher is McGraw-Hill Osborne Media and I’m excited to be working with them again. The book will be on shelves this summer. However, you can order your copy today from the Amazon and McGraw-Hill sites.

Here’s some text from the book description:

"Written by a former member of the SharePoint development team, this is a step-by-step guide to mastering the latest release of this integrated suite of server capabilities.In How to Do Everything: Microsoft SharePoint 2010, Stephen Cawood—one of the people who helped build SharePoint—offers advice from his many years of working with SharePoint customers, cutting to the core and focusing on key features to get you up to speed quickly. You’ll get easy-to-follow tutorials on blogs, wikis, My Sites, Web parts, taxonomy, document management, workflow, publishing sites, team sites, and much more. Take full advantage of the content management, enterprise search, collaboration, and information-sharing capabilities of SharePoint 2010 with help from this practical guide."

Friday, April 23, 2010

SharePoint 2010 is out!

I tweeted about this yesterday when the bits actually appeared, but here are the URLs from SharePoint MVP Sean Wallbridge:

SharePoint 2010 is on MSDN.

Microsoft SharePoint Designer 2010 (32 bit)

Microsoft SharePoint Designer 2010 (64 bit)

Reminder: SharePoint Designer 2010 only connects to SharePoint 2010 sites. You will want to continue to use SharePoint Designer 2007 to connect to your WSS/MOSS sites.

Also note that you can't mix 32bit and 64bit Office versions, so you’ll want to download either Office 32bit and SPD 32bit or the 64bit versions of both.

Microsoft SharePoint Foundation 2010

image

Also, you might want to read the SharePoint 2010 hardware and software requirements

image 

- a shout out to the MCMS folks