Tuesday, April 06, 2010

SharePoint Designer 2010 Beta and Office 2010

If you’re looking to download both the SharePoint Designer 2010 beta and the Office 2010 beta, you may have discovered that there is a 64bit public beta for SPD, but the public beta for Office 2010 is 32bit.

I installed SPD 64bit first--only to find that the 32bit Office beta wouldn’t install if a 64bit Office application was already installed.

The solution is to download the Office 2010 64bit beta from MSDN downloads.

Monday, March 29, 2010

Augmented Reality Interview for AOL News

I recently did an interview about Augmented Reality for an AOL News site (www.asylum.com). A few years ago, I co-wrote a book about Augmented Reality that was based on the work of Dr. Mark Fiala—an old friend of mine and creator of the ARTag marker system.

The writer was interested in a number of AR applications that have started to make it into mainstream culture. For example, AR tattoos are apparently gaining popularity (see video below).

- Augmented Reality tattoo

Friday, March 19, 2010

SharePoint 2010 Config Wizard Error

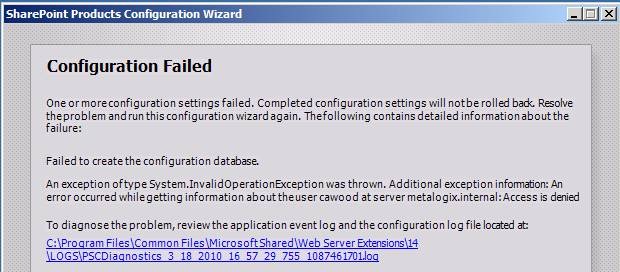
I was getting this error when trying to run the configuration wizard for the SharePoint 2010 RC Hyper-V Image.

clip_image002

In the wizard, I was specifying a domain account with sufficient permissions, but I still got the access denied error. The solution was quite simple, I had forgotten that I was logged into the machine as the local admin account—not a domain account. The config wizard needs to read some info about the domain account you’re using for the setup. When I switched users to my own domain account, the wizard ran successfully.

Here’s a snipped from the install log:

Task configdb has failed with an unknown exception 03/19/2010 06:38:14  9  ERR                    Exception: System.InvalidOperationException: An error occurred while getting information about the user SharePointAdmin at server internal: Access is denied

at Microsoft.SharePoint.Win32.SPNetApi32.NetUserGetInfo1(String server, String name
at Microsoft.SharePoint.Administration.SPManagedAccount.GetUserAccountControl(String username)
at Microsoft.SharePoint.Administration.SPManagedAccount.Update()
at Microsoft.SharePoint.Administration.SPProcessIdentity.Update()
at Microsoft.SharePoint.Administration.SPApplicationPool.Update()
at Microsoft.SharePoint.Administration.SPWebApplication.CreateDefaultInstance(SPWebService service, Guid id, String applicationPoolId, SPProcessAccount processAccount, String iisServerComment, Boolean secureSocketsLayer, String iisHostHeader, Int32 iisPort, Boolean iisAllowAnonymous, DirectoryInfo iisRootDirectory, Uri defaultZoneUri, Boolean iisEnsureNTLM, Boolean createDatabase, String databaseServer, String databaseName, String databaseUsername, String databasePassword, SPSearchServiceInstance searchServiceInstance, Boolean autoActivateFeatures)

Wednesday, February 10, 2010

Live Blogging from SPTechCon

I’m here in San Francisco live blogging for EndUserSharePoint.com at SPTechCon (#SPTechCon).

I’m currently in the SharePoint developer workshop being run by Phil Wicklund. It’s a full day overview of SharePoint development.

clip_image001

Wednesday, February 03, 2010

SharePoint Game of Life

I’m sure some SharePoint community folks will remember John Conway’s Game of Life population simulation (cellular automaton) from comp. sci. For my SharePoint 2010 Enterprise Metadata Management (EMM, or taxonomy) talk at SharePoint Saturday in New York last weekend, I decided to create my own version for testing the performance of the new SharePoint taxonomy API.

Update: I have posted the source code for the SharePoint Game of Life web part on CodePlex. If you’re interested in SharePoint taxonomy, you can also check out my blog series on Enterprise Metadata Management (EMM).

Using the rules of the Game of Life, I created a SharePoint 2010 Visual Web Part that creates a new taxonomy term for each organism spawned during the simulation. When the creature dies, the term is deleted from the term store.

SharePointGameofLife

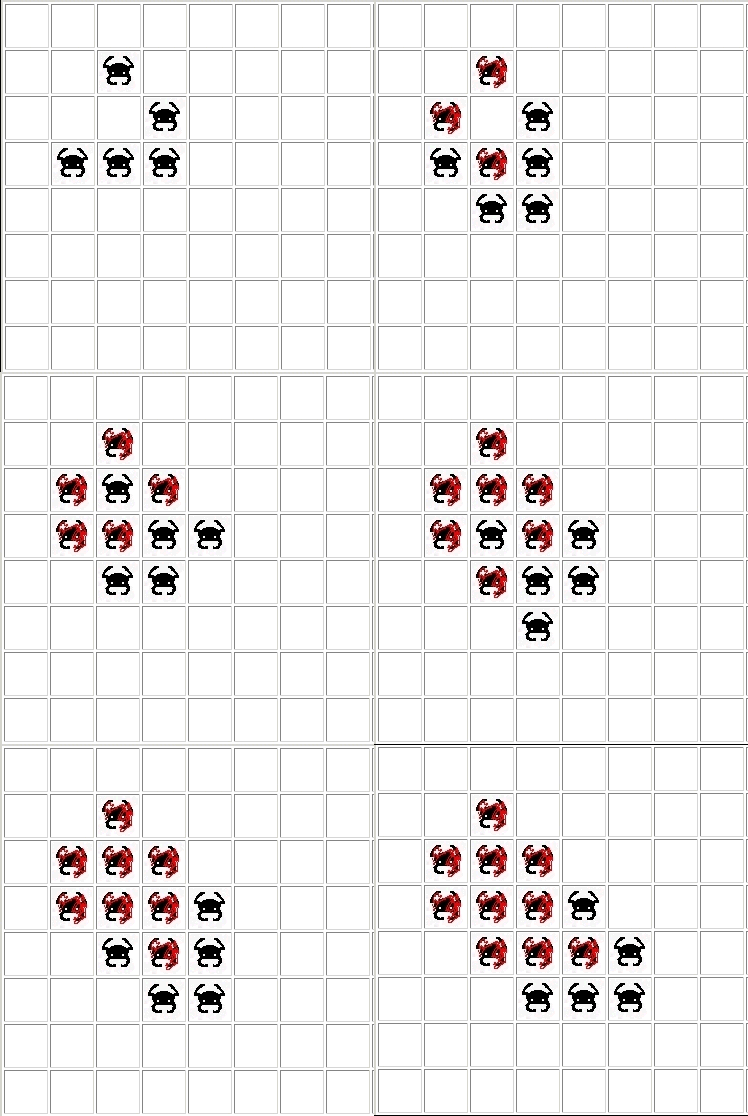
- SharePoint Game of Life running a glider

I actually did this back in 1999 for the NCompass Resolution Publishing API (the software that eventually became Microsoft Content Management Server), so I also had an interesting exercise of porting ASP script to C# code. The SharePoint Game of Life web part tracks the number of terms created and the time it took to run. I’m planning to use this web part as a sample for a SharePoint 2010 book project.

Here are the rules of the game (from Wikipedia):

  • Any live cell with fewer than two live neighbours dies, as if caused by under population.
  • Any live cell with more than three live neighbours dies, as if by overcrowding.
  • Any live cell with two or three live neighbours lives on to the next generation.
  • Any dead cell with exactly three live neighbours becomes a live cell.
  • The most famous pattern in the game is called a glider. This pattern is interesting because over iterations, it will simply continue to move across the grid. The glider configuration has been adopted as the hacker emblem.

    clip_image002

    - the glider starting position

    For dramatic effect, I decided to add an image for a dead organism—as you can see in the animation. This isn’t normally done, so for the Game of Life purists, I’ll probably add an option to disable it in the release version of the code.

    The code isn’t ready for prime time yet, so I don’t have perf numbers to publish yet. But hopefully, I’ll get a chance to polish it up soon.

    BTW – The creature is an homage to Mazogs. A ZX-81 (Timex Sinclair 1000) game I played as a kid.

    Thursday, January 21, 2010

    Paul Quarrington

    It’s truly a tragedy that Canada has lost one of its best novelists at such a young age. Paul Quarrington passed away yesterday.

    I had the good fortune to have Paul as my mentor for a writing course and his book, Boy on the Back of the Turtle, helped inspire my wife and I to go on a trip to the Galapagos Islands.

    If you want to read a truly great novel, find a copy of Quarrington’s Whale Music.

    Tuesday, January 19, 2010

    Office Ribbon Hero

    Further to my previous post Games are the Way to Test Software, I wanted to mention the new Office Ribbon Hero game. Score points by using the ribbon, accept challenges and share your results with your Facebook friends.

    Can you imagine if you were new to Office how helpful this would be? It makes me think of the XT typing tutor game I played back in high school. It was similar to missile command--words falling down the screen and the player has to type them before they destroy bases. Great game.

    Monday, January 18, 2010

    Hyper-V Import Again Fails

    I ran into this Hyper-V subtlety, so I figure I’ll share it here and make it easier to find with a search. If you try to import a Hyper-V image and the import fails, you will not be able to use the same files to try the import again. Hyper-V actually deletes and alters files as part of the import process.

    image

    The error you’ll likely see is “Import failed. Import failed. Unable to find virtual machine import files under location … You can import a virtual machine only if you used Hyper-V to create and export it.” At face value this error is infuriating since you are trying to import a Hyper-V export, but the fact that you’re running the import for the second time means that Hyper-V does not consider your source to be valid.

    The lesson here is don’t try and import your exported Hyper-V image without first making a backup copy. If you have a backup, you can just copy over the small files again and not have to export or copy the large image files a second time.

    Friday, January 15, 2010

    Microsoft’s Free SyncToy

    I have been using the Mozy online backup service for a while now, and while it is an affordable and convenient way to backup my laptop, it’s not a solution for syncing folders between my laptop, my home desktop and my work desktop.

    In order to resolve the sync problem, I decided to try Microsoft’s free SyncToy PowerToy. I believe that Microsoft SharePoint Workspace 2010 is where I will eventually go for at least part of this functionality, but a quick—not to mention, free—resolution is appealing to me today.

    UPDATE: If you're interested in this utility, you should check out the new version: Windows Live Mesh.

    Backup vs. Sync

    While there certainly is a relationship between sync and backup, the two are not the same. The reason I want to backup my files is because I want to be able to recover something that was lost due to a failure such as a hard drive crash. The reason I want to sync my files is that I want to do things such as walk home from work and have the same file on my home machine that I was just editing at work. In fact, I don’t want it just to be the same file, it must be the same version of the file.

    Microsoft SharePoint can be useful for these scenarios, but I use it primarily for work. I use Mozy online backup to protect assets such as my vacation photos. I want to be able to sync because when I open my laptop on a plane (like I just did to write this post), I want the right versions of a bunch of files to be there. Furthermore, I may not know which files I want, so the sync is something that should happen automatically.

    What can SyncToy do?

    SyncToy is able to help with most of my files syncing needs. Using the tool, I can create a relationship between files shares on as many computers as I want and specify a few options for how I would like those files to be handled.

    CreateFolderPair - creating a folder pair for syncing

    Once I have my sync pairs created, I can run the operation and the files on my desktop at work will be synchronized with my files on my laptop.

    RunningSync - running a sync

    If you’re not sure what’s going to happen with the click the Run button, there is also a preview run feature that you can use to see what the operation will do before it runs.

    PreviewRun - previewing a sync run

    Note: Synctoy will write a file (.dat) to each folder that you add to a folder pair. If you delete this file, SyncToy will no longer be able to run the synchronization.

    Schedule SyncToy

    Since SyncToy does not have a way to configure a sync operation to run, you will need to use Windows Scheduler to automate the task. This is not ideal and doesn’t allow for real-time synchronization, but as you can see in the steps below, it’s trivial to set it up to run at a set time.

    From the SyncToy 2.1 Help:

    While you do not have to schedule SyncToy to use it, some users may find it helpful to schedule recurrent SyncToy runs. Perhaps you have a folder pair that takes a long time to sync and you want to run SyncToy in the middle of the night, for example.
    SyncToy does not provide a user interface to schedule folder pairs to run at designated times. However, there is a method to schedule tasks using the Microsoft© Windows© operating system.

    Windows Vista/ Win7
    To schedule a task using the operating system:
    1. From the Start menu, select All Programs - Accessories - System Tools - Task Scheduler.
    2. Select Create Basic Task in the Actions pane on the right.
    3. Add a Name and Description and select Next.
    4. Choose when you want the task to start and select Next.
    5. Choose date/times (if applicable) to run task and select Next.
    6. Choose Start a Program option and select Next.
    7. Select Browse and locate the SyncToyCmd.exe.
    8. Type "-R" in the Add Arguments textbox. –R all by itself will run all folder pairs that are active for run all. If you want to run just a single folder pair, add –R “My Pair” to the end of the command line.

    Note: If the folder pair name contains a space, surround it with quotation marks… "C:\Program Files\SyncToy 2.1\SyncToyCmd.exe" -R "My folder pair."

    The weakness of SyncToy comes to light in the ‘stepping on a plane’ scenario. Today, SyncToy does not have a UI option for scheduling synchronization and even if you use Windows scheduler, you’re still not in the Nirvana state because a lot could happen between the time that your scheduled sync runs and when you get onboard your flight. However, despite these limitations, I’m going to be using SyncToy for the time being.

    Try SyncToy 2.1 for free.

    Saturday, January 09, 2010

    History of SharePoint ECM Through Shirts

    I moved a while back and was amazed how many free shirts I still have kicking around. I thought I’d pick the most relevant ones and do a quick history of SharePoint ECM through clothing.

    SharePointHistoryShirts

    Note: If you want to do an animation like this, I recommend smiling. While no expression is easier to duplicate, there’s less chance that you’ll look like the psychotic killer in a Criminal Minds episode.

    1998 – 2001 (NCompass Labs t-shirt and leather jacket)
    NCompass Labs was located in Vancouver, Canada. NCompass Resolution was built to be a platform for creating websites with content management features and it would go on to become Microsoft Content Management Server (MCMS). MCMS was the basis of today’s SharePoint publishing sites functionality.

    2001 (e-biz hoodie, MCMS 2001 polo, Microsoft Portal Airlift windbreaker)
    SharePoint Portal Server 2001 and MCMS 2001 were released. At this point, SharePoint was an application designed to build Intranets. MCMS was built as a development platform for web content management. The fact that both could be used to build Intranets caused confusion—some people liked to say that SharePoint was for Intranets and MCMS was for public sites, but that wasn’t accurate. MCMS was moved to the newly created E-Business Servers division and SharePoint was in the Office Servers division.

    Aside: The “EBZ” hoodie was given out because the team that left Redmond building 1 before we moved in were so messy that the space “looked like a frat house.”

    2002 (E-Business Servers Hawaiian speaker shirt, MCMS 2002 t-shirt)
    MCMS 2002 was released primarily to add support for .NET developers. The marketplace confusion about the two content management products from Microsoft continued. The E-Business Servers division embarked on the Jupiter project which was a vision for an integrated suite of business products including BizTalk and MCMS.

    2003 (TechEd 2003 Speaker shirt)
    SharePoint Portal Server 2003 was released. SPS added key features and scalability. SPS also kicks off the SharePoint vision to be both a platform and an application.

    2004 – 2007 Metalogix Booth Staff polo and Colligo share shirt
    The E-Business group is dissolved (because of their taste in shirts?) and the MCMS team becomes part of the SharePoint team.

    From Microsoft: “Based on extensive customer feedback, we have integrated the Web content management capabilities of CMS 2002 into the new Microsoft Office SharePoint Server 2007”

    A key aspect of this timeframe is that the SharePoint partner ecosystem grows dramatically. Because of this, I threw in a couple of partner shirts. More ECM features are added to SharePoint.

    Aside: I left out the speaker shirt from TechEd New Zealand. As native South Africans, my brother would never forgive me if I published a photo of me wearing the silver fern. But to be fair, I had a fantastic time, met some great people, and hope to go again.

    2007 – 2009 SharePoint Conference Speaker shirt
    Microsoft Office SharePoint Server (MOSS) was released and SharePoint gains the impressive title as the fastest product to grow to 1B (in yearly revenue ) in Microsoft history. The market clearly demonstrates that it wants one solution that is both a platform and an application for building websites. Also, SharePoint gains significant mindshare as a solution for public internet sites. At the end of the decade, SharePoint 2010 Server and SharePoint Foundation are in public Beta—both receiving favourable reviews.

    Thursday, January 07, 2010

    SharePoint Managed Metadata End-User Experience

    This post is part two in a series that I’m writing about SharePoint 2010 Enterprise Managed Metadata (EMM or ‘taxonomy’). If you haven’t set up a SharePoint 2010 development environment yet, you may also want to check out SharePoint 2010 Beta 2 install.

    SharePoint Taxonomy Part One – Introduction to SharePoint Managed Metadata
    SharePoint Taxonomy Part Two – End-User Experience
    SharePoint Taxonomy Part Three – Administrator Experience
    (including Using SharePoint Term Stores and SharePoint Taxonomy Hierarchy)
    SharePoint Taxonomy Part Four – Developer Experience
    (including SharePoint 2010 Visual Web Parts and SharePoint 2010 Taxonomy Reference Issues)

    There are two types of tags in the new SharePoint 2010 taxonomy system: managed keywords and managed terms. I’ll cover each one and give example of how users can take advantage of the various features that each type enables.

    Managed Keywords

    Keywords are used to informally tag content within SharePoint. Instead of relying on a centrally managed store of terms that they must choose from, keywords allow users to add their own tags. This means that faculties such as folksonomy and informal tag clouds are enabled.

    Note: Managed keywords are stored in a separate single database and do not have a hierarchical structure.

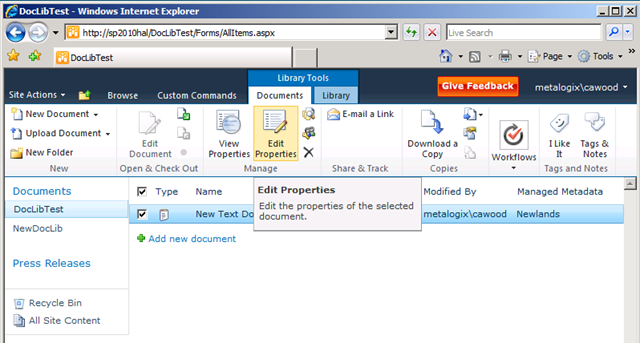
    To add a managed term to a document, first select the document in the document library and select Edit Properties.

    image
    - Selecting a document for editing

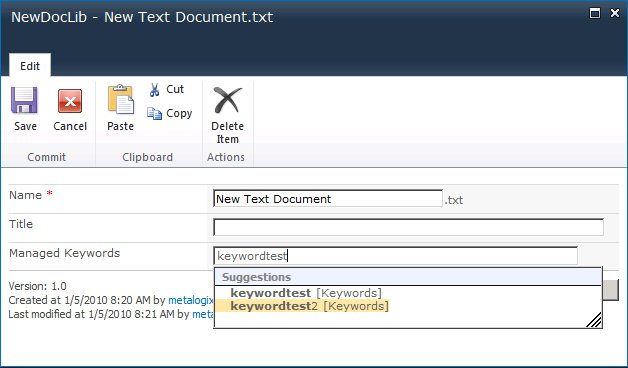
    Once you have the edit document properties dialog open, find the Managed Keywords field and you can either start typing an existing keyword (which will prompt you with suggestions) or you can type in a new keyword.

    image
    - Adding a keyword to a document

    The Tag Cloud Web Part

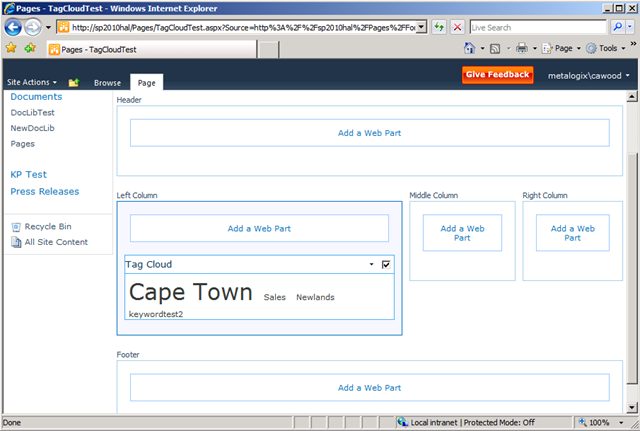
    Once you’ve begun tagging things, you’ll probably want to be able to use that data in convenient ways. The tag cloud web part is a quick way to get a sense of the folksonomy being created on your SharePoint server.

    If you have sufficient permissions to create a web part page and add web parts, you’ll be able to add the tag cloud web part to web part pages.

    image
    - Adding the tag cloud web part to a page

    Once added, there are a number of options in the tag cloud settings.

    image
    - A tag cloud web part in edit page mode

    image

    - A tag cloud web part in published mode

    Note: A lot of features aren’t activated at the site collection level by default. Activating the “SharePoint Server Standard” feature enables the Tag Cloud web part. If you find that you’re not offered the Tag Cloud web part, ask your SharePoint admin to investigate.

    Managed Terms

    Managed terms are placed in a central repository of terms. This enables consistency across users, provides hierarchical organization, and allows for strict information architecture. In the SharePoint Term Store Management Tool, users with sufficient permissions are be able to perform many operations on terms in the hierarchy. However, most users will simply use the terms from the central store.

    As with keywords, terms can be added to many types of content within SharePoint. This example, will show how to add a term to a document within a document library that has already been enabled for tagging with terms. For more information about enabling a SharePoint 2010 Beta 2 document for tagging with managed terms, refer to SharePoint Taxonomy Part Three – Administrator Experience.

    To add a managed term to a document, first select the document in the document library and select Edit Properties. Once you have the edit document properties dialog open, find the managed metadata field and you can either start typing a term or click the “Browse for a valid choice” icon on the right.

    image
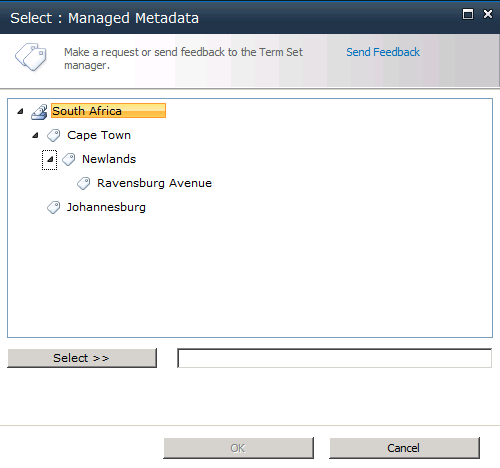
    - Browsing for a term to add to a document

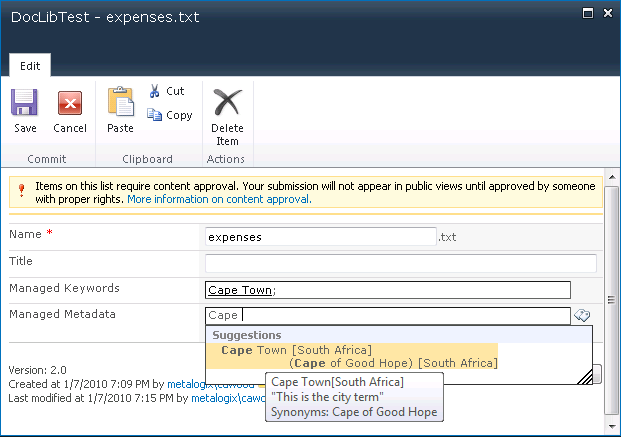
    The screenshot below shows the suggest as you type feature which will show terms that match your partial input. Also, in the box below, you can see the labels (synonyms) and the description which helps users understand how different tags should be used.

    image

    Metadata-driven Navigation

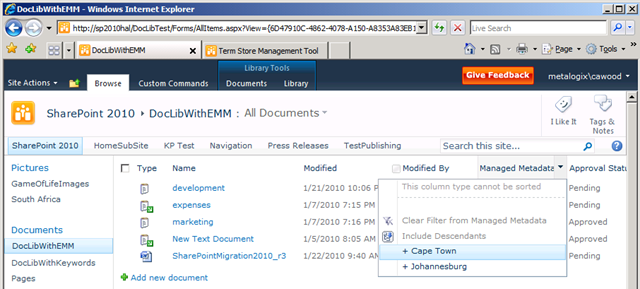
    Managed Metadata can also be used to enable some cool navigational features within SharePoint 2010. For example, if you go to a list that has a managed metadata column, you’ll be able to filter the view by simply selecting one of the terms being used in the list. This enables the end-user to instantly filter lists without having to create a custom view.

    image
    - Filtering a document library using the Managed Metadata term “Cape Town”

    Once you apply the filter, the column heading will show a funnel icon to indicate that you’re not seeing the full list. This essentially allows you to see SharePoint through a simple parametric navigation mechanism—or as we used to say on the SharePoint team, “navigation goggles.”

    image
    - The filtered results

    Happy tagging!

    [Disclaimer: This information is based on SharePoint 2010 Beta 2 and may differ from the RTM build.]

    Tuesday, January 05, 2010

    SharePoint Managed Metadata Administrator Experience

    This post is part three in a series that I’m writing about SharePoint 2010 Enterprise Managed Metadata (EMM or ‘taxonomy’). If you haven’t set up a SharePoint 2010 development environment yet, you may also want to check out SharePoint 2010 Beta 2 install.

    SharePoint Taxonomy Part One – Introduction to SharePoint Managed Metadata
    SharePoint Taxonomy Part Two – End-User Experience
    SharePoint Taxonomy Part Three – Administrator Experience
    (including Using SharePoint Term Stores and SharePoint Taxonomy Hierarchy)
    SharePoint Taxonomy Part Four – Developer Experience
    (including SharePoint 2010 Visual Web Parts and SharePoint 2010 Taxonomy Reference Issues)

    As a SharePoint administrator, the first step when using the new EMM features is to learn how to use SharePoint Term Stores and research the details for creating a SharePoint Taxonomy Hierarchy. You’ll also want to read Microsoft’s best practices and make use of the managed metadata planning data sheets. You can find those links at the bottom of my post SharePoint Taxonomy Part One – Introduction to SharePoint Managed Metadata.

    After you have got your term store set up and you’ve decided how your taxonomy will be organized, you’ll need to set the permissions on your term store and enable various content for tagging. Remember that there are two types of tagging: managed keywords and managed metadata. Managed keywords are used for informal “folksonomy” style tagging and managed terms are used for centrally controlled and delegated hierarchical term structures.

    How to Enable Managed Metadata on Your Server

    Step 1: Add an administrator to your term store.
    I covered this process in Using SharePoint Term Stores.

    Step 2. Create some terms.
    I covered the details of this topic in SharePoint Taxonomy Hierarchy.

    Step 3. Add a column of type “Managed Metadata”
    I’m not sure if this will be the case when the RTM version of SharePoint 2010 ships, but despite the fact that the documentation suggests that many content types (inc. document) come with a managed metadata column for tagging, I have found that this column only works for keywords—not for managed terms. In Beta 2, the column that comes with a document library is called “Managed Keywords” and has the internal name “TaxKeyword.”

    To use managed terms, I had to add a new column to my document libraries. To do this, first go to the list you want to enable and choose the Library tab from the ribbon, then Library Settings from the Settings area. Once there, choose Create Column.

    image
    - Adding a new column to a list

    When the Create Column dialog opens, choose the Managed Metadata column type and give it a name. You’ll also be able to choose options such as whether you want to allow multiple values.

    image - Use the Managed Metadata column type for managed terms

    After adding this column, you should be able to edit the properties of a document in the document library and see a new option to choose managed terms to put into the new managed metadata field. Click on the little tags icon on the right of the field to browse your term store.

    image
    - After adding the managed metadata column, terms can be associated with the document

    Promoting a Managed Keyword to a Managed Term

    One philosophy for building a taxonomy is to let the users decide which terms are important. In SharePoint 2010, there are two ways to achieve this. First, you can allow “fill-in” keywords in your term sets. Secondly, you can allow users to tag with managed keywords and then choose to promote some (or all) of them to managed terms.

    To change a managed keyword to a managed term, you simply open the term store management tool (from central admin or site settings) and use the "Move” option to move the keyword into the term hierarchy.

    image
    - Moving a keyword to the term store will convert it to a managed term

    Note: It is not possible to move a managed term to the keywords store. In other words, you can promote a managed keyword to a managed term, but you can’t demote a term to a keyword.

    Polyhierarchy

    A polyhierarchy enabled tree can include leaves (nodes) that have more than one branch (parent node). In SharePoint Server 2010, you can create a polyhierarchical structure with the Reuse Terms action in the Term Store Management Tool.

    This example doesn’t really make sense, but let’s just imagine that I had used terms that weren’t as regimented as a geography. Say, for example, I had used people instead and the Term Sets defined teams to which they belong. In that case, a person could be on more than one team and therefore, you might want to reuse the term. For simplicity, the screen below shows the same hierarchy used in my other examples, but the Cairo term has been reused and it now appears in two different locations in the tree hierarchy.

    image

    - An example of polyhierarchy

    If you look at the properties of the term (see screen below), you can see that it now belongs to two term sets.

    image

    More Notes about EMM Administration

    - When you create a new term store, make sure the application pool is running.
    - the Term Store Management Tool (TSMT) is available in Central Administration (and site settings). This tool manages terms centrally for the whole farm and can be used to create, copy, reuse, move, duplicate (for polyhierarchy), deprecate, delete and merge terms. The TSMT is also used to manage permissions on term stores.

    image
    - Term management options

    - The Managed Metadata column can allow multiple values.
    - All managed keywords are stored in a single non-hierarchical term set called the keyword set.
    - Site collections can optionally use their own term sets at the column level rather than use the central term store.
    - You can enable fill-in choices with a submission policy, this enables folksonomy.
    - Multilingual (MUI) terms are available.
    - Terms can be labelled to create synonyms that help users figure out which term to use.

    [Disclaimer: This information is based on SharePoint 2010 Beta 2 and may differ from the RTM build.]

    Thursday, December 31, 2009

    SharePoint Taxonomy Hierarchy

    If you’re wondering how to organize your SharePoint 2010 Enterprise Managed Metadata (EMM), you should start by reading the TechNet article, Plan terms and term sets (SharePoint Server 2010). I’m going to highlight some of the key points of that article and also add a few points from other sources.

    While the TechNet article reminds us that you could simply allow your users to add keywords and then use their input to create your taxonomy—promoting keywords to managed terms—it seems likely that most organizations will want to start with an organized metadata hierarchy.

    As explained in SharePoint Taxonomy Part One – Introduction to SharePoint Managed Metadata, the SharePoint 2010 EMM is organized into a hierarchy. The objects within this hierarchy are term stores, groups, term sets, and terms.

    Note:
    Keywords are stored in a non-hierarchical fashion in there own storage space.

    These are the rules for the taxonomy hierarchy:
    When a Managed Metadata service is created, a term store will be created. Once you have a term store, you can create a group. A group is a security boundary.
    • Once you have a group, you can create a term set. A term set must be the child of a single parent group.
    • Under a term set, terms can be created. A term can be the child of a term set, or of another term.
    • A term can be added as a child of another term.
    • Terms can be nested to seven levels. [Update: this documented rule is not enforced in the RTM version]

    One of the key points of the TechNet article about planning your terms and term sets is that a group is a security boundary. A group contributor can manage the term sets in the groups and create new term sets. All users who have access to a term set under a group can see all of the other term sets—even if they don’t have rights to manage the other term sets. Based on this, you should organize your term sets into groups based on the groups of users who will manage them. For this reason, your taxonomy may correlate to your organizational structure. Let’s take a look at an example.

    image

    - Sample SharePoint 2010 EMM (taxonomy) hierarchy

    Term Store: In the sample hierarchy shown in the figure above, you can see that there is one term store (called “Taxonomy” for lack of inspiration for a better name). Remember that you can have multiple terms stores, but each term store is stored in a separate SQL Server database.

    Group:
    Under the term store are two groups: Africa and North America. The idea is that these could be significant geographical locations to this particular fictional organization. Remember that the groups are a security boundary, so the users assigned to the Africa group don’t have to have any access to the Egypt group. However, if users are given rights to a term set under one of the groups, they will be able to see the names of all the term sets under that group.

    Term Set: Inside the Africa group there are two term sets: South Africa and Egypt.

    Terms: At the top level, the South Africa term set contains the terms Cape Town, Johannesburg and Joburg. Terms can be nested seven levels deep. In this case, the Cape Town term contains the child term “Newlands” (a neighbourhood in Cape Town), and that term contains the child term “Ravensberg Avenue” (the street I lived on in Cape Town).

    When you’re creating your managed terms, you’re free to identify synonyms; you can also specify which is the preferred term so that when a user types in “Joburg,” she will be asked to assign the term “Johannesburg.”

    Here are a couple more quick points to keep in mind:

    - You can specify a custom sort order for terms, so it isn’t necessary to show them in alphabetical order.
    - Term sets can be open or closed. Open sets allow all users to add terms. Terms can only be added to closed sets by users who are contributors to the group.
    - In addition to terms, SharePoint 2010 EMM contains keywords. Keywords aren’t restricted, so they can be used informally to create “folksonomy,” but keywords can be promoted to managed terms.

    If you’ve been tasked with creating the taxonomy for your EMM hierarchy, keep these points in mind, but I strongly recommend that you also take advantage of the articles and the worksheets available on TechNet.

    Note: You can see the taxonomy terms in a hidden list: http://servername/Lists/TaxonomyHiddenList

    [Disclaimer: This information is based on SharePoint 2010 Beta 2 and may differ from the RTM build.]

    Wednesday, December 30, 2009

    Can't Paste into Blogger with IE8

    Over the last few weeks, I've found that I'm unable to paste text into the blogger web editor. This problem was actually the final straw that drove me to try Windows Live Writer for blog Authoring--which BTW is working out splendidly and I'm happy that I finally gave it a shot.

    But getting back to the topic at hand... I did find a way to resolve the pasting issue. Since the issue occurs on multiple machines, I wondered if it was an IE8 problem with the Blogger control. I tried switching IE8 to IE7 mode and sure enough, I can now paste this text:

    To run a webpage in IE7 mode in IE8, open Tools –> Developer Tools (or use the F12 key) to launch the developer tools window.

    And since images are so easy to work with in Windows Live Writer, I'm going to save this draft and paste in a screenshot using Live Writer.

    image

    SharePoint Managed Metadata Developer Experience

    This post is part four in a series that I’m writing about SharePoint 2010 Enterprise Managed Metadata (EMM or ‘taxonomy’). If you haven’t set up a SharePoint 2010 development environment yet, you may also want to check out SharePoint 2010 Beta 2 install.

    Update: I have posted a video demo on the Metalogix blog showing how to create a SharePoint 2010 Taxonomy Web Part.

    SharePoint Taxonomy Part One – Introduction to SharePoint Managed Metadata
    SharePoint Taxonomy Part Two – End-User Experience
    SharePoint Taxonomy Part Three – Administrator Experience
    (including Using SharePoint Term Stores and SharePoint Taxonomy Hierarchy)
    SharePoint Taxonomy Part Four – Developer Experience
    (including SharePoint 2010 Visual Web Parts and SharePoint 2010 Taxonomy Reference Issues)

    Opening Microsoft.SharePoint.Taxonomy in the Visual Studio Object Browser reveals a long list of objects, but you won’t need to worry about a number of them. In this post, I’m going to start with the most useful and then add others if I find that they’re worth covering.

    image
    - Exploring the Taxonomy DLL in the Object Browser

    But if you’re curious, here’s the full list:

    ChangedGroup
    ChangedItem
    ChangedItemCollection
    ChangedItemType
    ChangedOperationType
    ChangedSite
    ChangedTerm
    ChangedTermSet
    ChangedTermStore
    FeatureIds
    Group (used in the sample below)
    GroupCollection
    HiddenListFullSyncJobDefinition
    ImportManager
    Label
    LabelCollection
    MobileTaxonomyField
    StringMatchOption
    TaxonomyField
    TaxonomyFieldControl
    TaxonomyFieldEditor
    TaxonomyFieldValue
    TaxonomyFieldValueCollection
    TaxonomyItem (base class for classes such as Term and TermSet)
    TaxonomyRights
    TaxonomySession (used in the sample below)
    TaxonomyWebtaggingControl
    Term (used in the sample below)
    TermCollection
    TermSet (used in the sample below)
    TermItem
    TermStore (used in the sample below)
    TermStoreCollection
    TermStoreOperationException
    TreeControl

    TaxonomySession

    The first class to cover is TaxonomySession. To use the taxonomy API to manipulate managed metadata, you’ll first need to instantiate a TaxonomySession object. Microsoft describes the class in this way:

    “The TaxonomySession class creates a new session in which to instantiate objects and commit changes transactionally to the TermStore object. A TaxonomySession object can have zero or more TermStore objects associated with it. TermStore objects are associated with the Web application of the parent SPSite object.”

    I’m going to continue with the example I started in SharePoint 2010 Visual Web Parts, but don’t worry if you’re not interested in building a web part, I just happened to choose that as the example. You can use the same code from a number of different places (e.g., a Windows Form application). I won’t be covering remote access to the taxonomy API in this post since that will topic is worthy of its own attention.

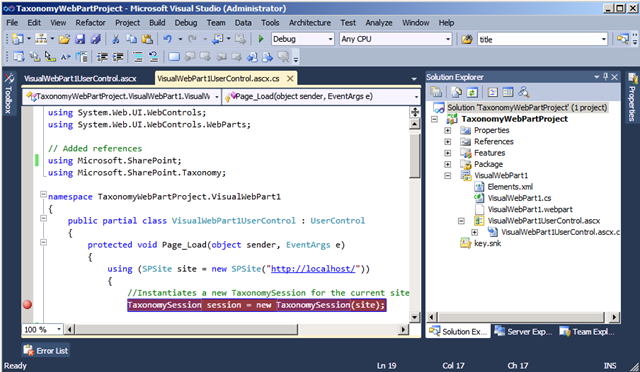
    The starting point for this conversation is VisualWebPart1UserControl.ascx.cs from the simple web part example. I covered issues adding the references in SharePoint 2010 Taxonomy Reference Issues.

    using System;
    using System.Web.UI;
    using System.Web.UI.WebControls;
    using System.Web.UI.WebControls.WebParts;

    // Added references
    using Microsoft.SharePoint;
    using Microsoft.SharePoint.Taxonomy;

    public partial class VisualWebPart1UserControl : UserControl
    {
    protected void Page_Load(object sender, EventArgs e)
    {
    using (SPSite site = new SPSite("
    http://localhost/"))
    {
    //Instantiates a new TaxonomySession for the current site.
    TaxonomySession session = new TaxonomySession(site);

    //Instantiates the connection for the current session
    TermStore termStore = session.TermStores["Managed Metadata Service"];

    // Write out the names of the term stores to a label
    Label1.Text = “”;
    foreach (TermStore termstore in session.TermStores)
    {
    Label1.Text += termstore.Name.ToString() + " … ";
    }

    // Write the name of the term store to a label
    Label1.Text += " Finished";
    }
    }
    }

    As you can see, this is a pretty straightforward example of how to get a TaxonomySession object and employ it. Once loaded, this web part will immediately write out the names of each term store available on the server.

    So let’s break it down. The first thing that happens inside the Page_Load method is getting an SPSite object. As mentioned above, TermStore objects are associated with the Web application of the parent SPSite object. By running the code within a using statement, you can rest assured that dispose() will be properly called on your objects. Since this web part project is using the SharePoint Visual Web part template, the only references I had to add were Microsoft.SharePoint (for the SPSite object) and Microsoft.SharePoint.Taxonomy (for the taxonomy objects).

    Now that you have a taxonomy session, you can start to use the taxonomy classes. In this case we’ll loop through each available term store on the server and write the results to a label. The label was simply dragged onto VisualWebPart1UserControl.ascx from the Toolbox onto design view for the web part.

    image
    - After dragging the label from the toolbox

    Pressing F5 will start the debugger and allow you to run the code as described in SharePoint 2010 Visual Web Parts.

    image
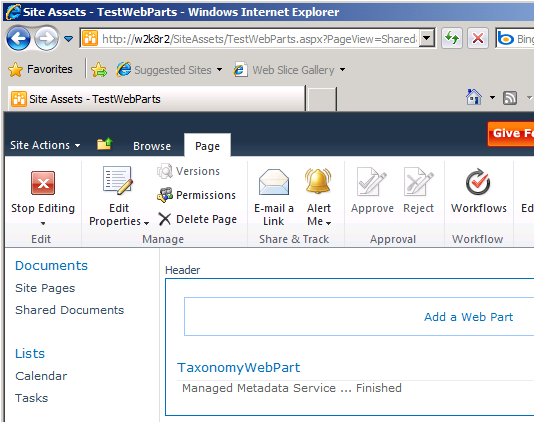
    - Running the web part to see the term store name

    In this case, there is only one term store, so only one name is returned. It’s a simple example but useful since you will need to know the name of your term store before you instantiate a term store object and start reading from or writing to your taxonomy.

    Note: If you get the name of your term store wrong, the error you see may not immediately tip you off that you’re fat fingered the text value. The error is:

    System.ArgumentOutOfRangeException was unhandled by user code
    Message=Specified argument was out of the range of valid values.
    Parameter name: index
    Source=Microsoft.SharePoint.Taxonomy
    ParamName=index
    StackTrace: at Microsoft.SharePoint.Taxonomy.Generic.IndexedCollection`1.get_Item(String index)

    The Hierarchy of Managed Metadata

    As explained in SharePoint Taxonomy Part One – Introduction to SharePoint Managed Metadata, the SharePoint 2010 EMM is organized into a hierarchy. The objects within this hierarchy are term stores, groups, term sets, and terms. For more info about the EMM hierarchy, refer to my SharePoint Taxonomy Hierarchy post.

    There are the rules for the taxonomy hierarchy (the latter three are from Microsoft):
    When a Managed Metadata service is created, a term store will be created. Once you have a term store, you can create a group. The Taxonomy API cannot create a term store (it is done through Central Administration or with a PowerShell script). However, the rest of the EMM containers can be created using the Taxonomy API.
    • After a Group object is created, the first TermSet object can be created. A TermSet object must be the child of a single parent Group object.
    • After a TermSet object is created, the first Term object can be created. A Term object can be the child of a TermSet object, or of another Term object.
    • After a Term object is created, another Term object can be created and added as a child Term object.

    Method to the Madness

    Here are some common methods that you’ll use when working with the EMM API:

    termStore.CreateGroup()
    group.CreateTermSet();
    termSet.CreateTerm()
    term.SetDescription()
    term.CreateLabel()
    term.Delete()
    termStore.CommitAll()

    Let’s start with the last one first: the CommitAll method. After performing write operations to a TermStore object, you must call CommitAll to commit the transactions. The taxonomy API is transactional so either every operation will be successfully committed, or none of the changes will be applied. As you saw in the list of classes above, the object model also includes changes. For example, ChangedItem and ChangedGroup. These are used to record what has happened.

    The SetDescription method allows you to create a description for the term and you can use CreateLabel to create synonyms. You can choose whether the label will be the default using a true or false Boolean. Of course, the Delete method will delete an object.

    Note that when creating a term or label, EMM provides the ability to supply the same term in different languages. This provides a number of multilingual features, but it also means that you’ll need to supply a Locale Identifier (LCID) when using some of the create methods. Windows uses the LCID to choose the language and culture when displaying information. The ID for English is 1033.

    Here’s a longer version of the using statement from above--it shows an example of these methods in action:

    using (SPSite site = new SPSite("http://localhost/"))
    {
    //Instantiates a new TaxonomySession for the current site.
    TaxonomySession session = new TaxonomySession(site);

    //Instantiates the connection named "Managed Metadata Service" for the current session.
    TermStore termStore = session.TermStores["Managed Metadata Service"];

    Group group = termStore.CreateGroup("Africa");
    TermSet termSet = group.CreateTermSet("South Africa");
    Term term = termSet.CreateTerm("Cape Town", 1033);
    term.SetDescription("This is the city term for Cape Town", 1033);
    term.CreateLabel("Cape of Good Hope", 1033, false);
    Term termChild = term.CreateTerm("Newlands", 1033);
    termChild.Delete();
    termStore.CommitAll();

    Label1.Text = " Finished";
    }

    image
    - The hierarchy has been created and the description and label were set

    [Disclaimer: This information is based on SharePoint 2010 Beta 2 and may differ from the RTM build.]

    SharePoint Conferences in 2010

    To help organize my time, I’m going to get started on my conference list early this year. I don’t have many details about which conferences Metalogix will exhibit at, or where I’ll be speaking, but at least I can put the dates in my calendar. I’ll add the missing information when it’s available.

    SharePoint Saturday New York (#spsnyc) – January 30, NY – Speaker (Enterprise Metadata Management (EMM), Taxonomy)
    SPTechCon (#SPTechCon) – February 10-12, San Francisco – Live Blogger for EndUserSharePoint.com
    Kollabria SharePoint Seminar series – February 11, San Francisco – Speaker (Migration)
    Microsoft MVP Summit - February 16-19, Redmond, WA - Speaker (Migration to SharePoint blogs)
    SharePoint Pro – March 16-19, Las Vegas
    Kollabria SharePoint Seminar series – March 23, Atlanta – Speaker (Migration)
    SharePoint Summit – April 12-14, Montreal
    SharePoint Pro Connections Deep Dive – May 10 – Speaker (EMM, Taxonomy)
    SharePoint Saturday Washington, DC (#spsdc) – May 15 – Speaker
    Microsoft TechEd – June 7-10, New Orleans
    Microsoft Worldwide Partner Conference – July 12–15, Washington, D.C. (Booth Staff)
    SharePoint Saturday New York (#spsnyc), July 31st, Microsoft Manhattan Office (Booth Staff)
    Microsoft PDC -- October 28-29, Redmond
    Microsoft SharePoint Conference – No conference in 2010
    SharePoint Connections (DevConnections) -- November 1-4, Las Vegas
    Microsoft TechDays in Halifax – November 2-3, Halifax, Canada. World Trade Centre
    TechEd Europe -- November 8-12, Berlin

    image

    Tuesday, December 29, 2009

    SharePoint Saturday New York Presentation

    I'll be speaking about SharePoint 2010 Managed Metadata (taxonomy) at SharePoint Saturday in New York (#spsnyc) on January 30th.

    website: http://www.sharepointsaturday.org/ny

    I’ve been digging into the new taxonomy features and I’m looking forward to showing off some code.

    image

    SharePoint 2010 Taxonomy Reference Issues

    If you’re looking to use the new SharePoint 2010 Managed Metadata (Taxonomy) API, you will likely run into one or both of these issues. One of them is mentioned in the known issues for SharePoint 2010 Beta 2, but not in a way that’s conducive to finding the solution with Bing or Google, so I’m including it here as well as a new one I’ve stumbled across.

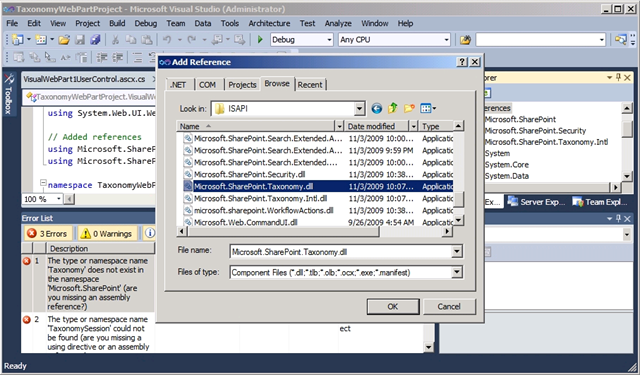
    The first issue is that after adding the Microsoft.SharePoint.Taxonomy reference, your project will not recognize any of the taxonomy classes (e.g., TaxonomySession). The first thing that I noticed is that adding the reference to Microsoft.SharePoint.Taxonomy from the .NET reference list simply did not work. Instead, I got a reference to Microsoft.SharePoint.Taxonomy.Intl—which is obviously a different DLL.

    image 
      - Broken reference to Microsoft.SharePoint.Taxonomy

    To resolve this issue, I simply used the browse option and added the right DLL explicitly from: C:\Program Files\Common Files\Microsoft Shared\Web Server Extensions\14\ISAPI\Microsoft.SharePoint.Taxonomy.dll. I deleted the other Taxonomy reference just for clarity.

    image
    - Browsing to the Taxonomy DLL will resolve the first issue

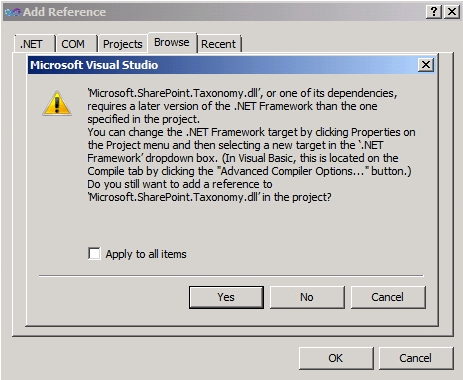
    When you add the right version, you may see the error: “’Microsoft.SharePoint.Taxonomy.dll’ or one of its dependencies, requires a later version of the .NET framework than the one specified in the project. You can change the .NET Framework target by clicking Properties on the Project menu...” You can ignore this error (you want to use .NET 3.5), it is resolved by the next solution.

    image 
      - You can ignore this message

    The second problem is the one mentioned in the known Beta 2 issues:

    “Some assemblies, such as Microsoft.SharePoint.Publishing, appear in some cases to have a dependency on an incorrect version of the System.Web.DataVisualization assembly. The incorrect reference causes build failures. If you see this problem, add a reference to the correct version of System.Web.DataVisualization on your system. If you installation is on the C drive, that assembly will be located here: C:\Program Files (x86)\Microsoft  Chart Controls\Assemblies\System.Web.DataVisualization.dll”

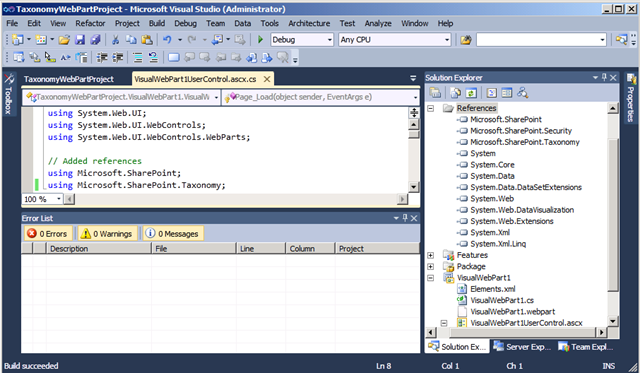
    Evidently, Microsoft.SharePoint.Taxonomy is another one of the assemblies with this issue. Fortunately, the solution is straightforward. Simply add a reference to System.Web.DataVisualization using the path above and your problems are solved.

    image 
      - After fixing the Taxonomy reference and adding DataVisualization, the project compiles

    [Disclaimer: This information is based on SharePoint 2010 Beta 2 and may differ from the RTM build.]
    SharePoint 2010 Visual Web Parts

    One of the new features in SharePoint 2010 that I’m most excited about is the ease with which developers can now create web parts. To distinguish the old from the shiny new, SharePoint 2010 provides the “Visual Web Part” project type. In this post, I’ll quickly cover the basics of getting a new web part working in debug mode--I’ll get into more detail in future posts.

    Update: I have posted a video demo on the Metalogix blog showing how to create a SharePoint 2010 Taxonomy Web Part.

    Obviously, you’ll need a working SharePoint 2010 development machine, so if you don’t have the set up yet, I suggest you refer to my post about SharePoint 2010 Beta 2 Install.

    Once you have everything set up, the first step is to create a new project in Visual Studio 2010 Beta 2.

    image
    - Creating a new project in Visual Studio 2010 Beta 2

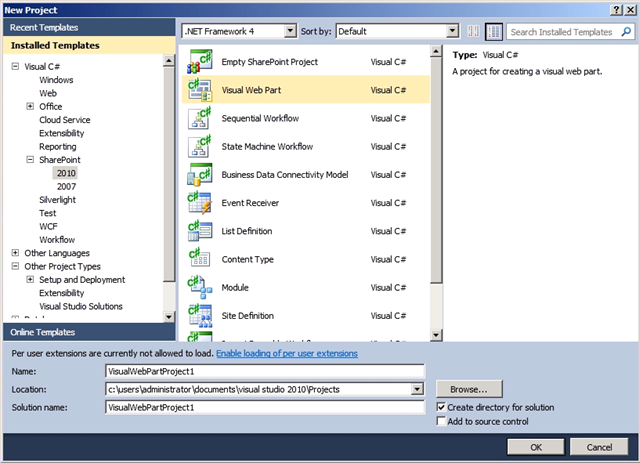
    The new project dialog gives you the ability to choose a myriad of project types. You’ll want to choose Visual C# > SharePoint 2010 > Visual Web Part. As usual, you also have the option of choosing a project name, the path for the project files and a solution name.

    image
    - The new project dialog

    When the project is created, you will see that the plumbing of your new web part is provided in the project template.

    image
    - Your blank template for web part creations

    Rather than dive into the code, we’re just going to get this blank web part running, so start the debugger (F5 or click the green arrow).

    At this point, you’ll be asked to create a web part page to associate with your web part. After you choose a name and template for your new web part page, you can save your choices and the page will be created.

    Note: The good news is that if you delete this web page, you will be asked to created another when if you choose to debug your project again. The bad news is that it appears that overwriting the page may be necessary--even if you don't delete the first page.

    Update: Thanks to Peter Holpar who pointed out that I neglected to mention that you can add the debug page URL (once you've created it) into the Debug option of the project properties. This saves the extra steps of creating the page for each subsequent debug run.

    image
    - Creating a web page to run the web part in debug mode

    Depending on which template you choose, click an area where you see “Add web part” to bring up the web part picker. If you chose the default web page template, you will see four options.

    image
    - The web part page has been created

    You’re new web part will appear in the “Custom” category. After you choose to add it, you’ll see the name appear on your web part page.

    image
    - Choosing the new custom web part from the available web parts

    And that’s it. You now have a blank web part project that you can use to build what you want. Sure, it doesn’t actually do anything, but just enjoy how simple it is to get a working web part running in debug mode on your SharePoint server. Now you can drag and drop controls from the Toolbox just like any other ASP.NET page and start your creation.

    image
    - The new visual web part has been added

    Debugging and Breakpoints

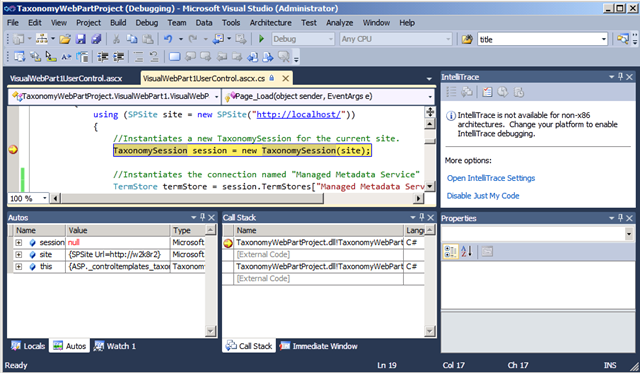
    One of the new advances in web part goodness is ease of debugging. To see how easy it is to debug and step through your code, simply insert a breakpoint into your visual web part.

    image
    - A breakpoint set in the SharePoint web part

    When you now run the debugger, code execution will stop at your breakpoint and let you step into/over or do whatever you desire in debug mode.

    image
    - The debugger has hit the breakpoint

    Now the trick is to figure out what you want to do, but isn’t that better than worrying about the plumbing?

    [Disclaimer: This information is based on SharePoint 2010 Beta 2 and may differ from the RTM build.]