Wednesday, September 18, 2013

Convert Broken HTML to XHTML

I recently made the decision to refactor a 600 page software manual. That’s a daunting task, so why did I do it? The old format was barely working, inflexible, required a truly awful propriety tool, and cost the company considerable time and money when changes (such as translations) were required.
The underlying pages were in HTML, or at least the closest thing to HTML that still actually worked. In reality, the code was awful; there were broken tags and redundant tags all over the place. The editor in question (developed by a small company in Hawaii) is nothing more than a wrapper around Microsoft’s free HTML Help Workshop tool. I decided to clean up the HTML (read: convert it to XHTML), dump the editor and dynamically build the manual the same way I’ve done at companies in the past. This is an ongoing project, but here’s how I handled the task of cleaning up ~600 HTML files, so they were in valid XHTML.
Resources:
HTML - Special Entity Codes
HTML Tidy
Online RegExr Test Tool and Interactive Tutorial
Sublime Text Editor
image
- running a Regular Expression replace in the Sublime Text editor
Step 1: Clean up the HTML with HTML Tidy
HTML Tidy is convenient way to repair poor HTML. It doesn’t fix everything, but it does help and it makes the code look a lot better since it will fix much of indentation. So the first thing I did was run this HTML Tidy command on all the files.
I ran this in Git Bash after turning off word wrap in tidy settings file. Even with the word wrap option, HTML Tidy inserted more newlines than you’d expect, so it isn’t perfect, but it made a big difference.
$ find /C/Manual -type f -name "*.htm" -exec tidy -f errors.txt -m -utf8 -i {} \;
Note that you can remove the HTML Tidy watermark pretty easily using find/replace in Sublime. And that is a nice segue to the next step.
Step 2: Simple Find/Replace in Sublime
Using the “Find in Files…” feature, it’s easy to make simple text substitutions in Sublime. For example, to be XHTML compliant, I need to convert &nbsp; to &#160;, <BR> to <br/>, and many other examples.
I also needed to simply remove some tags. For example, tags added when someone pasted text from Microsoft Word into the editor (e.g., <o:p> and </o:p>).
Sublime will help you figure out the syntax to match just the current open file, all open files, or a whole directory structure. For example, in the “Where” box for Replace, you might enter c:\directory\test,*.htm to match all .htm files.
Step3: RegEx Find/Replace in Sublime
Simple find/replace actions got me part way there, but they wouldn’t solve all the issues I had to deal with in the broken HTML. The next step was to use Regular Expressions to enable some more sophisticated corrections.
One example, was attributes within HTML tags (such as size, height, etc.) that weren’t enclosed in quotation marks. Browsers will deal with that transgression, but it’s not valid XHTML. I had to find a quick way to add the quotes around these attributes in ~600 files. The answer was find/replace using regular expressions in Sublime.
Find: (size=)([0-9])
This creates two capturing groups with “size=” as the first and any number of 0-9 characters as the second.
Replace: $1"$2"
This replace command encloses the second capturing group in quotation marks. For example, size=100 becomes size=”100”.
Well that’s all for now. I hope you found this helpful. I encourage you to try the RegExr online tool; it’s helpful when refining regular expressions.

Friday, September 13, 2013

Scripting Regular Expressions Find/Replace in Sublime Text

Just like everyone in the software industry, I’ve used many, many different text editors over the years.  vi, Emacs, Notepad, Notepad++, TextPad, nano, gedit… to name a few. But, of course, there is a ridiculously long list of text editors and I haven’t tried that many of them. The one that I’ve been working in for most of this year is Sublime Text. Sublime’s tag line is “Sublime Text: The text editor you’ll fall in love with.” I may not be in love yet, but I’m definitely checking it out a lot.

In addition to having excellent functionality built-in, Sublime also supports a plug-in model. There is the GoSublime plug-in for golang code and there’s the RegReplace plug-in that allows one to write find/replace commands using regular expressions and save them in script as Command Palette commands.

To install RegReplace on Windows:

Step 1: Install Package Control for Sublime Text

As you can see in the installation instructions for Package Control  for Sublime Text, all you have to do is open a Sublime Text console (Ctrl+`) and paste in the install code.

Step 2: Install RegReplace for Sublime Text

image

Option 1: After installing package manager, download RegReplace, unzip it and paste the unzipped folder into your Packages folder (e.g., C:\…\Sublime Text 3\Packages). Next, go to Preferences > Package Control and choose “Package Control: Install Package.” Then choose the package you want to install from the list.

Option 2: This requires you have Git. Open a command prompt. CD to your Sublime Text 3 packages directory, then enter the following command:

git clone -b ST3 https://github.com/facelessuser/RegReplace.git RegReplace

Step 3: Add a Default.sublime-commands file -- with your command added

I had to manually create the folder: C:\Users\username\AppData\Roaming\Sublime Text 3\Packages\RegReplace

Once you have the file, you can add your own custom commands. (Remember to add a comma to the command above.)

   // Test RegReplace
     {
         "caption": "Reg Replace: Test",
         "command": "reg_replace",
         "args": {"replacements": ["test_reg_replace"]}
     },

Step 4: Add your custom command to the Command Palette

To do this, choose Tools > Command Palette > Then type “setting” and you’ll see “Preferences: Reg Replace Settings – User.” Choose this option and paste the example one that comes with RegReplace into the new file that’s created.

This will create the file: /C/Users/username/AppData/Roaming/Sublime Text 3/Packages/RegReplace/reg_replace.sublime-settings

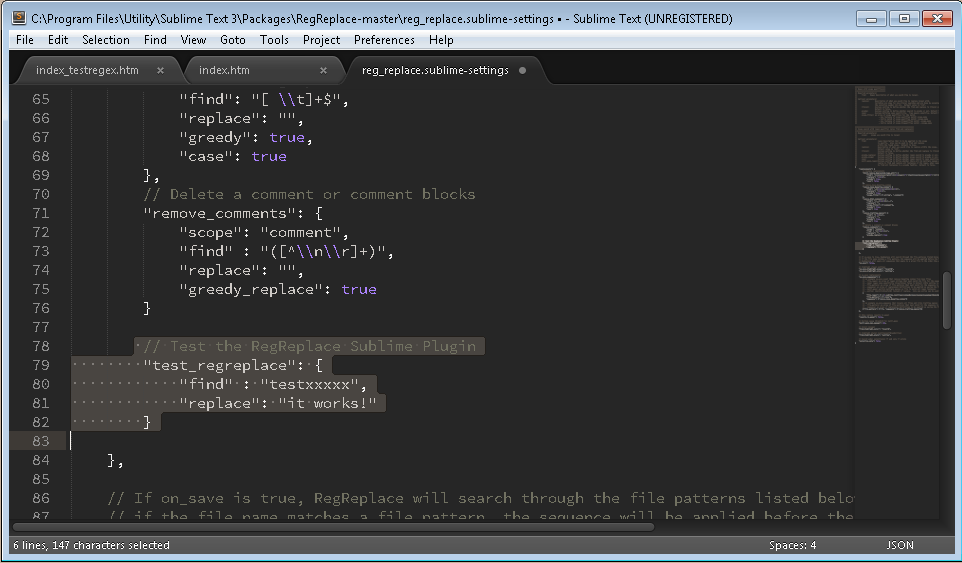
After the file is created, add a new command to reg_replace.sublime.settings. For example:

// Test the RegReplace Sublime Plugin
    "test_reg_replace": {
    "find" : "testxxxxx",
    "replace": "it works!"
   }

image

Step 5: Try it out!

Once you have everything set up, you can use the Command Palette to run your new custom find/replace regular expressions scripts.

image

Note: After installing RegReplace, I received the an error when trying to add my test code to reg_replace.sublime.settings. The error was something like “Cannot save. Can’t create .tmp file in RegReplace folder.” To work around the issue, I opened the security settings for the folder and added write permissions for all users. A bit overkill, but in my case, it’s a secure machine.

Thursday, August 22, 2013

GoREST (golang web services) Simple Examples

In my last post, Installing GoREST on Ubuntu Linux, I mentioned that I should really post a simple example of using GoREST. Here’s some example code for a Get and Post request using GoREST web services in golang.

Note that I’m also using the go-sql-driver/mysql driver for MySQL in golang. To install the driver, simply run:

$ go get github.com/go-sql-driver/mysql

Also, this example isn’t actually using JSON. Check out the link at the end of this post for a JSON example.

package main
import (
      "code.google.com/p/gorest"
    _ "github.com/go-sql-driver/mysql"
      "database/sql"
      "net/http"
      "log"
      "time"
      "os"
      "strconv"
)

func main() {
    // GoREST usage: http://localhost:8181/tutorial/hello
    gorest.RegisterService(new(Tutorial)) //Register our service
    http.Handle("/",gorest.Handle())    
    http.ListenAndServe(":8181",nil)
}

//Service Definition
type Tutorial struct {
    gorest.RestService `root:"/tutorial/" consumes:"application/json" produces:"application/json"`
    hello  gorest.EndPoint `method:"GET" path:"/hello/" output:"string"`
    insert   gorest.EndPoint `method:"POST" path:"/insert/" postdata:"int"`
}

func(serv Tutorial) Hello() string{
    return "Hello World"
}

func(serv Tutorial) Insert(number int) {
    db, err := sql.Open("mysql", "root:password@/dbname?charset=utf8")
    db.Exec("INSERT INTO table (number) VALUES(strconv.Itoa(number) + ");")
    db.Close()
    serv.ResponseBuilder().SetResponseCode(200)
}

I’m using Postman REST Client for my post tests, you can download Postman for free from the Chrome web store. (Blog post on using Postman with JSON.)

image

Monday, August 19, 2013

Installing GoREST on Ubuntu Linux

Previous posts on setting up a developer environment on an Ubuntu Linux virtual machine running on Windows Azure:
- Linux (Ubuntu) Virtual Machine on Windows Azure
- Remote Access to Ubuntu Linux VM on Windows Azure
- Installing LAMP on Ubuntu
- Installing Git on Ubuntu Linux

GoREST is a useful RESTful style web-services framework for the Go (golang) language. The commands to install GoREST are simple, but there’s more than one step involved. Although, having said that, this post will still be really light, so I’ll have to make sure I write another one soon with some GoREST examples. (Update: I wrote a post with some simple examples: GoREST (golang web services) Simple Examples)

First, you’ll need to install Mercurial so that you can run the “go get” command for GoREST:

$ sudo apt-get install mercurial

image

Next, run the command to install GoREST:

$ sudo go get code.google.com/p/gorest

The GoREST install is silent, so you won’t see any feedback.  My advice is to have a simple Hello World style example ready to go, so you can test your GoREST install.

Installing Go (golang) on Ubuntu Linux

Previous posts:
- Linux (Ubuntu) Virtual Machine on Windows Azure
- Remote Access to Ubuntu Linux VM on Windows Azure
- Installing LAMP on Ubuntu
- Installing Git on Ubuntu Linux

As part of my series on setting up a development environment on Ubuntu Linux running in Windows Azure, here are the steps to install and test the Go (golang) language.

First you have to SSH to your VM and install Go, which is super easy. Note that apt-get might not install the latest version of Go, see thread on Stack Overflow about installing latest version of Go.

$ ssh -p portnumber username@yourvmname.cloudapp.net
$
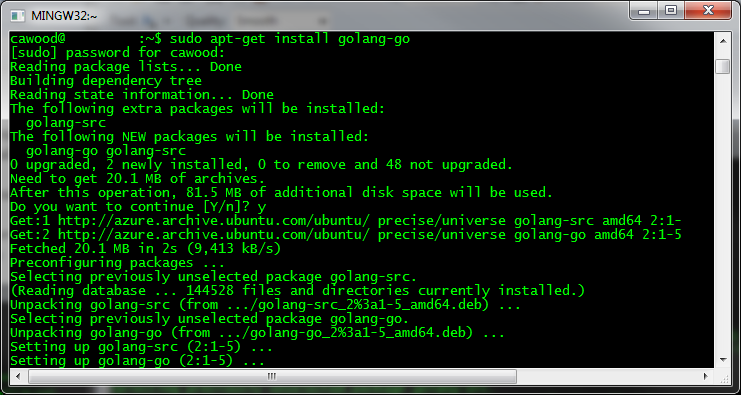
sudo apt-get install golang-go

image

You’ll be asking whether or not you’d like to participate in a program to track which packages are being installed.

image

To check that it’s installed, you can run: $ go version

You may want to do some additional customization. For more details, refer to this post: How to Install Google Go in Ubuntu by Joshua Price.

Sunday, August 18, 2013

Installing Git on Ubuntu Linux

Previous posts:
- Linux (Ubuntu) Virtual Machine on Windows Azure
- Remote Access to Ubuntu Linux VM on Windows Azure
- Installing LAMP on Ubuntu

I’ve been writing some posts about setting up a development environment for Ubuntu running on Windows Azure. Here’s the short post on getting Git source control working.

Install Git

Installing LAMP is easy, there isn’t a word for how easy it is to install Git. It’s one command and you’re done. Done with the install that is… you’ll need to do a little config and then clone a repository or initialize one.

$ sudo apt-get install git

image

Once you’ve got your install done, you can quickly configure your user settings with these commands.
$ git config --global user.name NewUser
$ git config --global user.email

Check your Git install

Where is Git installed?

$ which git

What’s your config?

$ git config –list

Start Using Git by Cloning a Repository

Clone your repository to a directory (for example, from GitHub):
$ git clone git@github.com:whatever folderName
Note that you don’t have to pay for a private repository. See my post on a Free Private Git Repository Using TFS Online Git Integration. (Need help? See Cloning a Git Repository.)
Also, if you’re new to Git, keep in mind that you can get the Pro Git book for free.

Saturday, August 17, 2013

Installing LAMP on Ubuntu Linux

Previous posts:
- Linux (Ubuntu) Virtual Machine on Windows Azure
- Remote Access to Ubuntu Linux VM on Windows Azure

Installing the rest of the L.A.M.P. stack (Linux, Apache, MySQL, PHP) on a Windows Azure Ubuntu image is remarkably simple. You simply need to run two commands. First install tasksel and then run tasksel to install the lamp-server package. It’s so easy that I’m also including instructions for testing that each component is installed and running correctly.

cawood@ubuntu:~$ sudo apt-get install tasksel

(At this point, you may be told that you can run sudo apt-get autoremove to get rid of walinuxagent-data-saver. This is optional.)

cawood@ubuntu:~$ sudo tasksel install lamp-server

image

After you’ve installed the LAMP stack, you can test that each component is working.

Testing the Apache Web Server Install

First you can simply test that the index file exists by running these commands:

$ cd /var/www
$ cat index.html

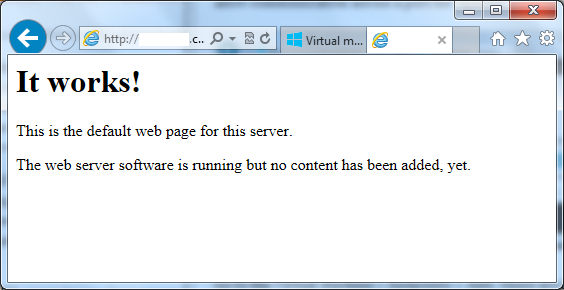
<html><body><h1>It works!</h1>
<p>This is the default web page for this server.</p>
<p>The web server software is running but no content has been added, yet.</p>
</body></html>

To start editing your index page, you can run:

$ sudo nano index.html

On Azure, you must create an endpoint for the Apache port. This opens the Azure firewall to allow communication across a port for Apache.

image

Go to the Virtual Machine > Endpoints > Add. These are the standard values: name: http, protocol: tcp, public port :80, private port: 80. Once you’ve created the endpoint, you can browse to your new Apache server.

image

Test your MySQL Install

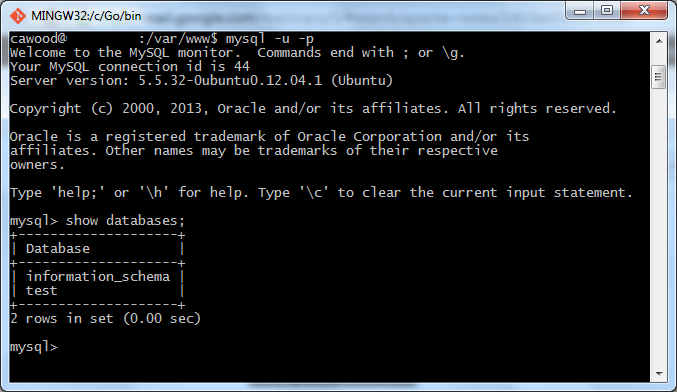
To make sure your MySQL install is working, simply run mysql and then type show databases; and press Enter. Couldn’t be easier. The result should look the window below.

image

Test PHP on your Server

Finally, to test your PHP install, you’ll need to create a file and then launch it in your favourite browser. Maybe because I'm nostalgic about the days of Pine, I’m a fan of the  GNU nano editor, so I use this command:

$ sudo nano /var/www/info.php

Add this content to the file:

<?php
phpinfo();
?>

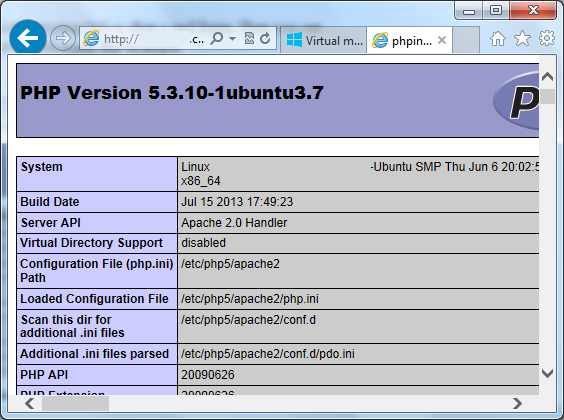
After you’ve made your changes, Save and Exit by typing Ctrl+x, then y and Enter. Then you can open the info.php page using your machine IP or DNS name. For example, http://myvm.cloudapp.net/info.php.

image


There you go. The LAMP stack running on Windows Azure.

Tuesday, August 13, 2013

Remote Access to Ubuntu Linux VM on Windows Azure

Previous post: Linux (Ubuntu) Virtual Machine on Windows Azure

I was getting ready to write a post about connecting remotely to Ubuntu running on Windows Azure, when I found this post: Remote Desktop to Ubuntu in Windows Azure. Unfortunately, it doesn’t work with Ubuntu 13.4 (Raring Ringtail); which just happens to be the image I choose to install in my virtual machine. Rather than wrestle with it any longer, I’ve decided to create a new VM using the Ubuntu 12.04 LTS Server (Precise Pangolin) image.

You may wonder why anyone would bother setting up remote access since you can SSH into the machine remotely and do everything through the command line. For me, the answer is quite simple, I want another way to connect in case something goes wrong. I’ve had VMs get into bad states (both one Amazon AWS EC2 and Windows Azure), so I’d like the option to connect as many ways as possible.

Note: I've used the Ubuntu 12.04 LTS server image since newer versions of the Ubuntu Unity desktop don't have a 2D mode and therefore are difficult to use with remote client software. If someone has the solution to this issue, please leave a comment.

[Update: Of course, you fist have to set up SSH: How to Use SSH with Linux on Windows Azure. You should create an SSH key first and associate the certificate (*.pem file) with the VM when you create the VM.]

To get remote access to 12.04, here are the steps:

1. Connect using SSH. I like the Git Bash terminal that comes with the Git install. PuTTY is also a good SSH client.

2. Install a desktop. This command will take a while, so get yourself a cup of joe... and feel free to make it a grande.

sudo apt-get install ubuntu-desktop

image

3. Install XRDP/ VNC Server.

sudo apt-get install xrdp

4. In the Azure Management Portal, create a VM endpoint for XRDP. 3389 is the default port.

5. Use the "Connect" button from the Azure portal to download an RDP shortcut for your VM.

image

6. Open the shortcut and login.

image

Here are a couple of other posts on this topic:
http://azurecoder.azurewebsites.net/tag/ssh-to-linux-virtual-machine/
http://www.liberiangeek.net/2012/05/connect-to-ubuntu-12-04-precise-pangolin-via-windows-remote-desktop/

Tuesday, August 06, 2013

Enable SharePoint Document Sets in Office 365

This still requires a number of steps, so here’s the rundown:

This first key point is that this feature is only available to Office 365 Enterprise plans. If you’re not sure which plan you’re on, check with an admin.

Note: You must be a Site Collection Administrator or a Site Owner to create or configure Document Set content types.

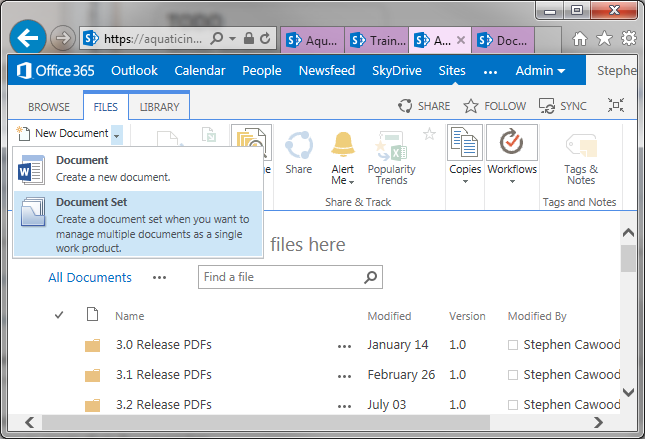
image
- Creating a new document set

1. Enable Document Sets for a site collection

2. Create a new Document Set content type

Note: you don’t need to worry about the “Configure or customize a Document Set content type” unless you actually want to customize something.

3. Create a new instance of a Document Set

image

After you create and configure a Document Set content type, you must add it to the library where you want users to create their Document Sets.

To do this, go to Library Settings > Content Types (section) > Add from existing site content types

image
- adding the new content type to the site

Friday, July 26, 2013

Great Article: STOP GLOSSING OVER THE GOOD STUFF

image
- image from www.scrawnytobrawny.com

I don’t normally do this, but this is a great article…

STOP GLOSSING OVER THE GOOD STUFF (HOW TO BE POSITIVE AND HAPPY)

by Jason Lengstorf

“During the course of conversation, I made a couple negative comments about my life; essentially, I started complaining about my situation.

Phil looked me in the eye and asked, point blank, “Are you actually complaining right now?”

It caught me off guard to be questioned like that, because I was used to commiserating with other entrepreneurs about how “hard” our lives were and all the things we wished we could change.

…I was being a colossal tool.”

Thursday, June 27, 2013

Free Private Git Repository Using TFS Online Git Integration

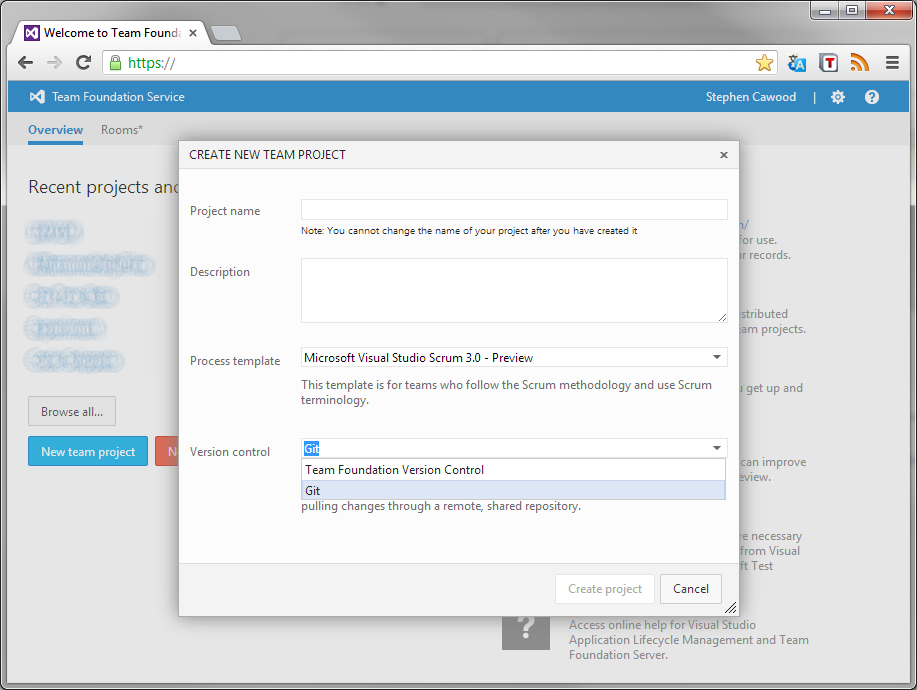
If you’re looking for a way to have a free private (and hosted) Git repository, Team Foundation Services Online is a great way to go. Last time I checked, GitHub was charging for private repositories.

www.geeklit.com TFS Online Git Integration

You can use Visual Studio if you want, but you can treat your Git repository just like any other, so you don’t have to use VS.

image

Read the detailed instructions for creating a new Git project in TFS online and Getting Started with Git in Visual Studio and Team Foundation Service for more info.

BTW – TFS online also has some really cool project management features (e.g., Kanban board), so it’s not just source control.

Tuesday, May 21, 2013

SharePoint 2013: Quick Launch Heading Without a URL

There are occasions when you’d want to create a heading in the SharePoint Quick Launch navigation without your heading being navigable. In the past, I believe it was possible to create a heading without specifying a URL, but in SharePoint 2013, the URL field is mandatory—at least from the Site Settings interface. (See below for update.)

Option 1: enter “#” as the URL from Site Settings > Look and Feel > Quick Launch

Option 2: Use the “EDIT LINKS” option under the Quick Launch and leave the URL field empty. Although, the URL field is mandatory from Site Settings, you can leave it blank from this interface.

image

Both of these options create a link to the site’s home page, but they allow you to create a heading without using an absolute URL to some random page.

Update: Option 3:

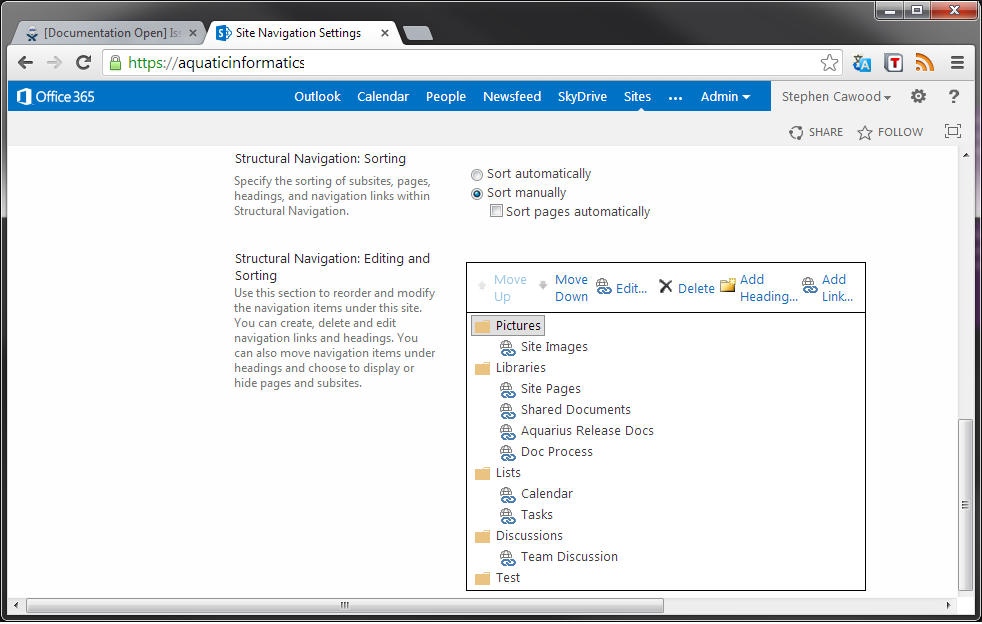
There is actually a way to do it the old fashioned way; it’s just not that intuitive if you happen to try the UI for editing the Quick Launch above. Go to Site Settings > Navigation and then scroll down to the Structural Navigation: Editing and Sorting section.

image

Monday, April 29, 2013

Linux (Ubuntu) Virtual Machine on Windows Azure

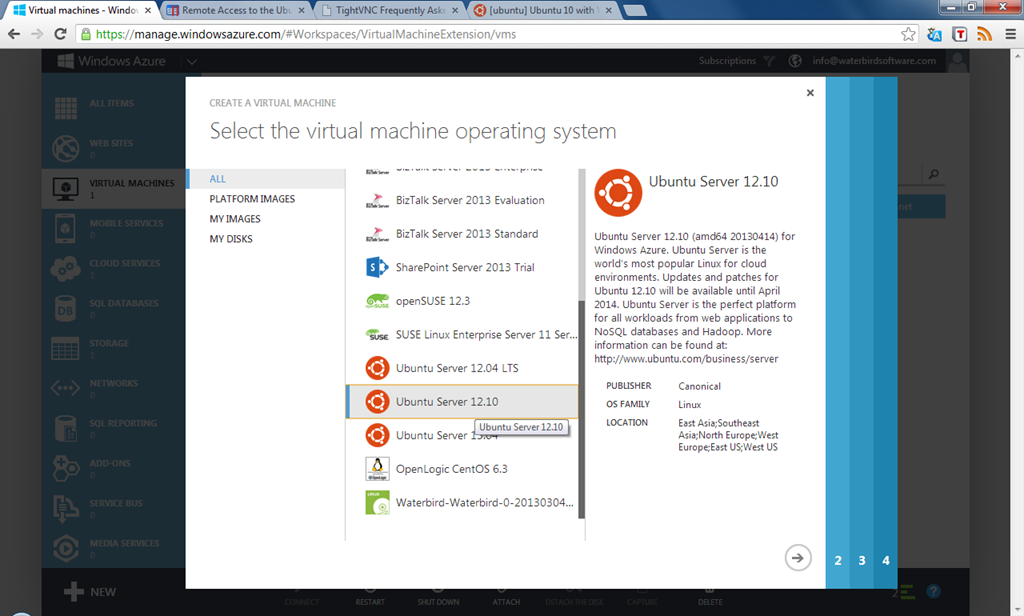
Creating (it’s hard to write “installing”) a Linux virtual machine on Windows Azure is remarkably simple. It’s just a matter of choosing the O/S and configuration you want from a gallery of options.

The whole process takes a few minutes and under the BizSpark start-up program, it’s possible to get access to Windows Azure for free.

AzureLinuxVMCreate
- choosing to create an Ubuntu virtual machine in Windows Azure

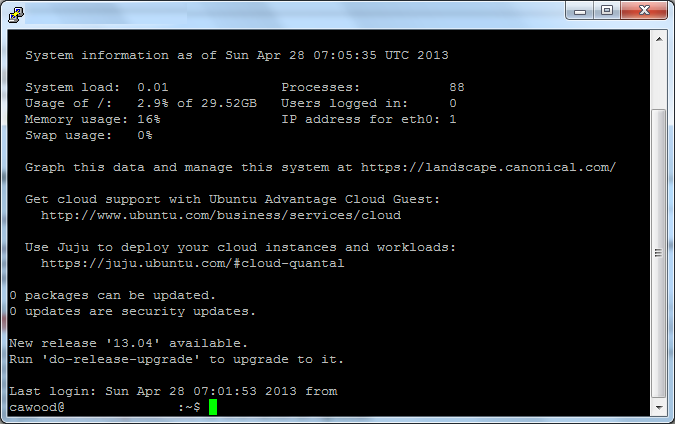
After creating the VM, you can connect easily from Windows by downloading PuTTy SSH.

PuttyConnected
- connecting to Linux on Azure using PuTTy

Full instructions for creating a Linux Virtual Machine on Windows Azure can be found on the Windows Azure website.

Monday, April 22, 2013

SPAM Green is people! It’s people!

I’ve heard that some people refer to the excessive mail that comes in from legitimate sources (e.g., your airline plan, Groupon and hotel plans) as “Bacon.” In other words, it’s not SPAM, it’s bacon. I don’t think that’s a good term because why would you associate something negative with bacon?

Anyway, the issue that I have been complaining about for a long time is not the volume of email from accounts that are genuine, but SPAM that comes as a result of human error. Someone mistyped in the address somewhere along the way and now you get their mail. I’ve decided to call this type of email “SPAM Green.” Why? Because it’s people! SPAM Green is people!

If that doesn’t make any sense to you, you really need to watch Soylent Green.

I have a relatively short email address (6 characters), so this happens to me all the time—I mean every week I get mail that’s for someone else. Much of the time, there’s an unsubscribe option, so I just do that, but sometimes there is no way to unsubscribe so I have to just mark it as junk. The funniest ones are the messages that include login details for their account. Of course, I don’t use that information for evil, but one time I got messages from some shady “have an affair” site, so I did use the info to go in and delete the account.

Thursday, March 21, 2013

World Water Day 2013: What is your water footprint?

Check out Stu Hamilton’s blog post on the Aquatic Informatics website about World Water Day 2013.

2013logo_en1-e1363904910326

“To mark World Water Day at Aquatic Informatics we watched the movie ‘Last Call at the Oasis’. In discussion about the issues raised by this movie one of our senior developers expressed surprise at the magnitude of the water footprint for everyday products.

For example, the water footprint for a t-shirt was given as 700 gallons!

I don’t know whether the notion of accounting for your water footprint will catch on or not. A few years ago the idea of calculating your carbon footprint got quite a bit of press and even though carbon calculators have never caught on the notion that your carbon footprint matters seemed to stick. Equating energy use with a carbon footprint is intuitive – if I turn on a light my footprint grows whereas if I walk to work my footprint shrinks.”

image

Wednesday, February 27, 2013

Running Mono 3.0.5 Beta on Windows

Mono is a really cool concept. It’s a C# compiler/framework that works cross-platform. C# is fantastic, so I really like the idea of being able to develop C# (potentially with Visual Studio) and target any device. Until Mono came along, C# was only used on Windows because it uses the Microsoft .NET framework. (Mono also boasts the MonoGame platform and the MonoDevelop IDE for Linux coding.)

image

Here is the introduction from the Mono Wikipedia page:

“Mono is a free and open source project led by Xamarin (formerly by Novell and originally by Ximian) to create an Ecma standard compliant .NET Framework-compatible set of tools including, among others, a C# compiler and a Common Language Runtime.

The stated purpose of Mono is not only to be able to run Microsoft .NET applications cross-platform, but also to bring better development tools to Linux developers.[3] Mono can be run on many software systems including Android (and most other Linux distributions), BSD, iOS, OS X,Windows, Solaris, and some for game consoles such as PlayStation 3, Wii, and Xbox 360.”

So I downloaded Mono to try it out on Windows (I’ll try Ubuntu next) and I ran into an issue right away. Just trying to validate the install using the “Hello World” example on the Mono Basics page didn’t work. It’s really not that complicated, here’s the example program:

using System;
 
public class HelloWorld
{
    static public void Main ()
    {
        Console.WriteLine ("Hello Mono World");
    }
 
}

However, I couldn’t get it to work using the gmcs compiler that’s used in the example. The result was this all too common error:

C:\Mono\Mono-3.0.5>gmcs
'gmcs' is not recognized as an internal or external command, operable program or batch file.

image
This error will occur on Windows when the program actually doesn’t exist, or it can’t be discovered from the location that the console is running. There are two way to fix this issue for any Windows program:

1. Use the full path to the program and use quotes if the path has spaces in it

2. Add the path for the program to the Windows Environment Variable called “Path.”

So I tried to find the executable for gmcs, but I could not even find gmcs.bat or gmcs.exe. In this case, it wasn’t an issue with Windows or Mono, it was simply out of date documentation on the Mono site.

I received this helpful advice from the Mono user community forum, “Have you tried "mcs -sdk:2"? Mono 2.11 merged all the compilers into the one unified compiler, and now gmcs is a shell script that simply calls mcs (at least on Linux).” Ah, that’s good to know!

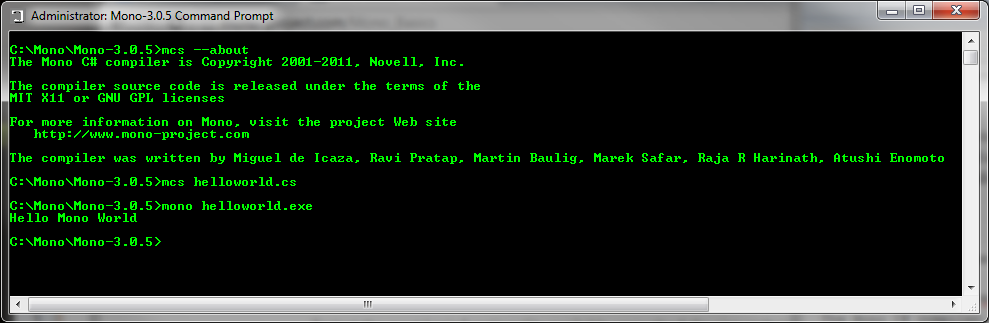
Here is the working version of the “basics” test code:

C:\Windows\System32>mcs --about
The Mono C# compiler is Copyright 2001-2011, Novell, Inc.
The compiler source code is released under the terms of the
MIT X11 or GNU GPL licenses
For more information on Mono, visit the project Web site
  
http://www.mono-project.com
The
compiler was written by Miguel de Icaza, Ravi Pratap, Martin Baulig, Marek Safar, Raja R Harinath, Atushi Enomoto

C:\Windows\System32>cd C:\Mono\Mono-3.0.5

C:\Mono\Mono-3.0.5>mcs helloworld.cs

C:\Mono\Mono-3.0.5>mono helloworld.exe
Hello Mono World

image

Success!

Wednesday, February 20, 2013

SharePoint Pro Magazine Article–So you want to be a SharePoint author?

An article I wrote about becoming a SharePoint author has been published on the SharePoint Pro magazine blog. Thanks go to Dan Holme for letting me fill in for him!

image

The article is called So You Want to be a SharePoint Author? Here’s a snippet:

“With the release of the SharePoint 2013 Preview, a great content machine has been switched to high gear. Articles, blog posts, training material, and documentation are all being crafted at a furious pace. And we can’t forget the books—lots and lots of books.

A quick search on Amazon reveals that a single stack of all the SharePoint-related books would be well over 100 feet high. If you’re one of the people thinking about writing your first SharePoint book, my advice to you is...”

Now you’ll just have to follow the link.  :P

Wednesday, January 09, 2013

SPC12: Developing apps for SharePoint 2013 with Visual Studio 2012

Speakers: Mike Morton, Sean Laberee

This session was an introduction to the new App model for SharePoint and Office. The room accommodated about 3500 people and it was packed.

  • loud cheers from the large crowd for new app dev model experience (e.g., just save and refresh instead of redeploying)
  • the new app model uses 'modern' web dev techniques such as JQuery and knockout.js
  • funny moment: during a demo, a presenter forget to close a quote and many people yelled out from the audience
  • creating web parts is even easier than 2010 visual web parts. (inc. client web parts for office 365)
  • cool that you can 'appetize' existing web apps
  • apps have events
  • use OAuth for security
  • apps can be MVC not just web forms
  • really cool that you can locally debug using a local DB and then deploy to Azure an it will automatically provision SQL Azure DB for you. This uses dacpac under the hood
  • debug uses iisexpress and no app registration is required
  • apps for Office can be packaged somehow to be apps for SharePoint—details pending

Saturday, December 01, 2012

Friday, November 30, 2012

SharePoint 2013 Conference–Upgrade Deep Dive

Speaker: Sean Livingston (Senior Program Manager, Microsoft)

Developing a solid foundation for your users is critical to the success of your SharePoint Server 2013 deployment - in this session we'll share the major changes in how upgrade works in SharePoint Server 2013 and how to best take advantage of new capabilities to enable and deliver a smooth upgrade experience to your users.

This was a 400 level session that described in detail the various out of the box upgrade options that are available for SharePoint administrators. The fundamental message of the session was upgrade is “safer and faster.”

image

This session was in a huge room and it was almost full. In fact, the session was actually moved to a larger room and there were still people standing in the back. Here are my notes:

· Deferred site collection upgrade is the main new feature. I wrote a post about the deferred site collection upgrade option when the SharePoint 2013 preview was first released. My message in that post was that it’s a good feature, but don’t confuse “deferred” with “incremental.” This is not a feature that allows you to take, for example, one site out of a site collection and migrate it to 2013 while leaving the rest of the content on a 2010 server.

· In short, the deferred site collection upgrade allows SharePoint 2010 customers to “upgrade’ to SharePoint 2013 but still run site collections under the SharePoint 2010 code base. In other words, you have to upgrade the DB schema, but you can run 2010 site collections in 2013. This means--in principle--that custom code for SharePoint 2010 should just work and continue to work until you’re ready to upgrade the site collection. Once you do that, you’ll be running on the 2013 code base.

· Note that this is all at the site collection level—not on a sub-site by sub-site basis.

· Upgrade preview creates a copy. default is 100MB mac. that copy will actually be used is the site collection is upgrades. The size is configurable.

· Upgrade queue is used to control how many upgrade actions are happening at the same time. upgrade throttling. PowerShell upgrade commands will honour the upgrade queue unless you explicitly override it.

· Performance is about 5mins for a small site collection and can be as quick as 45 seconds. However, Sean was clear that, if your site collections were slow to upgrade last time; they will be slow to upgrade again. The “more stuff you have” the longer it will take. This includes features, numbers of sub-sites. it could take hours to upgrade (for “big and gnarly site collections”).

· You can run PowerShell commands to get all the site collections and pipe them into the upgrade queue so that they are all upgrades.

· get-spsite is now shown by default  shows compatibility level in PowerShell commands

· get-spsiteupgradesessions info will show what’s going on the in queue on the server

· get-spsite | upgrade spsite is the basic upgrade command

· Sending email updates when site collections are queue and/or completed is an option. The default is to send mail if upgrade was UI initiated.

· Evaluation site collection creation uses SQL Server snapshots. if mirroring is being used, it won’t work.

· This process snapshots the whole DB regardless of how many site collections are in the DB. Then the site collection is cloned (in the original DB) with -eval added to the URL.

· Expiration date is set for evaluation copy. You can optionally added it to the upgrade queue. Then the snapshot is cleaned up.

· If you don’t have snapshot, a different process is used—a site collection backup. 85GB is the recommended max size for this option. Then backup is restored to a -eval URL. Then the backup is cleaned up.

· SharePoint 2013 does not support partially trusted code solutions. It still supports sandbox. Bin directory is full trust only.

· Claims authentication is now default for new web applications. The recommendation is to use claims mode exclusively. Existing 2010 claims providers would just work.

· If you delete s site and then upgrade the site collection(or apply a CU patch), the site recycle bin can now restore the site (by running the upgrade. This means recycle bin is now much safer.

· Cross farm services compatibility means now that you don’t have to do a big bang upgrade . 2013 federated services can be consumed by 2010 farm.

· Added in RTM is a maintenance window feature. These are called maintenance windows objects. many settings such as start, end, Duration. It also allows you to display a message to users about maintenance; that’s handy.